
Specifications

19
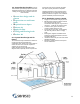
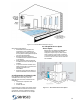
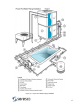
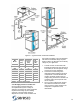
Figure 21 – Typical Outdoor Condenser Installation
NE
Model
Factory
Charge
(Lbs)
50’ line
contractor
charge
(Lbs)
Factory
Oil
Charge
(Oz)
004
25 17 9
005
27 28 12
006
27 29 12
007
28 32 14
008
44 32 15
010
48 48 20
012
51 62 29
014
61 77 35
Table 5 - R-22 and Oil Charges
2.9.2 Charging of Remote Condensers
Once a proper evacuation has been
accomplished the system is ready for
charging. The outdoor air-cooled condenser
requires a field charge by the installing
contractor. The field charge required
depends on the size of the condenser and
the length of the piping. The unit nameplate
will show the exact field charge required.
Refer to Table 5 to determine the necessary
charge for your application.
1. The last vacuum can be broken with
liquid R-22. Monitor the exact amount of
R-22 added, as the total system charge
must be per the unit nameplate.
2. Connect the control wiring to the
terminals provided inside the electrical
compartment of the dehumidifier and
outdoor condenser. Refer to the low
voltage wiring schematic for details. The
condenser fan(s) will not operate until
this is complete.
3. Once you have charged and checked
the condenser and line set for leaks,
open the service valves located in the
compressor compartment of the
dehumidifier.