
Owner Manual


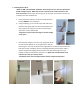

*IMPORTANT: YOU ARE READY TO ADJUST POSTS FOR EQUAL REVEAL AND TIGHTEN THE POST BOLTS
TO THE FRAME
7) Installing the Roof:
*2 people are recommended for this step. If unit is being
Installed against a structure, install post caps prior to
Installing roof. See Step 10.*
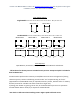
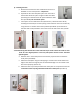
a. Assemble the roof on the ground by sliding the louvers
(See PIC 7a.) For privacy purposes determine the
direction you would like the louvers to go prior to
sliding them on.
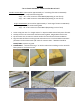
b. If you are using the pergola end caps it is
important to use silicone to secure them to the cross
beams in the front of the shower (door side). (See
PIC 7b-1) Secure the end caps (flat) with silicone to
the back side of the cross beams. (See PIC 7b-2)
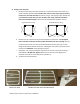
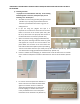
c. Space cross beams using roof jig (provided with kit):
With one person standing inside the shower to guide
and support the roof, lift the roof and slide it into
place. Make sure the back of the cross beams are
flush with the base frame (PIC 1a) before proceeding.
The end cross beams should sit just inside your top wall brackets. (See PIC 7c). Space
cross beams with roof jig (provided with installation kit). (See PIC 7d)
d. Use the L brackets and self-tapping ¾” stainless steel screws to attach each cross beam
to the inside of a wall panel or header on both the front and rear of the shower. (See PIC
7d)
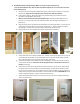
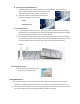
e. It is time to secure the peek a boo bracket on
either side of the roof. Place the drilled holes
against cross beams. Center it to where it
should be (approximately 5” on either side).
Use self-tapping ¾” stainless steel screws
in the pre-drilled holes to secure the peek a
boo bracket to the louvered roof. (See PIC 7e)
PIC 7c
PIC 7b-2
PIC.7e
PIC 7d
PIC 7a
PIC 7b-1