
Owner Manual


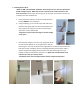

6) Installing the Lock:
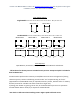
a. Remove the lock from the door hardware box and ensure
deadbolt is in the closed position. *Important*
b. Separate the door lock and place spacer over door lock so
that the flat side of the spacer is against rubber seal while
positioning the notched end of the spacer toward the dead
bolt. (See PIC 6b) Do not remove spacer.
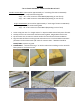
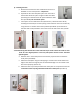
c. Insert spacer on the inside of the door (See PIC 6c-1). Attach the other half by
matching the notched pin into the opening of the red leaver. Secure to the door by
using the four ¾” stainless steel screws provided. (See PIC 6c-2) Use the two ¼”
stainless steel screws provided to secure the lock to the side of the door. (See PIC
6c-3)
*TIP-Install the (2) Flat Head Screws in the strike side as per PIC 6c-3. Start the screws as seen
in PIC. 6c-2 in a diagonal pattern ¼ turn only and repeat in all four corners. Then start
again & tighten.
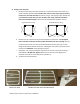
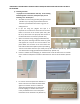
d. Hold the door in the closed position and mark the proper location to attach the
strike plate. (See PIC 6d)
e. Attach the strike plate using the self-tapping ¾” stainless steel screws. Make sure
edge is flush with front edge of post and the beveled edge is on the outside so the
door closes properly. (See PIC 7e)
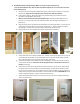
f. Attach the door stop to the post behind the strike plate. It is important to have the
center hole of door stop align with the middle of the strike plate. (See PIC 7f)
PIC 6b
PIC 6d
PIC 6f
PIC 6c-1
PIC 6c-2
PIC 6e
PIC 6c-3