
Owner Manual


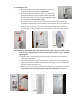

j. Removable panel installation
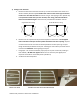
a. Install a header on post to post where the removable will go. Install post
bracket under header post bracket. (See PIC 2 j-a) Repeat step on adjacent post.
b. Measure 72 1/2” from the top header bracket and install special cut post
bracket included in box with panel. (See PIC 2 j-b) Repeat on adjacent post.
c. Install removable panel. Place top in first and set bottom on special post
brackets. (See PIC 2 j-c)
d. Drill ¼” hole on bottom of the panel and through post bracket and install clevis
pins. Repeat for adjacent side. (See PIC 2 j-d)
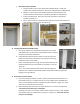
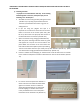
3) Installing Half Wall Panel (Double Units):
a. Only 3 post brackets are required for the half wall, 2 for the half
wall header and 1 for the bottom of the half wall. Refer to steps 2a
thru 2d for post bracket installation.
b. Install the half wall panel into the header so that the end of the
header is flush with the end of half wall so that the tab is facing
toward the center of the header.
c. Fasten a self-tapping screw through the top of the header into the
tab of the half wall to secure the frame to the header. The screw
should go
14 ½” in from the end of the header that’s flush with end of the
half wall. Then install the half wall and header into the wall brackets using the self-
tapping screws. (See PIC 3c)
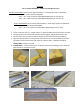
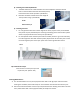
4) Secure Shower Unit to Surface
a. If you are placing your shower on pavers, cement or blacktop; attach the frame to a
level surface using 2” x ¼” Simpson Strong Tie “Titan” (Approved for 115 MPH wind
zones). You will need 4 screws for a double unit and 4 screws for a single unit. Plastic
shims are recommended to avoid contact.
b. Before screwing down the frame, use plastic washers or P.V.C shims to level frame.
*The frame must be level prior to fastening*.
If placing your shower on a wooden surface; attach the frame using 4” x 3/8” lag bolts.
You will need 4 qty. for a double unit and 4 qty. for a single unit. *The frame must be
level prior to fastening*.
PIC 3c
PIC 2 j-a
PIC 2 j-b
PIC 2 j-d
PIC 2 j-c