Installation Manual For
Contact us at 888-392-9625 or email us at sales@serenityenclosures.com with any questions during the installation process. Our service team is available 24/7.
6 X 6 Base **6 x 6 frames should be 1” smaller on all 4 sides of unit** Double Unit 6x6 Base: (There will be approximately a 1” overhang of shower on 6x6 Base) 10 qty. - 5” x 3/8” Galvanized lag bolts 2 qty. – 34” or 44” Pressure Treated Wood (Depending on size of unit) 2 qty. – 66” or 86” Pressure Treated Wood (Depending on size of unit) Single Unit 6x6 Base: (There will be approximately 1” overhang of shower on 6x6 Base) 8 qty. - 5” x 3/8” Galvanized lag bolts 4 qty.
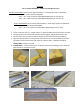
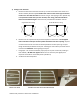
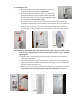
1) Setting Frame and Posts: a. Remove the base frame from the box and lay on a flat surface where the shower unit will be installed. (See PIC 1a)* For double units make sure the center supports of both frames are in line with each other and fasten using ¾” self-tapping screws. (See PIC 1b) It is important to determine your door location, door swing, and all wall locations before unit installation begins.* See Floor Plan provided with installation manual. Single Model Door Swing Double Model Door Swing b.
2) Installing Wall Panels and Post Bracket: (Make sure speed on drill is adjusted to #7) *If you purchased Shower Valve Trim Set with removable wall panel, See 2 j for instructions to install the removable panel.* a. On the face of the post where the wall/header will sit, place the post bracket jig on top of post. (See PIC 2a) *Important: This will keep header and top of the wall panel aligned.* b. Place bracket inside jig.
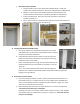
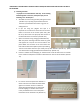
j. Removable panel installation a. Install a header on post to post where the removable will go. Install post bracket under header post bracket. (See PIC 2 j-a) Repeat step on adjacent post. b. Measure 72 1/2” from the top header bracket and install special cut post bracket included in box with panel. (See PIC 2 j-b) Repeat on adjacent post. c. Install removable panel. Place top in first and set bottom on special post brackets. (See PIC 2 j-c) d.
5) Installing Shower Door: *Note: For DSE-7, 8 and CSE 9 & 10 Models – Door swing must be in the same direction for Handle to Align Properly. Make sure the unit is secured to the surface and level so the door sits plumb. Determine your door swing prior to moving on. All screws for the door are included in the door hardware box. a. Follow steps from 2a & 2b to ensure the header bracket is installed PRIOR to door installation. b.
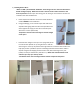
6) Installing the Lock: PIC 6b a. Remove the lock from the door hardware box and ensure deadbolt is in the closed position. *Important* b. Separate the door lock and place spacer over door lock so that the flat side of the spacer is against rubber seal while positioning the notched end of the spacer toward the dead bolt. (See PIC 6b) Do not remove spacer. c. Insert spacer on the inside of the door (See PIC 6c-1). Attach the other half by matching the notched pin into the opening of the red leaver.
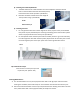
*IMPORTANT: YOU ARE READY TO ADJUST POSTS FOR EQUAL REVEAL AND TIGHTEN THE POST BOLTS TO THE FRAME 7) Installing the Roof: PIC 7a *2 people are recommended for this step. If unit is being Installed against a structure, install post caps prior to Installing roof. See Step 10.* a. Assemble the roof on the ground by sliding the louvers (See PIC 7a.) For privacy purposes determine the direction you would like the louvers to go prior to sliding them on. b.
8) Installing the Towel Bar/Hook Bar: a. Towel Bar: Measure 54” off finished floor and mark 2 adjacent posts (the desired Posts on the side where the towel bar will be placed.) PIC 8a Use stainless steel screws provided. (See PIC 8a.) b. Hook bar should be installed at the same height as The top of door hinge. (See PIC 8b) PIC 8b Need hook bar pic PIC 8a 9) Installing the Floor: a.