CAT-M Module USER GUIDE SEQUANS Communications Les Portes de la Défense – Hall A 15-55 Boulevard Charles de Gaulle 92700 Colombes - France Phone. +33.1.70.72.16.00 Fax. +33.1.70.72.16.09 www.sequans.com contact@sequans.
Legal Notices Copyright© 2015, SEQUANS Communications All information contained herein and disclosed by this document is confidential and the proprietary property of SEQUANS Communications and all rights therein are expressly reserved. Acceptance of this material signifies agreement by the recipient that the information contained in this document is confidential and that it will be used solely for the purposes set forth herein.
Table of Contents Legal Notices ................................................................................................................................................ 2 Software Acknowledgements ........................................................................................................................ 2 Document Revision History ........................................................................................................................... 2 Referenced Documents ...........
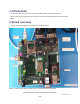
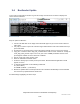
1. Introduction This document describes how to use the Cat-M "Module" board, from boot to data traffic. This document targets engineers who will need to use the Cat-M Module board for test activities and demos. 2. Board overview The main interfaces and buttons are described in the picture below.
3. Board boot up 3.1. MFW MFW is based on default.ELF file. Note : That currently the FW is to be pushed from the Laptop and hence requires a dedicated Laptop per UE to be used at all times. Bootup procedure below needs to be performed everytime the UE is USB Powered down or Reset is performed. 3.2. BAT file for FW flashing Please contact your Sequans POC for Batch file to Flash the UE & Latest FW Firmware file (*.elf) should be renamed to default.elf & be placed under SQN_CATM_DM_STP_V0.3\SQN_FW_Load\
3.4. Bootloader Update To check the current Bootrom Version Log into UE through console Port & The first line displays the current version of Bootrom. Steps to update the Bootrom: 1. Connect UE USB cable on the laptop. Serial Ports will appear as you connect them to different UART ports. 2. Use putty or teraterm to open UE console through UART2 with the baud rate 115200 and keep it open all the while. 3. On UE press on the Reset button to have UE load the bootrom and to see the current version. 4.
Please Note : Currently Reverting back to Older Bootrom is not compatible.
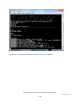
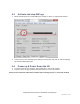
4. DM connection Please contact Sequans POC for latest Version of DM tool. 4.1. Start DM 1. Click on “4G Debug & Monitoring tool”; Sequans DM window shall be displayed as below: 2. If not, make sure “File->Offline Mode” is untick.
4.2. Activate light events 1. Click on “Views->Record config” 2. Click on “Add base events” this will enable basic LTE events, Add specific events if required.
4.3. Activate and stop DM logs 1. Before performing the test, activate DM logs by clicking on “Start” on “Sequans DM” window. . 2. At the end of your test, stop DM logs by clicking on same button, then click on “Cancel”. DM logs are located at “Basename” path 4.4. Power up & Power Down the UE 1. To power up the UE, type “poweron” then press Enter on “CLI for UE” window. 2. To power off the UE, type “poweroff” then press Enter on “CLI for UE” window.
5. Establish Data Connection to PC 5.1.
Click on Next Select Install the hardware manually ] In the list, select Modem SEQUANS Communications Confidential and Proprietary Cat-M Module User Guide 12/25
Check Don't detect my modem In the list, select Communications cable between two computers SEQUANS Communications Confidential and Proprietary Cat-M Module User Guide 13/25
Select the COM port associated with the UART1 of the board (in this case, we use COM5) Click on Finish SEQUANS Communications Confidential and Proprietary Cat-M Module User Guide 14/25
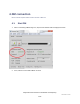
Now in the device manager, under the Modem section, you can see the Communications cable between two computers Click right on it, and select Properties SEQUANS Communications Confidential and Proprietary Cat-M Module User Guide 15/25
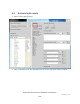
In the tab Modem list the baudrates for Maximum Port Speed, you will see that the maximum value is 115200. We want to make 921600 baudrate available. To do so we have to modify the base register.
Go into HKEY_LOCAL_MACHINE\SYSTEM\CurrentControlSet\Control\Class\{4D36E96D-E325-11CEBFC1-08002BE10318}\0000 Check the AttachedTo field value matches the UART1 COM port. Here we have highlighted an example of COM24.
Find the first occurence of 00 C2 01 00 and change it into 00 10 0E 00 SEQUANS Communications Confidential and Proprietary Cat-M Module User Guide 18/25
Close regedit, return in the device manager and re-open the Properties window of Communications cable between two computers Select 921600 as maximum baudrate SEQUANS Communications Confidential and Proprietary Cat-M Module User Guide 19/25
Open the Network and sharing center Click on Set up a new connection or network Select Set up a dial-up connection SEQUANS Communications Confidential and Proprietary Cat-M Module User Guide 20/25
Put a dummy number in Dial-up phone number then click on Connect When the dialing window appear, click on Skip SEQUANS Communications Confidential and Proprietary Cat-M Module User Guide 21/25
Click on Close on the next window Return in the Network and sharing center and click on Change adapter settings on the top left SEQUANS Communications Confidential and Proprietary Cat-M Module User Guide 22/25
Click right on the Dial-up Connection and click on Properties In the Options tab, uncheck Prompt for name and password, certificate, etc.
Once the UE is ATTCHED to the Network, Type below commands to establish PPP connection to the Laptop Connect to the UART1 port( Used to load the FW) with baud rate of 921600 & then AT ( Press Enter) AT+CGDATA="PPP",1,1 Once you see Connect message close the window and proceed to Next Step. Note : It is important to close the window as otherwise the port remains occupied and PPP connections is not established.
Click right on the Dial-up Connection and select Connect A dialog window opens, passes quickly the connection steps until it shows Connected for a few seconds, then it closes itself. The console of the board shows that PPP connection is established and shows the local and remote IP adresses.