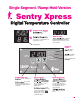
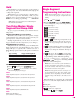
Single Segment / Ramp-Hold Version Sentry Xpress Digital Temperature Controller °F °C Temperature Display Temperature display is in °F. Time Display Temperature display is in °C. See page 7 for instructions on selecting °F and °C. : Separates hours from minutes. Example: Display shown above is 1 hour and 2 minutes. °C Display Dot Indicator Lights On during programming. Program Review Hr./Min. when lit On during program review.
Contents General Guidelines . . . . . . . . . . . . . . . . . 3 Time and Temperature Display . . . . . . . . . . . . . . . . . . . 3 Operation Begins from the IdLE Display . . . . . . . . . . . . 3 Thermocouple Inspection . . . . . . . . . . . . . . . . . . . . . . . 3 A Rapid Way to Scroll Numbers . . . . . . . . . . . . . . . . . . 3 Program Review & Repeat Firing . . . . . . . . . . . . . . . . . 3 Delay . . . . . . . . . . . . . . . . . . . . . . . . . . . . . . . . . . . . . . . 3 Rate . . . . . . . .
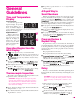
General Guidelines I A Rapid Way to Scroll Numbers During programming, hold an arrow key down several seconds, and numbers will begin to scroll rapidly. Ordinarily, you would press to raise a number and to lower it. But sometimes it is faster to press the opposite key. This is because the numbers scroll below 0000 to the highest number, and vice versa. Examples: Time and Temperature Display Center Dot: Time A center dot appears during time display. It separates hours from minutes (i.e.
pear, alternating with time left until the firing begins. Power Failures After a power failure, the controller will continue firing provided that: I The kiln temperature is above 212°F/100°C when the power comes back on. I The temperature dropped no more than 180°F/100°C while the power was off. 1) It fires at a controlled heating rate, or speed, measured in degrees of temperature change per hour. 2) It fires to a target temperature. 3) It can hold the target temperature.
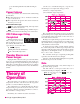
Hold Hold maintains a steady temperature for the length of time you specify. You can use Hold in both heating up and cooling down segments. Single Segment Programming Instructions Note: Single Segment firing is all you will ever need if you are only going to a temperature and holding. When Hold is set to 99.59 hours, the controller will remain at that temperature indefinitely, until you press . To enter a 99.59 hour Hold, press the once from 00.00 during programming.
PrO2: A program can have up to 8 segments, but you don’t have to use all 8 segments. Use only the number needed per firing. Often one segment is all you will need. Zero out the unused segments. The instructions on page 7 explain how to do that. Ramp-Hold, Program 2 PrO3: Ramp-Hold, Program 3 PrO4: Ramp-Hold, Program 4 (To get back to , press times until appears.
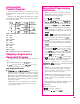
A Ramp-Hold Practice Program To practice using the controller, we will enter a program that includes three segments. The last segment is a cooling segment. Ramp-Hold Programming Instructions Note: You have up to 8 segments available in Ramp-Hold. If you don’t need all 8, zero out the unused segments. See step 6 below. Using the programming instructions in the next column, enter this firing schedule. Then use Program Review (page 3) to check for accuracy. From , press . Press the key (not the ).
Lost Wax Burnout Segment 3 lowers temperature to 800°F/426°C, the typical casting temperature for silver. (Most types of gold cast at 900°F/482°C.) CAUTION: Only kilns with vent holes are designed for lost wax burnout. However, you can use a kiln without the vent hole provided that you open the door ½” during venting. CAUTION: Always use a wax tray. Note: These instructions apply to injection wax that melts at 200°F, not pattern waxes and plastics that melt at higher temperatures.
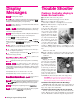
Error Messages BAdP / Bad Programming The kiln will not fire because the program just entered has a rate of 0000 in segment 1. Program the firing again. EtH / Electronics Too Hot The temperature of the electronic circuit board is above 158°F/70°C. This could damage the controller, so the firing has been stopped. To prevent this, keep the firing room cooler. Use better ventilation. FaIL / Thermocouple Failure The thermocouple, or temperature sensor, failed during firing.
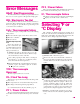
Display Messages Trouble Shooter Problem: Controller display is blank. No heat in kiln. The firing was stopped. I Is the kiln connected to the power? Fired to completion. If the kiln is already hotter than the programmed target temperature when you begin firing, will appear immediately after you begin firing. I Has the circuit breaker tripped or fuse blown? I (page 3) Delay is a count-down timer that starts the kiln when the time runs out.
Controller Power Input Test Result: less than 20 volts Did you recently replace the transformer? It may be the wrong voltage. The voltage is below 20, which is not enough power for the controller. To find out the cause of low voltage, continue below: Controller Input Test #2 The back of the board is still facing you and the kiln is plugged in. Remove the INPUT plug, which is the white, orange, and blue wires, from the back of the controller.
Shorthand Instructions These instructions may be confusing until you have read more detailed instructions on Single Segment, page 5, or Ramp-Hold, page 7. Read the safety guidelines, page 2. After pressing the keys in left column, the center message will appear. Single Segment Keys to Press Display thru (Not Down Arrow) Select rate (Sample rate) or Enter temperature (Sample temperature) Enter hold time (Or hold time) The kiln is now firing.