
Instruction manual

/ 3
How to Display IdLE
IdLE must appear before you can fire the kiln.
I
If CPLt , STOP , or other message appears instead of
IdLE when the kiln is first turned on, press the
START/STOP key (the key with the circular arrow).
IdLE will appear.
I
If you press START/STOP during a firing, STOP will ap
-
pear. To get back to IdLE , press START/STOP again.
I
If the display shows an error message such as FAIL in
-
stead of IdLE , see page 9.
I
CPLt (firing completed) appears at the end of a firing.
To make IdLE appear, press START/STOP.
Which Instructions Apply To You
For greater flexibility in the types of ware you can fire, we
have installed two firing modes in your controller. Follow
steps 1 - 3 to find out which modes you have:
1 From IdLE press START/STOP once.
2 Press the Up Arrow key several times. You will see the
following display messages:
COnE and ProG
or
SPd1 - SPd5 / temperature and ProG
3 Press START/STOP repeatedly until IdLE appears.
COnE Cone-Fire Mode (see page 7)
Cone-Fire mode fires the ware to a pyrometric cone num-
ber using the Orton cone tables on page 14. This mode is
used for ceramics, pottery, stoneware, and glazes. Your sup-
plier can tell you which cone number to program.
SPd1 - SPd5 Single Segment Mode (see page 5)
Choose one of five firing speeds. Then enter the tempera
-
ture you are firing to. This mode is for firings that need only
one rate, such as Art Clay Silver and Precious Metal Clay.
ProG Ramp-Hold Mode (see page 6)
Ramp-Hold mode offers the most flexibility. Use it to cre
-
ate custom firings with multiple rates and temperatures.
Use this mode for glass fusing and glass slumping. Some of
the reasons to use Ramp-Hold mode:
I
To use two or more firing rates
I
To cool at a controlled rate
I
To modify a Cone-Fire program
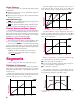
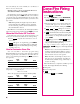
Type of Firing Suggested Firing Mode
China Painting Cone-Fire
Decals Cone-Fire
Enameling Single Segment
Glass Bead Annealing Ramp-Hold
Glass Fusing Ramp-Hold
Glass Slumping Ramp-Hold
Glaze Cone-Fire
Greenware Cone-Fire
Silver Clay Single Segment
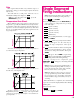
A Rapid Way to Scroll Numbers
The Up Arrow and Down Arrow keys change number set
-
tings during programming. Ordinarily, you would press Up
Arrow to raise a number and Down Arrow to lower it. But
sometimes it is faster to press the opposite key. This is be
-
cause the numbers scroll below 0000 to the maximum set
-
ting, and vice versa. Examples:
I
To program a 99.59 hour Hold when the display shows
00.00, press the Down Arrow once.
I
To program a FULL rate when the display shows 0000,
press the Down Arrow once.
I
To program a temperature of 200°F when the display
shows 1800°F, press the Up Arrow.
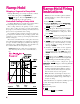
Program Review & Repeat Firing
Program Review lets you check that the information pro
-
grammed into the controller is correct. It is a good habit to
use Program Review before every firing.
I
Program Review during firing: press the Down Ar
-
row key. The rate, temperature, hold, etc. will display one
after the other. Firing will continue.
I
Program Review from IdLE: press the Down Arrow
key. After rate, temperature, hold, etc., Strt will appear.
Press START/STOP. -On- will appear, and the kiln will
begin firing the program just reviewed.
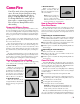
Hold
Hold maintains a steady temperature for the length of
time you specify. You can use Hold in both heating up and
cooling down segments.
When Hold is set to 99.59 hours, the controller will re-
main at that temperature indefinitely, until you press STOP.
To enter a 99.59 hour Hold, press the Down Arrow once
from 00.00 during programming.
Note: During firing, the Hold temperature alter
-
nates with time left in Hold.
Delay
Delay is a count-down timer. The kiln begins firing when
the timer runs out of time. Use Delay to fit a firing into your
schedule.
Caution: For safety, do not leave the kiln alone dur
-
ing a delay or a firing. We cannot guarantee your kiln
against overfiring even though the controller is au
-
tomatic.
1 After you have programmed the controller and it is
ready to begin firing, Strt will appear.
2 Press the Down Arrow key once. dELA will appear,
alternating with 00.00 .
3 Use the arrow keys to enter delay time (e.g. 1 hour 10
minutes = 01.10). Then press START. dELA will
appear, alternating with time left until the firing
begins.