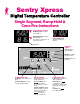
Sentry Xpress Digital Temperature Controller Single Segment, Ramp-Hold & Cone-Fire Instructions Temperature Display No Display Dot: Temperature display, °F. Right Display Dot: Temperature display, °C. See page 9 for instructions on selecting °F and °C. Time Display Center Display Dot: Separates hours from minutes. Display Dot Indicator Lights Top: On during programming. Middle: On during program review. Bottom: Blinks during firing. START/STOP Key 1) On/Off: Starts and stops a firing.
Contents General Guidelines . . . . . . . . . . . . . . . . . . . 2 Thermocouple Inspection . . . . . . . . . . . . . . . . . . . . . . . 2 How to Display IdLE . . . . . . . . . . . . . . . . . . . . . . . . . . 3 Which Instructions In This Manual Apply To Your Controller . . . . . . . . . . . . . . . . . . . . . 3 A Rapid Way to Scroll Numbers . . . . . . . . . . . . . . . . . . 3 Program Review & Repeat Firing . . . . . . . . . . . . . . . . . 3 Hold . . . . . . . . . . . . . . . . . . . . . . . . . . . .
How to Display IdLE IdLE must appear before you can fire the kiln. A Rapid Way to Scroll Numbers The Up Arrowand Down Arrowkeys change number settings during programming. Ordinarily, you would press Up Arrow to raise a number and Down Arrow to lower it. But sometimes it is faster to press the opposite key. This is because the numbers scroll below 0000 to the maximum setting, and vice versa.
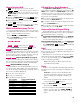
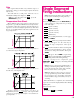
Power Failures After a power failure, the controller will continue firing provided that: I The kiln temperature is above 212°F/100°C when the power comes back on. I The temperature dropped no more than 180°F/100°C while the power was off. The next diagram, below, shows three rates. A rate of 1000° will reach 1000° in 1 hour. A rate of 500° will reach 1000° in 2 hours. A rate of 333° will reach 1000° in 3 hours.
Rate Each segment must include a rate, which is degrees of temperature change per hour. Single Segment mode has only one rate. The kiln will fire at full power when the rate is 1799°F/999°C. Full power displays as FULL . Single Segment Firing Instructions Note: Single Segment firing is all you will ever need if you are enameling or firing silver clay. Note: To enter full power from 0000 , press the Down Arrow key once. 1 From IdLE , press START.
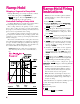
Ramp-Hold Skipping a Segment in Ramp-Hold In Ramp-Hold firing, you can skip a segment as follows: 1 The kiln is firing. Press the Up Arrow key. Ramp-Hold Firing Instructions Note: If you don’t need all 8 segments available in Ramp-Hold, zero out the unused segments. See step 6 below. 2 SStP will appear. Press the Up Arrow key again. The firing will skip to the next segment. 1 From IdLE , press START. Controlled Cooling in Ramp-Hold Use Ramp-Hold mode to program a slow cooling.
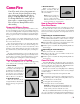
Cone-Fire Cone-Fire mode is based on pyrometric cones. It is not designed for heat treating, glass fusing and enameling. For these firings, use Ramp-Hold mode (page 6). Use Ramp-Hold to fire ceramic pieces that require a custom firing schedule. You can also use Ramp-Hold to add a slow cooling. Pyrometric Witness Cones It is important to understand pyrometric witness cones, because clay and glazes are rated to cone numbers.
next cone will vary. As a rule of thumb, 45 - 60 minutes of hold = one cone of heat work. Example: to fire to cone 05, program Cone-Fire for 06 and add 45-60 minutes of hold time. If your kiln has a peephole, watch the pyrometric witness cones during firing. Press STOP when the correct witness cone bends. Note how much Hold time was needed. Program that much Hold time the next time you fire the same type of ware. Cone-Fire Firing Instructions 1 From IdLE , press START.
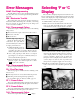
Error Messages BAdP / Bad Programming The kiln will not fire because the Ramp-Hold program just entered has a rate of 0000 in segment 1. Program the firing again. EtH / Electronics Too Hot The temperature of the electronic circuit board is above 185°F/85°C. This could damage the controller, so the firing has been stopped. To prevent this, keep the firing room cooler. Use better ventilation. FaIL / Thermocouple Failure Selecting °F or °C Display The controller can display temperature in either °F or °C.
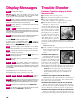
Display Messages Abrt The firing was stopped. Trouble Shooter Problem: Controller display is blank. No heat in kiln. COnE (page 8) This is the prompt for Cone-Fire mode. Press the START key to select Cone-Fire. The controller is then ready for you to select a pyrometric cone number. I Is the kiln connected to the power? I Has the circuit breaker tripped or fuse blown? CPLt Fired to completion.
power for the controller. To find out the cause of low voltage, continue below: Controller Input Test #2 The back of the board is still facing you and the kiln is plugged in. Remove the INPUT plug, which is the white, orange, and blue wires, from the back of the controller. Touch a voltmeter probe to the white wire and the other probe to the orange wire. Input Test #2 Result: Less than 20 Volts AC There are two possible reasons: 1) Low voltage at the wall receptacle; 2) defective transformer.
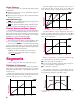
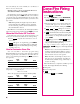
Cone-Fire Schedules - °F These are the Medium Speed firing schedules programmed in Cone-Fire mode. To customize a schedule, write down your changes on a separate sheet of paper. Then load your new schedule into Ramp-Hold. Note: Your controller accepts only cone numbers that fall within the kiln’s maximum temperature range. Low Fire Cones °F Cone 022 021 020 019 018 017 016 015 014 013 012 011 Segment 1 Rate 1 Temp.
Cone-Fire Schedules - °C These are the Medium Speed firing schedules programmed in Cone-Fire mode. To customize a schedule, write down your changes on a separate sheet of paper. Then load your new schedule into Ramp-Hold. Note: Your controller accepts only cone numbers that fall within the kiln’s maximum temperature range. Low Fire Cones °C Cone 022 021 020 019 018 017 016 015 014 013 012 011 Segment 1 Rate 1 Temp.
Temperature Equivalents For Orton Self-Supporting Pyrometric Cones °F °C Cone Self-Supporting Cones Num-ber Heated at: 27° F 108° F 270° F Per Hour* Per Hour* Per Hour* Pre-Fire Color Cone Number 15° C 60° C 150° C Per Hour* Per Hour* Per Hour* Pre-Fire Color 022 — 1087 1094 Green 022 — 586 590 Green 021 — 1112 1143 Fuschia 021 — 600 617 Fuschia 020 — 1159 1180 Orange 020 — 626 638 Orange 019 1213 1252 1283 Yellow 019 656 678 695 Yellow 018 1267 1319 1353
Shorthand Instructions Read the safety guidelines, page 2. After pressing the keys in the left column, the message in the center will appear. For more detailed instructions, see page 8. Cone-Fire Keys to Press Display IdLE COnE - PrOG (Not Down Arrow) Select COnE COnE Select cone number 06 / 1828 (Last cone fired) 06 / 1828 (Sample cone) FASt Select speed FASt (Sample speed) HLd Enter Hold Time 00.00 (Or hold time) Strt -O n- The kiln is now firing.
Shorthand Instructions Read the safety guidelines, page 2. After pressing the keys in the left column, the message in the center will appear. For more detailed instructions, see Single Segment, page 5, or Ramp-Hold, page 6. Single Segment Keys to Press Display IdLE SPd1 (Not Down Arrow) Select rate SPd1 (Sample rate) or °C °F Enter temperature - PrOG 1900 (Sample temperature) HLd Enter hold time 00.00 (Or hold time) Strt The kiln is now firing.