
User guide


order to monitor SQL Server Agent Alerts with SQL Sentry. See SQL Server Books Online for more
information on tokens and security.
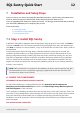
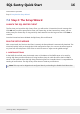
2. SELECT CONNECTIONS TO WATCH
On the Select Connections to Watch screen the Add Connection dialogue will be displayed. Use the
Connection Type drop-down box to choose your connection type. Enter the server name or the server
name\instance name and click the Connect button to add the connection. To add
additional connections that you would like to monitor use the Add button. After you have added all
the connections that you want SQL Sentry to watch, click Next to continue.
Note: For each connection type you can select up to the number of connections allowed by
your license.
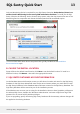
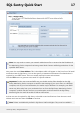
3. CONFIRM SETTINGS
Click Execute to confirm settings and continue
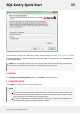
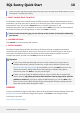
4. SETUP PROGRESS
The Setup Progress dialog will show the status as the wizard settings are applied and watched
connections are synchronized for the first time. If any errors occur, click the button for that step to
access the error details. At least one connection must be synchronized successfully in order to
complete the wizard, at which time the Next button will be enabled.
Important:
If errors occur while synchronizing with one or more connections, it may be due to
problems with security, network connectivity, and/or name resolution. See the topic
Security and the SQL Sentry Server for more details. You can click Back to return to the
"Select Connections" dialog, either resolve the problems or deselect the problem
connections, then click Next to retry the process again.
If there is an error during the SMTP Connectivity test you will be able to complete the
wizard, however, SQL Sentry will not be able to deliver email or pager alerts until the
problem is resolved. If you need to adjust the SMTP settings, you can click Back a few
times to return to the "SMTP Settings" dialog and make the necessary changes and test
them, then proceed back through the wizard.
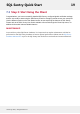
FINISHED
You have successfully configured SQL Sentry when the final confirmation dialog displays. Please refer
to Additional Tasks for additional configuration options. Click Finish to start using the Client.
Click below to proceed:
Step 3: Start Using the Client!
SQL Sentry Quick Start 18
©2015 SQL Sentry. All Rights Reserved.