
Operator`s manual


VirTis BenchTop 2K, 4K and 6K Basic Operation
Revision 004, 12/09 23
© SP Industries, Inc. 2009
Operation Instructions
1. Ensure that the condenser is clean and dry before proceeding. Check the
drain line for residual moisture, which can cause slow vacuum pump-down.
Ensure that the plastic quick-connect drain fitting is not inserted into the drain
fitting receptacle on the front of the unit.
2. Pre-freeze the product to a minimum of -40 °C.
3. If you are freeze-drying product on manifold shelves or directly in the chamber
and your unit’s heat option includes the ability to track product temperature
through a product probe, insert the probes. They should be placed close to
the bottom of the sample, but not touching it.
Note: Temperature probes can only be used with racks and feed-through adapter
plates.
4. Check that all connections and ports are secure. Ensure that Quickseal
valves are closed and that the drain plug is removed from the drain fitting.
5. Press the COND button to begin cooling the condenser. Wait for the
condenser to reach at least -40 °C (i.e., approximately 20 to 30 minutes).
Before proceeding, confirm that the condenser temperature status light is
green on the LED Wave display and the Synoptic screen displays the
condenser temperature at -40 °C or colder.
Alternatively, press the AUTO button and allow the system to proceed
through the freeze-drying process using the defined settings. If using the
AUTO function, skip to step 8.
6. Enable vacuum by pressing VAC. Allow the system to evacuate the system.
Before proceeding, confirm that the vacuum status light is green on the LED
Wave display and that the desired vacuum level is displayed on the Synoptic
screen.
Note: If your vacuum pump is not connected to the BenchTop unit, the Sentry 2.0
controller will not be able to enable it. Switch on the vacuum manually. See your
vacuum pump operator’s manual for more information.
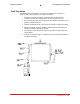
7. Add product as appropriate:
a. If using a manifold, attach a flask to a Quickseal valve and turn the
valve to the open position to begin the freeze-drying process. Allow the
vacuum to recover to at least 200 millitorr or your vacuum control
setpoint before connecting additional flasks.
b. If using a vacuum concentrator, add samples and begin spinning.
Note: For more information, refer to Chapter 6: Cold Trap Condenser.
8. Ensure that critical system parameters (i.e., refrigeration and vacuum) stay
within the acceptable ranges. The LED Wave on the control panel provides a
quick reference. Periodically check the condenser for ice build-up and defrost
as needed.
9. Observe the product to determine when drying is complete. For manifold
drying, the process is complete when the outside of the flasks lose
condensation and the product appears dry.
For heated shelf and chamber drying, the process is complete when one or
more of the following are true: