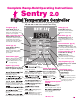
Complete Ramp-Hold Operating Instructions Sentry 2.0 Digital Temperature Controller See pages 24 - 25 for instructions on upgrading your DTC 100, 600, 800 or 1000 series board to the Sentry. Program (pg 8) Delay (pg 11) Select stored program (1 - 4). Enter rate, temperature, and hold for each segment. Enter time in hours:minutes. Delays the start of firing. From IdLE, press 4. From IdLE, press 3. Edit a Program (pg 13) Add Time (pg 11) Change the current segment temperature. Press Enter.
Introduction Thank you for purchasing the Sentry micro processor, our most advanced generation of digital temperature controllers. As you read the manual, have your controller in front of you so that you can try out the keys. The controller display messages are limited to four characters. For this reason, the messages appear cryptic: IdLE instead of “Ready to begin,” CPLT instead of “Fired successfully to completion,” RA1 instead of “Enter rate for first segment.
Contents Getting Started. . . . . . . . 5 Room Temperature and Humidity . . . . . . . . . . . . . . . . 5 Thunder Storms and Power Surges . . . . . . . . . . . . . . . 5 Time and Temperature Display. . 5 The IdLE Display . . . . . . . . . . . . . 5 Thermocouple Inspection . . . . . . 5 Preventing an Overfire. . . . . . . . . 6 Theory of Operation . . . . . . . . . . 6 Programming Instructions . . . . . . . . . . 7 The Stop/Back Key . . . . . . . . . . . 7 Correcting Entries . . . . . . . . . . . .
Safety The warranty on your Sentry controller does not cover damage from overfiring, regardless of the circumstances. It is the operator’s responsibility to make sure the kiln turns off at the end of the firing. Follow these safety rules in addition to the ones in your kiln or furnace manual: When the kiln is not in use, disconnect the power and keep the lid or door closed. (For larger kilns with heavy cordsets, we recommend a power disconnect box near the kiln.
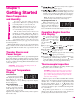
Chapter 1 Getting Started Room Temperature and Humidity It is okay to store the Sentry at sub-zero temperatures. But before operating, raise the room temperature to at least 32°F / 0°C. Note: The Sentry will register sub-zero °F / °C temperatures. However, 32°F / 0°C is the lowest recommended operating temperature. The circuit board is rated for 176°F / 80°C maximum operating temperature. However, the maximum recommended temperature is 158°F / 70°C, measured at the controller inside the kiln switch box.
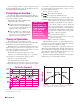
If you are using a portable, separate controller, you will need to install the thermocouple onto the kiln. See the separate TnF 2 installation instructions. The two parts of a segment: Preventing an Overfire Even though a digital controller turns off the kiln automatically, you should monitor the kiln during firing. This is to prevent a possible overfire. Remain nearby while the kiln is firing. Check the kiln occasionally. Set the temperature alarm (page 12) to remind yourself to check the kiln.
Chapter 2 Programming Instructions Before using your Sentry, read all of this chapter. Have your controller in front of you so that you can try out the keys as you read. The Stop/Back Key You can stop a firing at any time by . pressing If you enter Options, you do not have to go through all the prompts to get back out. Press to go to . During programming, the key will take you back one programming step with each key press, so it is easy to make corrections.
Programming Steps Use these instructions for your first firings. Later you may prefer “Ramp-Hold Shorthand Instructions,” back cover. As you follow these steps, you will see values (temperatures, rates, etc.) from the last firing. To use these again, press . To program a controlled cooling, set the segment to a lower target temperature than that of the preceding segment. Note: In Program Review, a heating rate of 9999 is displayed as .
Repeat Firings If you repeat the same firing program often, use Program Lock so that it cannot be inadvertently changed. See page 18. To repeat the last firing, press from . The kiln will begin firing. Make sure you are repeating the correct firing by using Program Review (next page). For repeat firings that you don’t want to inadvertently change, see Program Lock, page 18. Program Review When you press to begin firing, the controller will fire the program that is in active memory.
Temperature Overshoot When a kiln is heated too fast, it may overshoot the target temperature, especially in small kilns at lower temperatures. To avoid this, add an extra segment to slow the firing. The segment with the slower rate should begin approximately 40° - 60° below the final target temperature. Starting a Firing in a Hot Kiln Sometimes a firing begins in a hot kiln after a power failure or other interruption.
Stained glass, 1 8", 2 layers, full fuse. The fusing temperature will vary depending on the brand of glass, the batch, and even on the color. Vent the lid. Set the alarm to 500°F. When the alarm sounds, close the lid from venting position and insert peephole plugs. Set the alarm again, this time to 1350°F. When it sounds, check the glass through the peephole. When the glass fuses to your satisfaction, write down the temperature and hold (Skip Segtime for future firings, and press , then ment).
Present Status Press during a firing to display the segment that is firing. One of the following messages will appear: I I , the segment number, and rate: The Sentry is in the ramp part of a segment. (See charts, page 6.) and segment number: The Sentry is in the hold part of a segment. The controller returns to normal display after 5 seconds. Note: Present Status shows the actual firing rate of the current segment instead of the rate you programmed.
Skip Segment Skip Segment works only during firing. It jumps the firing from the current segment to the next one. Note: Skip Segment does not skip from a ramp to a hold. It skips to the next segment. To skip a segment, press . will appear, then the . (If you change your mind current segment. Press afand don’t want to skip that segment, don’t press ter appears. Instead, press again. The firing will continue in the same segment.
middle section, and the bottom light power to the bottom section. (Two-zone kilns: Ignore the center light.) Note: Though power output lights are on, mechanical problems can prevent the relays from turning on. I When a zone temperature is too low, its indicator light will flash rapidly. The heating elements in that zone will stay on continuously, and the controller will attempt to balance the heat in the other two zones.
brating controllers. Thus, it remains a reliable calibration standard. Note: The temperature at which you calibrated your digital pyrometer should be the same temperature you use to check the controller’s temperature readout. Example: If you took a reading from a reliable source at 2000°F, you should check your controller reading at around 2000°F. Mount the thermocouple of the calibrated pyrometer in the firing chamber near the Sentry’s thermocouple.
using the Reset (RST) option (page 18), use the TC option to select the correct thermocouple. Reset changes the thermocouple selection to Type-S. From Press , press appears. or (Degrees of temperature change per hour) (Degrees of temperature change per minute) repeatedly until . Use the and keys to select . After selecting one of the above, press Press to return to . .
kiln’s electrical data plate. It is usually on the side of the switch box. The data plate lists the watts, amps, and volts. If watts are not listed, multiply amps x volts. (Example: 15 amps x 240 volts = 3,600 watts.) Note: On controllers that have pre-18D software, the TEdE setting also affects the HTdE High Temperature Deviation alarm (page 20). On 18D and later controllers, the HTdE setting is always 100°F / 56°C. Divide the wattage of your kiln by 1000, which gives the kilowatts.
tory. The controller will not fire hotter than that temperature. Press . Press to return to . ELEC / Electronics Temperature Check the Circuit Board Temperature High temperatures in the switch box can damage the controller circuit board, which is rated for 176°F / 80°C maximum operating temperature. To lower board temperature, use a fan to blow air across the kiln switch box into the louvers. (But do not blow air into the kiln’s peepholes.
Chapter 7 Error Messages I I I Error messages are accompanied by an alarm. Non-interrupting messages do not stop the firing. Terminating error messages do. FTH, FTC, and LTdE error messages are based upon the adjustable setting in the Temperature Deviation (TEdE) option (page 17). Note: On controllers with pre-18D software, the HTdE error message is also based on the TEdE option. Non-Interrupting Error Messages Press to silence the alarm. (Do not press to silence the alarm.
Terminating Error Messages Check for worn or burned out elements, defective relays, low voltage and defective thermocouple. Reprogram a slower rate in heating-up and cooling-down segments. Note: To avoid slower rate.
TCL / Thermocouple Lag The heating rate is slower than 9°F / 5°C per hour and the kiln temperature is more than 100°F / 56°C away from the programmed temperature. The TCL becomes inactive above 500°F/260°C. Power Failures The Sentry handles a power failure in two ways: After a brief power failure, the controller continues firing as before. It shows a normal temperature display alternating with . Causes: I I I I On kilns that use a portable controller, the thermocouple fell out of the firing chamber.
Appendix A: Display Messages Message Definition Abort The firing was stopped. Page Reference 5 Message Definition Page Reference Electronics Too Hot 20 The Sentry circuit board is too hot, so the kiln shut off. Alarm 8, 10, 11, 12 ALAR appears either when you are entering an alarm temperature or when the alarm is sounding during a firing. To stop an alarm, press any key except STOP.
Message Definition Page Reference Kilowatts 12, 16 The controller can figure the cost to fire your kiln if you supply your kiln’s wattage. (See the data plate on the switch box.) Divide wattage by 1000 to get kilowatts. Enter that amount: 10,800 watts ÷ 1000 = 10.8 Missing Pin 21 When LId appears, a two-pin connector on the back of the board is missing. Program Lock 18 With this option activated, a stored program cannot be altered or removed from memory.
Appendix B: Upgrading Instructions Upgrading the DTC 100, 600, 800 & 1000 Series to the Sentry Unplug the kiln or disconnect the power. Remove the 4 screws holding the controller faceplate to the switch box. Gently remove the old controller. Disconnect the wires from the old controller. I f you r k i l n i s top-loading and originally came with a DTC 100 or 600, the heat shield inside the switch box may need to be moved to give more clearance for the new Sentry controller.
Appendix C: User Program Records Date_______________________________ User Program 1 Rate °/Hour Target Temperature Date_______________________________ Hold Time Hours.Mins Optional Fan On / Off User Program 3 Rate °/Hour Target Temperature Hold Time Hours.Mins rA1 1 Hd1 . rA1 1 Hd1 . rA2 2 Hd2 . rA2 2 Hd2 . rA3 3 Hd3 . rA3 3 Hd3 . rA4 4 Hd4 . rA4 4 Hd4 . rA5 5 Hd5 . rA5 5 Hd5 . rA6 6 Hd6 . rA6 6 Hd6 . rA7 7 Hd7 . rA7 7 Hd7 . rA8 8 Hd8 .
Index A H R AbRT, 5, 22 heat treating, 10, 12 rA 1, 7, 8 Add Time, 1, 11 hold, 6, 8, 11, 13 rate, 1, 7, 10, 12, 16, 17, 19, 20 ALAR, 22 HTdE, 20 relay, 24 alarm, 1, 6, 8, 9, 10, 11, 12, 16, 17 humidity, 5 Reset , 1 AOP, 1, 8, 10, 16, 18, 22 I RST, 1, 18, 23 Auxiliary Output, 16, 22 B baby monitor, 6, 12 bAdP, 20, 22 C Celsius, 5, 15 CFG, 1, 18, 22 CHG-, 1, 15, 22 clicking, 2, 12 controlled cooling, 8, 9, 13 COST, 1, 12 CPLT, 5, 9, 17, 22 D DELA, 8, 22 Delay, 1, 11, 18 DIFF, 1, 14 E ELE
Appendix D: Sentry Ramp-Hold Shorthand Instructions After you press the keys in the left column, the message to the right will appear. KEYS TO PRESS DISPLAY COMMENTS PROGRAM AND FIRE THE KILN. Apply power to kiln Press Enter if IdLE does not appear. 4 Enter program number. A number from 1 to 9 Program number appears. ENTER Enter rate of segment 1. Rate Rate appears. ENTER Enter temperature of segment 1. Temperature Temperature appears. ENTER Enter hold time.