
Operating instructions

Thermocouple Offset Settings
°F Setting °C Setting Result
C 0 C 0 No adjustment
H 1-45 H 1-25 Kiln will fire hotter
C 1-45 C 1-25 Kiln will fire cooler
Thermocouple Offset Examples
Setting Result
H 1 Kiln will fire 1° hotter
H 17 Kiln will fire 17° hotter
C 12 Kiln will fire 12° cooler
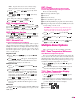
Multiple-Zone Thermocouple Offset
From , press repeatedly until
appears.
Press . (top thermocouple) will ap
-
pear.
While displays, press . The other
thermocouple(s), then , will appear with
each press of the key.
3 zone kilns:
2 zone kilns:
When the correct thermocouple appears, press
.
Using the and keys, enter the new offset. (See
charts above.) Press . The thermocouple
you adjusted (i.e. ) will appear. Select an-
other thermocouple, or return to by press-
ing .
CHG- / Selecting °F or °C
The controller operates in your choice of Fahrenheit or
Celsius temperature. In °C display, a lighted dot appears in
the lower right. In °F, it disappears. To switch from °F to °C
or vice versa:
From , press repeatedly until
appears.
Press . Use the and keys to select
or .
After selecting one of the above, press .
Press to return to .
°F/°C Temperature Conversion Formulas
Below are formulas for converting temperture between
°F and °C. Converting a firing rate requires a different for
-
mula than converting a firing temperature:
Firing to a Temperature
(i.e. “Fire to 1600°F.” 1600°F = 871°C)
(°C x 1.8) +32 = °F
(°F - 32) ÷ 1.8 = °C
Firing Rate or Temperature Change
(i.e. “Fire at 200°F per hour” or “Fire 200°F hotter.” 200°F =
111°C)
°C x 1.8 = °F
°F ÷ 1.8 = °C
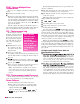
TC / Thermocouple Type
Select Type-K, -S or -R Thermocouple
The Sentry can use Type-K, -S or -R thermocouples. If
you specialize in firings above 2200°F / 1204°C, you should
use the Type-S or -R.
Type-K is best suited for
temperaturesbelow 2200°F
/ 1204°C.
The controller cannot
detect the type of
thermocouple installed in
your kiln. So if you change
the thermocouple to a dif
-
ferent type, be sure to se
-
lect the new thermocouple type in TC option.
Note: Ask your kiln supplier if you are not sure about
the type of thermocouple in your kiln.
CAUTION:
If you select Type-S or -R,
but your kiln is wired with a Type-K, your kiln will
underfire. If you select Type-K and your kiln is wired
with a Type-S or -R, your kiln will OVERFIRE. After
using the Reset (RST) option (page 25), use the TC op-
tion to select the correct thermocouple. Reset changes
the thermocouple selection to Type-S.
From ,press repeatedly until
appears.
Press . Use the and keys to select
or .
After selecting one of the above, press .
Press to return to .
AOP1, AOP2 / Auxiliary Outlets
Select Vent Fan or Alarm for the Auxiliary Outputs
The optional AOP1 and AOP2 (Auxiliary Outputs) are
for electrical receptacles mounted in the kiln’s switch box.
The outletscan eachpower a kiln vent or an external alarm,
such as a bell. (The AOP outlet is a special-order option
that might not be included on your kiln.)
The choices in the AOP1 and AOP2 options:
I
This choice sends power to the AOP re
-
ceptacle whenever the alarm sounds. (See Temperature
Alarm, page 8.) Plug in a loud bell to alert you, from a
distance, that the kiln has reached the alarm tempera
-
ture. (Controllers with pre-20A software: Select
.)
I
Use this setting ifyour kilndoes not have
the AOP outlet.
I
This option adds a
prompt for fan ( ) to each segment during
Ramp-Hold programming (page 15). (Controllers with
22 Cone-Fire / Ramp-Hold
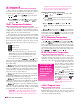
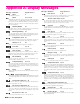
The S-Type thermocouple has a ce
-
ramic sheath. Most K-Type
thermocoupleshave a metal sheath.
S-Type
K-Type