
Operating instructions


First, program a Cone-Fire.
After programming a Cone-Fire, will ap
-
pear. From , press until ap
-
pears.
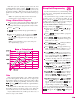
Press . Use the or key to scroll through
this selection:
Same as Medium in cone programming
10% faster than standard
Same as Fast in cone programming
30% faster than standard
40% faster than standard
40% slower than standard
30% slower than standard
Same as Slow in cone programming
10% slower than standard
When the speed of choice appears, press .
To go back to , press .
The kiln is now ready to fire with the new speed.
OFST / Cone Offset
Calibrate Cone-Fire to a Shelf Cone
Sometimes the pyrometric cone programmed in
Cone-Fire does not match the bending of the witness cone.
ConeOffset will adjust Cone-Fire to firehotter or cooler.
Each time you use Cone Offset, you alter the tempera-
ture for only one of the three ranges of cones:
I
Low fire cones 022 - 011
I
Medium fire cones 010 - 01
I
High fire cones 1 - 10
The range of cones affected by Cone Offset is deter
-
mined by the cone programmed to fire when you enter
Cone Offset.
Example: You have programmed an 05 cone in
Cone-Fire. By changing Cone Offset, you change not only
the firing of the05 cone, but all medium fire cones from 010
to 01.
Adjusting one range of cones has no effect on the other
two. To adjustall thecones equally,use ThermocoupleOff
-
sets, page 21.
Note: Use Cone Offset to adjust one particular tem
-
perature range of cones. Use Thermocouple Offset to
make an overall adjustment for all firings in both
Cone-Fire and Ramp-Hold.
Follow these guidelines beforedeciding thatyou need to
use Cone Offset:
I
The thermocouple must protrude into the firing cham
-
ber the correct distance: about 1” for ¼” wide
thermocouples,½” -5/8” for1/8” widethermocouples.
I
Keep shelves 1” - 1 ½” away from the thermocouple.
I
Keep witness cones at least 2” away from heating ele
-
ments.
I
Place witness cones in several locations in the kiln.
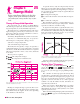
How to Use Cone Offset
Cone Offset changes the shut-off point of the cone by
the degrees of temperature shown in the chart below.
First, program a Cone-Fire.
From , press until appears.
Press . The current Cone Offset adjustment
number will appear.
Using the and keys, select a new adjustment
number (see chart below). Then press .
will appear. To return to , press
.
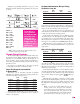
Cone Offset Settings
Note: select a cone in Cone-Fire before changing Cone Offset.
°F Setting °C Setting Result
0 0 No adjustment
5 3 Kiln will fire hotter
10 6 Kiln will fire hotter
15 8 Kiln will fire hotter
20 11 Kiln will fire hotter
-5 -3 Kiln will fire cooler
-10 -6 Kiln will fire cooler
-15 -8 Kiln will fire cooler
-20 -11 Kiln will fire cooler
Cone Offsets remain in memory for future firings unless
you use the Reset option (page 25).
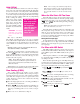
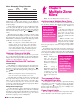
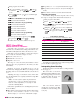
Interpreting Cone Bending
Position the witness conein thekiln accordingto instruc
-
tions on page 10.
The cone bent to 6 o’clock: No
calibration in ConeOffset needed.
The self-supporting cone has fired
to maturity when the tip is even
with the cone base as shown.
Theconedidnotbendfar
enough: Use a positive Cone Off
-
set number for a hotter firing, such
as 10 (°F).
20 Cone-Fire / Ramp-Hold