
Operating instructions


I
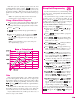
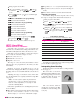
When
the Sentry sends a signal to
the relays, all three lights ap
-
pear.
I
The top light indicates power to the
top section of the kiln. The bottom light indicates power
to the bottom section. Ignore the center light.
I
The
top light indicates power
to the top section, the
middle light is power to
the middle section, and
the bottom light is power
to the bottom section.
When a zone tempera
-
ture is too low, its indicator
light will flash rapidly. The
heating elements in that
zone will stay on continu
-
ously, and the controller will
attempt to balance the heat
in the other two zones.
Testing Multiple-Zone Elements
When relays or thermocouples are connected to the
wrong controller terminals, zones will show a wide temper-
ature difference. To wire the kiln properly, trace the switch
box wiring with the kiln’s wiring diagram. Also, see “Ele-
ment Test,” page 25.
Chapter 6
The Options
Key
The Options key gives you access to a list of special fea
-
tures. With each press of the Options key, you will see the
display code for the next option.
When you find the option you want to use, press
.
Use the and keys to select changes within the op
-
tion.
After making a selection for an option, press
. The display code for the option you just
changed will appear. You are then ready to go to the
next option.
I
In Cone-Fire mode, you will see more options than in
Ramp-Hold mode.
I
If you select a change for an option but don’t press
, the change will not go into effect.
There are two ways to get out of Options and back to
:
Press .
Do nothing for 60seconds in Options. Youwill auto-
matically be taken out of the Options display and
back to .
Note: If youare firing thekiln whilein Options, press-
ing takes you out of Options and back to the fir-
ing display. But it does not stop the firing.
Cone-Fire Options
These options appear only if a Cone-Fire program has
been selected. If your controller has Ramp-Hold mode
only, skip to General Options, page 21.
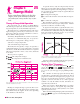
SPd / Cone-Fire Speed
Adjust Cone-Fire Speed
Beyond Slow, Medium & Fast
There are two ways to adjust the speed of a cone fire:
Select Fast (1), Medium (2), or Slow (3) when pro
-
gramming a firing.
Alter a speed in the Speed (Spd) option.
Every cone has a standard firing schedule. Select Me
-
dium speed (the 2 key) during Cone-Fire programming,
and the cone will fire to the standard schedule. Select Fast
(1), and the standard schedule will speed up by 20%. Select
Slow(3), and the standard schedule will slowdown by20%.
In the Speed option, you can furtheradjust thespeed of a
standard schedule 10 - 40% slower or faster:
19
The Sentry is
packed with fea
-
tures. Do not let
this intimidate
you. Become fa
-
miliar with only
the features you
need; ignore the
rest.
Your kiln or fur
-
nace will eventu
-
ally develop fine
cracks in the
firing chamber.
This is normal.
The cracks close
at high
temperatures.