
Operating instructions

Page 18 of 34
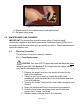
9. Repeat steps 2-8 if multiple hoses need replacement.
10. Re-apply tubing wrap.
5.0 MAINTENANCE AND CLEANING
IMPORTANT! All disinfection should be done using a “hospital-grade”
disinfectant registered with the Environmental Protection Agency (EPA) and in
accordance with the manufacturer’s specified instructions. Check manufacturer’s
instructions before use.
5.1 Electrical Controller
The electronic controller is easy to maintain:
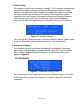
5.1.1 Fuse Replacement
CAUTION! Only use UL/ETL-Approved fuses that have the same
rating as specified (See Section 7.0). Using fuses with higher ratings
may result in damage and/or injury:
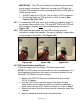
1. Remove the power cord from the electrical socket on the
back of the controller.
2. Using the tip of your finger or a small sized flat-head
screwdriver, push the small tab on the fuse drawer and slide
it out of the socket.
3. Remove the “blown” fuse from the fuse holder receptacle and
discard.
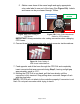
4. Insert the replacement fuse in the same fuse receptacle.
5. Push the fuse holder completely back into the electrical
socket until it “snaps” into place.
6. Replace power cord and turn on the controller.
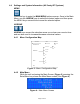
Figure 17: Replacement of CPR Hose