
Operating instructions

Page 17 of 34
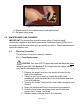
5. Obtain a new hose of the same length and apply appropriate
color code label to one end of the hose (See Figure 15A). Labels
and hoses can be purchased through Tridien.
IMPORTANT! Always maintain color coding convention when changing
CPR hoses.
6. Connect hose to the appropriate color coded connector inside mattress.
7. Feed opposite end of the hose through the CPR Pull and completely
insert connector that was removed during Step 2, leaving a slight gap
approximately equal to 1/10’’.
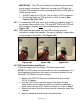
8. Holding the CPR Pull in one hand, pull the hose slowly until the
connector is fully inserted. Stop pulling when connector flange is flush
with the plug base.
NOTE! CPR Pull will not attach to the controller properly if connector is not
flush. Do not push connector while trying to insert.
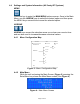
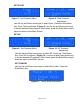
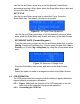
Figure 15A: Color-Coding of
CPR Hoses
Figure 15B: Color-Coded Attachment
Guide for CPR Assembly
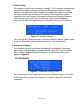
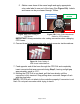
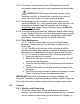
Figure 16: Color-Coding of
CPR Hoses Inside Mattress
Integrated
Bolster BLUE
Raised Bolster
GREEN
B Zone BLACK
A Zone RED
KEY