
User's Manual


Rev S-00001-20051010-1 Page 6 of 15
Required Equipment:
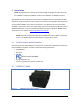
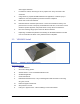
i. VSN240-F Sensor
ii. Gloves and safety glasses.
iii. At least 200ml or 2/3 of a SmartStud Adhesive tube.
iv. SmartStud applicator.
v. The “Grinding” and “Double” Coring Bits. See Coring Bit Section below.
vi. Chisel and hammer.
vii. Coring Drill and frame. (Milwaukee 510067 or comparable).
viii. Shop Vacuum or brush.
ix. Heat gun or propane torch. * When installing in moist environments.
Sensor Location and Orientation
• Sensors should be installed in the middle of the lane.
• The arrow (⇐) sticker on the sensor should be parallel to the direction of traffic flow.
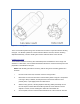
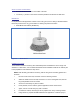
Coring Bits
The most time consuming function of the installation is the coring of the cylindrical hole in the
pavement. Sensys Networks recommends two types of 4 inch drill bits, with 1.25” standard
machine threaded sleeve. When used with a truck mounted drill, coring the hole can take less
then a few minutes. See figure 2 for 3d images of the bits, and visit
www.sensysnetworks.com/coringbits for full CAD drawings.
NOTE: Because of the SmartStud Adhesive moisture constraints, all drilling should be of
type “Dry” coring.
• Part number of “Double Cylinder” Coring Bit (PN BIT100)
• Part number of “Grinding” Coring Bit (PN BIT101)