
User's Manual


Rev S-00001-20051010-1 Page 10 of 15
adhesive is used, the preparation procedure should be completed
viii. Apply between 20%-25% of the 300ml tube, to the center of the cleaned location.
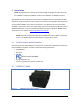
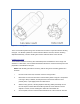
ix. Determine Sensor orientation (See Sensor Location and Orientation section), and
drop the sensor into the “puddle” of adhesive. Wiggle the sensor from side to side,
and apply pressure until it is correctly oriented and rests flat on the cleaned surface.
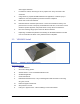
Adhesive should have been forced out from under the sensor, and will be exposed
on all four sides of the sensor.
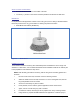
x. Using caution, apply a ring of adhesive that connects to the adhesive that flowed out
the sides. This forms a lip around the sensor.
xi. Depending on ambient temperature and humidity, the SmartStud Adhesive can take
from 5 to 25 minutes to harden. Verify hardness before completion.