
User's Manual
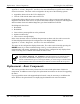

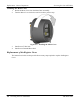
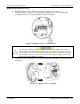

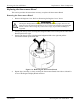
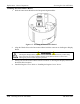
Table Of Contents
- ch01.pdf
- ch02.pdf
- ch04.pdf
- ch05.pdf
- appa.pdf
- appb.pdf
- appc.pdf
- Index.pdf
- appa.pdf
- ch03.pdf

Replacement – Basic Components Servicing the iCon APX Meter
4-8 Servicing the iCon APX Meter TM-iX0A-0805
Installing the Register Cover
1. Hold the Register Cover at a slight angle as shown in Figure 4-5.
2. Align the Interconnect Board with the associated connector on the Sensor Board.
3. Align the Captive Screw Slot with the opening in the Sensor Board.
Figure 4-5: Installing the Register Cover
4. Tip the Register Cover down onto the Meter Base Assembly
5. Press the Register Cover firmly into the Meter Base Assembly until the Interconnect Board
is firmly seated on the Sensor Board.
Use care not to over-tighten the captive screws. Failure to observe this Caution may result
in damage to the bosses in the Meter Base.
6. Securely tighten the Captive Screws to five (5) in-lb of torque.
7. Install the Meter Cover. Refer to “Installing the Meter Cover” above.