
User's Manual
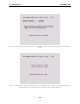
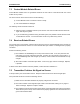
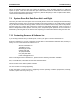
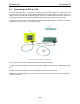
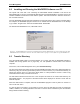
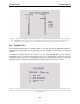
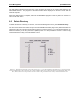
Table Of Contents
- 5 Data Collection Mode
- 6 Surveying Techniques
- 6.1 Low Frequency Reflection (Profiling) Mode
- 6.2 High Frequency Reflection (Profiling) Mode
- 6.3 Antenna Orientation
- 6.4 Triggers
- 6.5 Free Run
- 6.6 Odometer Data Acquisition
- 6.7 Signal Polarity
- 6.8 Spatially Aliasing the Data
- 6.9 Creating a Test Line for Data Quality
- 6.10 Adding GPS for Positioning
- 6.11 Common Mid-Point (CMP) Survey
- 6.12 Transillumination Surveys
- 7 Troubleshooting
- 8 File Management
- 9 Care and Maintenance
- 10 Helpful Hints
- Appendix A: Data File Formats
- Appendix B: GPR Signal Processing Artifacts
- Appendix C: Excerpts from the HP Fiber Optic Handbook
- Appendix D: Health & Safety Certification
- Appendix E: FCC Regulations
- Appendix F: Instrument Interference
- Appendix G: Safety Around Explosive Devices

pulseEKKO PRO 8-File Management
107
Figure 8-3: Data Directory Transfer screen. The triple arrows (>>>) on the left indicates which directory is currently selected.
Use the A and B buttons to move the arrows up or down to different directories. To transfer the directory to the PC, press the 2
(Send) button. It is also possible to use the 1 button to Tag several directories so they can all be sent at once.
8.4 Transfer File
Once the parallel XFER cable is connected (Section 8.1 on page 105) and the WinPXFER software is
installed and running (Section 8.2 on page 106), it is now possible to transfer data to the external
computer.
To transfer an individual data file from the DVL to a PC, select Transfer File from the main File
Management menu. On the next screen (Figure 8-4), use the A and B button to select one of the 20
available directories, then use the 1 button (Next Line) to move through the data lines in the directory.
When the name of the data line to transfer appears, press 2 (Transfer Line) to send it to the PC.
Figure 8-4: Line Transfer screen. Use the A and B button to select one of the 20 available directories, then use the 1 button (Next
Line) to move through the data lines in the directory. When the name of the data line to transfer appears, press 2 (Transfer Line) to
send it to the PC.