
User's Manual
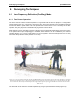

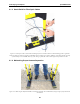
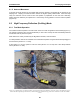
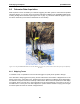
Table Of Contents
- 5 Data Collection Mode
- 6 Surveying Techniques
- 6.1 Low Frequency Reflection (Profiling) Mode
- 6.2 High Frequency Reflection (Profiling) Mode
- 6.3 Antenna Orientation
- 6.4 Triggers
- 6.5 Free Run
- 6.6 Odometer Data Acquisition
- 6.7 Signal Polarity
- 6.8 Spatially Aliasing the Data
- 6.9 Creating a Test Line for Data Quality
- 6.10 Adding GPS for Positioning
- 6.11 Common Mid-Point (CMP) Survey
- 6.12 Transillumination Surveys
- 7 Troubleshooting
- 8 File Management
- 9 Care and Maintenance
- 10 Helpful Hints
- Appendix A: Data File Formats
- Appendix B: GPR Signal Processing Artifacts
- Appendix C: Excerpts from the HP Fiber Optic Handbook
- Appendix D: Health & Safety Certification
- Appendix E: FCC Regulations
- Appendix F: Instrument Interference
- Appendix G: Safety Around Explosive Devices

pulseEKKO PRO 6-Surveying Techniques
87
6.4 Triggers
If the Trigger Method is set to CANBUS, Fibre-Optic or DVL Key (B), the following data collection
sequence is followed:
a) Set the antennas at the correct separation and centred on the starting position for the survey
line. The antennas should be oriented perpendicularly to the survey line direction as shown in
Figure 6-7.
b) The data collection screen on the DVL should display “Press Trigger”.
c) The operator presses the DVL B button, electrical or Fibre Optic trigger.
d) The system starts to beep, indicating that data are being collected. The antennas should be
kept in contact with the ground surface while the system is beeping.
e) When the beeping stops, one trace has been collected.
f) Move the antennas together along the survey line a distance equal to the Step Size distance.
g) Repeat from step b)
h) During data collection, fiducial markers (Section 5.4.1: P73) can be added at known positions
so the data can be “rubberbanded” during post-survey editing.
6.5 Free Run
If the Trigger Method is set to Free Run, the radar will go through the following cycle:
a) Set the antennas at the correct separation and centred on the starting position for the survey
line. The antennas should be oriented perpendicularly to the survey line direction as shown in
Figure 6-7.
b) Press the Start button on the DVL screen.
c) The system starts to beep, indicating that data are being collected. The antennas should be
kept in contact with the ground surface while the system is beeping.
d) When the beeping stops, one trace has been collected.
e) The system will pause for the number of seconds specified under Free Run Trace Delay. In
that time, move the antennas together along the survey line a distance equal to the Step Size
distance.
f) then back to c) to repeat the cycle.
g) During data collection fiducial markers (Section 5.4.1: P73) can be added at known positions
so the data can be “rubberbanded” during post-survey editing.