
User's Manual

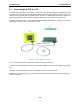
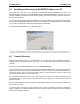
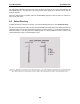
Table Of Contents
- 5 Data Collection Mode
- 6 Surveying Techniques
- 6.1 Low Frequency Reflection (Profiling) Mode
- 6.2 High Frequency Reflection (Profiling) Mode
- 6.3 Antenna Orientation
- 6.4 Triggers
- 6.5 Free Run
- 6.6 Odometer Data Acquisition
- 6.7 Signal Polarity
- 6.8 Spatially Aliasing the Data
- 6.9 Creating a Test Line for Data Quality
- 6.10 Adding GPS for Positioning
- 6.11 Common Mid-Point (CMP) Survey
- 6.12 Transillumination Surveys
- 7 Troubleshooting
- 8 File Management
- 9 Care and Maintenance
- 10 Helpful Hints
- Appendix A: Data File Formats
- Appendix B: GPR Signal Processing Artifacts
- Appendix C: Excerpts from the HP Fiber Optic Handbook
- Appendix D: Health & Safety Certification
- Appendix E: FCC Regulations
- Appendix F: Instrument Interference
- Appendix G: Safety Around Explosive Devices

8-File Management pulseEKKO PRO
106
8.2 Installing and Running the WinPXFER Software on a PC
The system will come with a CD containing the WinPXFER software installation. This will be the
WinPXFER folder on the CD. Run the SETUP.EXE program to install WinPXFER. If necessary, refer to the
software installation document that came with the system. This same document in electronic format is in
the root folder of the CD.
Once the WinPXFER program has been installed on the computer and the user is ready to transfer data to
the computer, the WinPXFER program needs to be run. Double-click the WinPXFER icon on the desktop
or go to Start - Program Files - Sensors & Software GPR - WinPXFER.
The first time that WinPXFER is run, it will install a driver.
Figure 8-2: The WinPXFER software needs to be installed on the PC that the GPR data files are to be transferred to. The main
WinPXFER screen is shown above. The user can use the Folder button to specify or create a folder to copy the GPR data into.
8.3 Transfer Directory
Once the parallel XFER cable is connected (Section 8.1 on page 105) and the WinPXFER software is
installed and running (Section 8.2 on page 106), it is now possible to transfer data to the external
computer.
On the DVL, from the File Management menu, press Transfer Directory.
The next screen shows the number of bytes in all 20 available directories (Figure 8-3). Data directories are
selected by using the A and B (Up and Down) buttons to move the arrows (>>>) to the desired directory. To
transfer the directory to the PC, press the 2 (Send) button. It is also possible to use the 1 button to Tag
several directories so they can all be sent at once
The data will be transferred from the DVL to the computer and saved in the current folder listed by the
WinPXFER software. The progress of the data transfer will be displayed on the DVL screen and the
external computer.
When the data transfer is complete, exit from the WinPXFER program. Press any button on the DVL to
return to the main menu.
It is best to always copy data to a new folder on the PC. Since the data files are given set names like
LINE01, LINEX01, etc., existing data files in the folder on the PC will be overwritten by the new data files
being transferred without warning.