
User's Manual
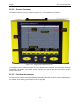
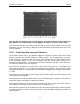
Table Of Contents
- 1 General Overview
- 2 Noggin Components
- 3 Noggin 100 Assembly
- 4 SmartCart Assembly
- 5 SmartTow Assembly
- 6 SmartHandle Assembly (Noggin 500 & 1000 only)
- 7 Rock Noggin Assembly (Noggin 500 & 1000 only)
- 8 Connecting GPS
- 9 Digital Video Logger (DVL)
- 10 Powering Up the System
- 11 Locate & Mark Mode
- 12 Survey & Map Mode
- 12.1 Survey & Map Menu
- 12.2 Data Acquisition
- 12.2.1 Replaying or Overwriting Data
- 12.2.2 Screen Overview
- 12.2.3 Position Information
- 12.2.4 Data Display
- 12.2.5 Section C - Menu
- 12.2.6 Gain
- 12.2.7 Collecting Data using the Odometer
- 12.2.8 Collecting Data in Free Run Mode
- 12.2.9 Collecting Data using the Trigger (or B) Button
- 12.2.10 Noggin Data Screens
- 12.2.11 Calib. (Calibration) Menu
- 12.2.12 Error Messages
- 12.3 Noggin Setup
- 12.4 Noggin File Management
- 12.5 Noggin Utilities
- 13 Troubleshooting
- 14 Care and Maintenance
- Appendix A Noggin Data file Format
- Appendix B Health & Safety Certification
- Appendix C GPR Emissions, Interference and Regulations
- Appendix D Instrument Interference
- Appendix E Safety Around Explosive Devices
- Appendix F Using the PXFER Cable and WinPXFER Software
- F1 Transferring Data to a PC using the PXFER Cable
- F1.1 Connecting the Digital Video Logger to a PC
- F1.2 PXFER Cable Types
- F1.3 Installing and Running the WinPXFER Program
- F1.4 Setting the DVL to the PXFER Cable Type
- F1.5 Transferring Noggin Data Buffer Files
- F1.6 Exporting Nogginplus Data
- F2 Transferring One or More Noggin PCX Files to an External PC using WinPXFER
- Appendix G GPR Glossaries

12-Survey & Map Mode Noggin
70
12.2 Data Acquisition
Selecting the Line, Grid or Run without Saving Data options from the main Noggin menu will start
data acquisition. The Run without Saving Option goes straight to data acquisition while the Line
and Grid options require the user to select a project number, file number and press Run before
data acquisition begins.
If the Auto Start option is set to ON (see Section 12.3.2.3: p.90 for details) the system will
automatically boot up and be ready for data acquisition. If Auto Start is set to OFF the user must
press the Start button to boot up the system.
After acquisition has started, the Start button disappears and a Stop button (used to halt
acquisition) appears on the right. A Gain button is also visible as well as the current Depth
setting and equivalent Time Window length in nanoseconds (see Figure 12-1).
Data acquisition begins by pressing the Start button on the DVL.
When the Start button is pressed for the first time after the unit is turned on, the Noggin will boot
up (this can take up to 30 seconds depending on the software version of the Noggin). During this
time the system is self-calibrating and measuring such factors as temperature and battery
voltage.
Once this boot up has been completed, data acquisition can begin. For subsequent lines there is
only a short delay before data acquisition can begin.
Data acquisition is done by moving the Smart System along the survey line. During data
acquisition, the Gain button is dynamic and the screen display of the signal sensitivity can be
changed on the go (see Section 12.2.6: P.73).
When the survey line is completed, press the Stop button to stop data acquisition. At this point
no more data can be collected without starting a new line.
12.2.1 Replaying or Overwriting Data
Immediately after a data file has been collected and the Stop button pressed, the data file can be
replayed by pressing the left and right arrow buttons to the scroll the data to the left and right. As
well, during data replay, the data can be enlarged or “zoomed” by pressing the Zoom button and
changing the zoom factor. For example, zooming 2 times on data with a depth setting of 5.0
metres will show the first 2.5 metres of data on the screen.
Any data file that has been collected can be replayed at any time by selecting the file number and
selecting Run. The user then has the option to View, Overwrite or Delete the data file.