
User's Manual


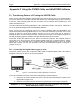
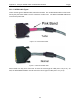
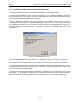
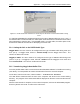
Table Of Contents
- 1 General Overview
- 2 Noggin Components
- 3 Noggin 100 Assembly
- 4 SmartCart Assembly
- 5 SmartTow Assembly
- 6 SmartHandle Assembly (Noggin 500 & 1000 only)
- 7 Rock Noggin Assembly (Noggin 500 & 1000 only)
- 8 Connecting GPS
- 9 Digital Video Logger (DVL)
- 10 Powering Up the System
- 11 Locate & Mark Mode
- 12 Survey & Map Mode
- 12.1 Survey & Map Menu
- 12.2 Data Acquisition
- 12.2.1 Replaying or Overwriting Data
- 12.2.2 Screen Overview
- 12.2.3 Position Information
- 12.2.4 Data Display
- 12.2.5 Section C - Menu
- 12.2.6 Gain
- 12.2.7 Collecting Data using the Odometer
- 12.2.8 Collecting Data in Free Run Mode
- 12.2.9 Collecting Data using the Trigger (or B) Button
- 12.2.10 Noggin Data Screens
- 12.2.11 Calib. (Calibration) Menu
- 12.2.12 Error Messages
- 12.3 Noggin Setup
- 12.4 Noggin File Management
- 12.5 Noggin Utilities
- 13 Troubleshooting
- 14 Care and Maintenance
- Appendix A Noggin Data file Format
- Appendix B Health & Safety Certification
- Appendix C GPR Emissions, Interference and Regulations
- Appendix D Instrument Interference
- Appendix E Safety Around Explosive Devices
- Appendix F Using the PXFER Cable and WinPXFER Software
- F1 Transferring Data to a PC using the PXFER Cable
- F1.1 Connecting the Digital Video Logger to a PC
- F1.2 PXFER Cable Types
- F1.3 Installing and Running the WinPXFER Program
- F1.4 Setting the DVL to the PXFER Cable Type
- F1.5 Transferring Noggin Data Buffer Files
- F1.6 Exporting Nogginplus Data
- F2 Transferring One or More Noggin PCX Files to an External PC using WinPXFER
- Appendix G GPR Glossaries

Noggin Appendix F - Using the PXFER Cable and WinPXFER Software
F-3
F1.3 Installing and Running the WinPXFER Program
The Smart system comes with a CD-ROM containing the WinPXFER program.
To install the WinPXFER program, follow the directions in the “Software Installation” document
that accompanies the CD. Briefly, running the SETUP.EXE program from the WinPXFER folder
on the CD will install WinPXFER on the computer.
Once the WinPXFER program has been installed on the computer and the user is ready to
transfer data to the computer, the WinPXFER program needs to be run. This can be done using
the WinPXFER shortcut on the Desktop, double-clicking the WinPXFER.EXE program in
Windows Explorer or pressing Start – Programs – Sensors & Software GPR and finally
WinPXFER.
Figure F-4: WinPXFER main screen
When the WinPXFER program has been run, it will display a screen as shown in Figure F-4.
This means that it is ready to receive data transferred from the DVL to the LPT port number 1.
This command assumes that the data buffers are being transferred across Parallel Port 1 (LPT1).
If using Parallel Port 2 (LPT2) or higher (LPT3, LPT4 etc.), specify the parallel port number under
the Port menu item from WinPXFER.
The name of the folder that the Noggin data will be transferred into is listed under the “Current
data folder”. In the example in Figure F-4, the data will be transferred to the C:\gpr_data folder.
The data folder can be changed by pressing the Folder button and choosing another folder.