
Installation Guide

3 of 3
WPD
Dimmer Switch
PHASE DIMMING • 3-WAY • 120VAC
Acuity Brands | One Lithonia Way Conyers, GA 30012 Phone: 800.535.2465 www.acuitybrands.com © 2019 Acuity Brands Lighting, Inc. All rights reserved. Rev. 04/14/2020
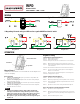
WIRING
OPERATION
Wiring Diagram
Manual Control
Brightness Setting
Typical Dimmer Wiring
3-Way wiring Schematic using one WPD and one regular ON/OFF mechanical switch
Wiring Method 1 Wiring Method 2 Wiring Method 3
WPD
LOAD
WPD
SWITCH
LOAD
WPD
SWITCH
LOAD
WPD
SWITCH
LOAD
TOP
TRAVELER LOAD
The WPD dimmer switch allows the user to turn ON/OFF and control the brightness level
of the connected lighting.
Basic Operation
1. To turn the connected lighting ON: Tap the top of the dimmer switch paddle.The LED
indicator will be turned on in blue.
2. To turn the connected lighting OFF: Tap the bottom of the dimmer switch paddleagain.
The LED indicator will be turned off.
3. To brighten the connected lighting: Press and hold the top of the dimmer switchpaddle,
release when desired level is achieved.
4. To dim the connected lighting: Press and hold the bottom of the dimmer switchpaddle,
release when desired level is achieved.
Setting High Trim (maximum brightness)
Action 1: Toggle air gap switch off/on
Response: The LED indicator will flash.
Information: During this state, within a 8 second window, the user can set high trim.
Action 2: While LED is flashing quickly, press top paddle 5 times continuously.
Response: The LED indicator will slowly flash, and light level will transition from 40%
to100% illumination
Information: The slow LED flash and illumination transition indicates trim direction
Action 3: Press top or bottom paddle to adjust light level to desired brightness
within an 15 seconds window.
Response: After slow flash stops, the maximum brightness is automatically saved.
Information: Setting high trim is complete.
Setting Low Trim (minimum brightness)
Action1: Repeat Action 1 above in High Trim Section
Action 2: While LED is quickly flashing, press bottom paddle 5 times continuously
Response: The LED indicator will slowly flash, and light level will transition from 0%
to 60% illumination.
Action 3: Repeat Action 3 above; however, setting desired minimum light level.
Restore the maximum or minimum brightness defaults
Action 1: Repeat Action 1 above in High Trim Section
Action 2: While LED is quickly flashing, press the paddle 10 times top or bottom in
the same direction continuously. The diming level will change from zero to
90%.
Response: The dim level will change from 0 to 90%.
1. Pressing and holding the dimmer switch paddle until the light
intensity is at the minimum setting (which may result in 0% light
output) does not turn the power OFF, you must still tap (short press)
the bottom of the dimmer switch paddle to turn the power OFF.
2. When power on again, the device will go back to the light level prior
to power off.
NOTE
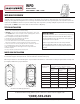
LED Indicator
Dimmer Switch Paddle
Air Gap Switch