
Operating instructions


8
3.7 Configuration of Zero and Span Procedures:
The ZERO and SPAN Buttons are under the transmitter’s name-
plate. The ZERO, SPAN, ZERO TRIM, ZERO ADJ, Units, Range,
Dampening, LCD and decimal set functions are configurable
using the ZERO / SPAN buttons.
3.7.1 Zero/Span Configuration Process:
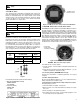
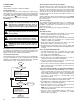
Remove both nameplate screws on the upper part of transmitter.
Remove top nameplate to access the Zero and Span Buttons (see
Figure 5).
1. Zero Configurations – Set the current process value for Lower
Range Value (4 mA). Apply zero pressure for 10 seconds and
push the Zero Button for 5 seconds. The LCD should display
“Zero”. Push the Zero button for 3 seconds, after 1 second the
LCD should display “-ZE-”. This message means the zero config-
uration is finished. If the zero configuration failed, the LCD will dis-
play “SPEr” or “SEtE”, try repeating the zero configuration steps.
2. Span Configurations – Apply the desired pressure for 10 sec-
onds and push the Span Button for 5 seconds. The LCD should
display “Span”. Push the Span button for 3 seconds, after 1
second the LCD should display “-SP-”. This message means
that the span configuration is finished. If the span configuration
failed the LCD will display “SPEr” or “SEtE”, try repeating the
span configuration steps.
Please refer to Appendix 1 for the button error and LCD display
message.
3.7.2 Menu Tree for Zero+Span Function:
The other functions supported by the ZERO / SPAN Buttons are
as follows:
1. Moving between menus: Zero
2. Enter or moving to sub menu: Span
3. Moving to top menu: Zero+Span
• Press the button for 3 seconds to execute each function.
After 3 seconds press the Zero+Span buttons, the LCD dis-
play will change from Menu to Trim. To see the next menu,
press the Zero button for 3 seconds. Use the Zero button to
move down the directory.
• Use the Span button to select the displayed menu. The same
procedure will be used for the sub menus.
4. How to select a numerical value
(a) Functions use numerical values: 12 Zero Adjustment, 22
Change Upper Range Value, 23 Change Lower Range Value,
24 Dampening Second
(b)How to select numerical value: First, select an increasing rate
(10
n
), then change each decimal value to increase or
decrease as wanted.
For example, select 3810:
Select increasing rate 1000 -> Increase 3 times ->
Select increasing rate 100 -> Increase 8 times ->
Select increasing rate as 10 -> Increase 1 time
(c) To select the increase / decrease steps: SelInc message will
be displayed on the bottom of the LCD. Select parameter and
press the Zero button : The decimal value will be changed
when the Zero button is pressed. After set, press the span
button to execute the parameter.
(d)To set the required values using Zero/Span buttons: VALUE
message will be displayed on the bottom of the LCD.
1. Press the Zero button, the menu will increase 1 item.
2. Press the Span button, the menu will decrease 1 item.
3. After setting, save the parameter by pressing the
Zero+Span buttons.
(e) To set the final value, repeat (c) and (d).
(f) After setting the final parameter, exit the menu by pressing
the Zero+Span buttons.
5. Exercises for each function
• ZERO TRIM
1. Access the menu by pressing the Zero+Span buttons.
2. Move to the sub directory using the Span button until the
1 TRIM message appears on the display.
3. Change the Zero Trim Function by using the Span button
until the 11 Z-TRIM message appears on the display.
• ZERO ADJUSTMENT: Change the PV value to 14
1. Exit the menu by pressing the Zero+Span button.
2. Move through the sub directory using the Span button until
1 TRIM message appears.
3. Move through the sub directory using the Zero button until
11 Z-TRIM message appears.
4. Access the Zero Adjustment function by pressing the Span
button until the 12 Z-ADJ message appears.
5. When the SelInc message appears, press the Zero button
repetitively until the 10.0 message appears on the LCD.
Set the value by pressing the Span button.
6. When VALUE message appears, change the LCD value to
10.0 and press the Zero button, then press the Zero+Span
buttons.
7. When Sellnc message appears, change the LCD value to
1.0 and press the Zero button, then set the value and press
the Span button. Press the Zero+Span buttons after the
LCD value changes to 14.0.
Zero/Span
Buttons
Figure 5: Transmitter Zero/Span Configuration Buttons
CAUTION: After 30 seconds without any action,
the button function will return to normal operation.