QUICK-START GUIDE senseon.
Thank you for choosing Senseon Plus for your cabinet protection! The Senseon Plus Quick-Start Guide will set you up with the basics of Senseon Plus’s software. For more comprehensive instructions, please refer to the Senseon Plus Cloud Software Guide. System Requirements: • • • • • Dedicated 2.
QUI CK-STA RT GUI DE I 3
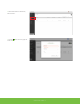
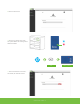
Pre-Setup Checklist 1. Visit cloud.senseon.com and click “Sign up” (see picture for reference). Follow the step-by-step online instructions. 2. Select “Profile Settings” in the user dropdown menu (located upper-right). 3. Input your user profile information, including phone number for text notifications.
4. Under “Administration” in the left menu, select “Locations.” 5. Press the button on the top right and create a location.
Setting Up Your Senseon Gateway 1. Power on the Wireless Gateway and connect the Ethernet cable into your router. Note: If you do not have access to your Router, you can power up your Gateway and connect it via Ethernet into a computer. Ethernet senseonplusgateway.local senseongateway.local 2. Using a computer that is on the same network as your router, enter senseonplusgateway.local into your web browser and log in (Default username is ”admin” and password is ”password”.
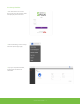
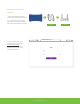
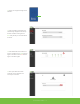
3. Select the “Network” tab on the left bar. On the Network screen, seen here, select the “Pencil” icon to edit your network setting. 4. Enter your local network’s credentials and click “Save.” Once saved, click “Test” to verify function. Once tested, click “Activate.” 5. Select “Administration” in the left menu.
6. Click Login under “Cloud Authentication”. 7. Enter your credentials and click Login. 8. Click on the “Edit” button beside the section “Cloud Configuration” to select the location you setup earlier. This will bring up a prompt (see picture) where you can select your pre-arranged location. Click “Update” after you have selected your location.
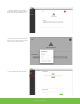
. Select the “Network” tab. 10. Power up your Senseon Plus system. Your system’s Reader and Card Programmer will blink in red/blue. USB 11. Click the switch beside “Access Point.” Once clicked, the switch will turn blue.
12. Wait for your Programmer’s light to turn solid blue. 13. Select “Controller” on the left bar. The Controller Page will populate with nearby Senseon Controllers and Programmer. Note: Verify that all your connected devices are shown. 14. Select “Dashboard” from the left bar to see your Controller status. A green indicator signals a controller is online. A red indicator signals a controller is offline. 15. After all your devices have been connected, return to “Network” and turn off your Access Point.
Editing Your Controller 1. Return to cloud.senseon.com. 2. Go to the “Controllers” sub-menu (under “Administration”). Select the edit (pen) icon next to the controller you want to edit. 3. Check the boxes for any active channels and desired settings for your controller. (You may need to contact your installer for this information.
4. Select the edit (pen) icon next to the channel you want to edit. 5. You can edit your channel names on this screen. Click “Save” when finished.
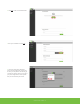
Adding a User 1. Under the Users sub-menu (under Administration in the left sidebar), click the green button in the upper right. 2. Scan a card with your card programmer to proceed. 3. Input user details and controller channel access. Note: You will create your own ID number using valid numbers of 1-16,000,000 with no duplicate ID numbers.) Click “Create” when finished. Once finished, you can use the card added.
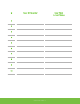
Viewing Your Activity Log 1. Select “Activity Log” in the side menu to view your logs. Refresh the page to see the latest activity. 2. Your log breaks down activity by time, user, controller, location, and transaction type.
Adding a Controller to Your Live Status Widget 1. On the “Controller Live Status” in your dashboard, select the “edit” icon (three vertical dots) next to the location bar to bring up a mini-menu. Select “Add Controller”. 2. You can also press the icon to see learn more about channel status. 3. On the “Edit Controller Live Status” prompt, select your controller’s location and name from their respective drop-down menus. The serial number will populate automatically.
Creating Notifications 1. Click on the profile icon to reveal a drop- down menu. Select “Notification Settings.” 2. Under the “Settings” sub-menu (under “Account Management” in the sidebar), click on the red in the lower right. 3. Input the details of the notification’s recipient, controller/channel, and method (text and/or e-mail).
4. You can check the conditions and times for your notifications under “Events” on the same screen. Click “Save” when finished. For more information about your system, refer to the Senseon Plus Cloud Software Guide.
Product Introduction Wireless Card Programmer: The Wireless Card Programmer enables the addition or removal of RFID cards to/from the Cloud. The Programmer can also scan RFID cards to locate their identification numbers. Wireless Module: The Wireless Module delivers data from your Senseon system to the Cloud. This lets you view your secured cabinets status remotely on your PC or mobile device in real-time.
Specifications Wireless Card Programmer Model SPLUSCP-1 Power Required 5.0v 1A WiFi Communication 2.4GHz RFID Reader 13.56MHz (RF) Temperature 0° - 80°C Dimensions 3.6” x 2.1” x 0. 6” Certification CE, RoHS, FCC Wireless Module Model SPLUSPR-2 Power Required 12v 5A WiFi Communication 2.4GHz Temperature -20° - 70°C Dimensions 2.5” x 2.3” x 0. 6” Certification CE, RoHS, FCC Wireless Gateway Model SPLUSGW-1 Power Required 5.1v DC, 3.5A WiFi Communication 2.
FCC Statement This equipment has been tested and found to comply with the limits for a Class B digital device, pursuant to part 15 of the FCC Rules. These limits are designed to provide reasonable protection against harmful interference in a residential installation. This equipment generates, uses and can radiate radio frequency energy and, if not installed and used in accordance with the instructions, may cause harmful interference to radio communications.
Have questions? Please contact Senseon Technical Support at (800) 688-8242 senseon.com Senseon® is a trademark of Accuride International, Inc. I 12311 Shoemaker Ave., Santa Fe Springs, CA 90670 | ©2022 Accuride International, Inc. (Ver. 2.