
User's Manual

Prepared by KM 11/2015 17 Patent pending
14407 Coil Plus Dr, Unit A | Plaineld, IL 60544
www.sennco.com | techsupport@sennco.com
815.577.3400 | Toll free 866.736.6261
Mon - Fri 9AM - 5PM CST
V. Conguring the system
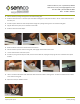
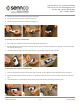
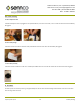
A. Make sure that the main alarm has power, all bubble makers have power (indicated by a green LED), all of the cradles have power (indicated
by a red LED on the underside of the cradle), and that all of the sensor heads have been acvated by placing them on a powered cradle
(indicated by two red ashing LEDs on the sensor head).
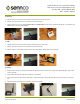
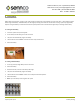
B. Make sure that the bubble makers are spaced 3 1/2 feet apart with all of their arrows pointed in the same direcon, and that the main alarm
is within 50 feet of them. Make sure that nearest sensor head is at least 2 feet away from the main alarm.
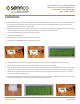
C. Insert a recognized DaKey into the main alarm and leave it inserted.
D. The LCD will state “DISARMED”
E. Hold down the buon on the front of the main alarm for 4 seconds.
F. The LCD will state “CONFIGURING” and show a device count of 000.
G. The bubble makers will all begin to ping a signal back to the main alarm (indicated by a blue ashing LED on each bubble maker).
H. The main alarm will listen for all of the sensor heads and the device count on the LCD will be updated.
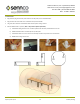
I. When completed, the ashing blue LEDs on the bubble makers will stop and the LCD will state “CONFIGURED” and show a count of the total
number of sensor heads found. If this number is less than the physically present heads check all of them and then repeat the conguraon.
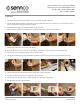
J. The LCD will also state “Remove key to arm the system” indicang it is now safe to remove the DaKey from the main alarm.. The system is
not armed unl the DaKey has been removed.
K. Aer removing the DaKey there will be a less than 5 second delay before the system is armed. The bubble makers will now ash a blue LED
and the sensor heads will ash a green LED as they ping back to the main alarm each second.