
Instruction manual


EN - 4
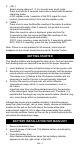
BATTERY INSTALLATION FOR REMOTE
SENSOR UNIT
1. Remove the battery cover by grabbing its bottom edge (near the
two recess location) from bottom of sensor unit.
2. Insert 2 pieces of AA size batteries according to the “+” and “-”
polarity marks shown in the battery compartment and then close
the battery door with the clip on. (press down the snap on both
sides slightly).
Front view Back view
WIRELESS REMOTE SENSOR REGISTRATION
PROCEDURE
1. Insert 2 pieces of AAA batteries fi rst to the main unit. The outdoor
temperature display shows - - . – while the wave icon will keep
blinking for 2 minutes indicate the main unit is in sensor searching
mode.
2. In a second step, insert the 2 pieces of AA batteries into the
sensor unit. The LED on the front panel will start fl ashing at a rate
of one time per around 2 seconds indicates channel-1 is being
used.
3. While the LED is fl ashing on remote sensor, press once the [CH]
key will change the sensor channel setting to 2. Keep toggle on
[CH] key can change channel setting up to 3. The LED is blinking
at a frequency to indicate the channel setting. i.e. continuous
blinks 2 times indicate channel 2 is selected.
Note: If user does not press any key for 10 seconds, it will exit the
channel setting mode and transmit the RF signal. The main unit
will register the temperature reading.
REMOTE CHANNEL AUTO-SCROLLING
This device is equipped with an auto-scroll function. While the auto-
scroll function is set, the unit will automatically cycle to display the
temperature and humidity of each remote sensor for 6 seconds.