User Manual ESR9855G Wireless 300N Gigabit Gaming Router Gigabit & StreamEngine Support
2
Table of Contents 1. INTRODUCTION........................................................................................................................................................................................... 7 1.1. 1.2. 1.3. 1.4. 1.5. 1.6. 1.7. FEATURES & BENEFITS............................................................................................ 7 PACKAGE CONTENTS .............................................................................................. 9 SAFETY GUIDELINES ...
5.1.2. Manual Network Setup.................................................................................................................................................................... 35 5.1.2.1. 5.1.2.2. 5.1.2.3. 5.1.2.4. 6. Wireless Security Level: BEST (WPA2)............................................................................................................................................................. 38 Wireless Security Level: BETTER (WPA) ....................................
6.4.2.2. 6.4.2.3. 6.4.2.4. 6.4.3. 6.4.4. 6.4.5. 6.4.6. 6.4.7. 6.5. 6.5.1. 6.5.2. 6.5.3. 6.5.4. 6.5.5. 6.5.6. 6.5.7. Load From Local Hard Drive.............................................................................................................................................................................. 94 Restore To Factory Default.................................................................................................................................................................
V ......................................................................................................................................................................................................................................... 127 W ........................................................................................................................................................................................................................................ 127 X ............................
1. Introduction The Wireless-N Gigabit Router is a 802.11n compliant device that delivers up to 6x faster speeds than 802.11g while staying backward compatible with 802.11g and 802.11b devices. It is not only a Wireless Access Point, which lets you connect to the network without wires. There's also a built-in 4-port full-duplex 10/100/1000 Gigabit Switch to connect your wired-Ethernet devices together.
Supports DNS/ DDNS Lets users assign a fixed host and domain name to a dynamic Internet IP address. Supports NAT (Network Address Translation)/NAPT Shares single Internet account and provides a type of firewall by hiding internal IP addresses for keeping hacker out Hide SSID Avoids unallowable users sharing bandwidth, increases efficiency of the network Firewall supports Virtual Server Mapping, DMZ, IP Filter, ICMP Blocking, SPI Avoids the attacks of Hackers or Viruses from Internet Support 802.
1.2. Package Contents Open the package carefully, and make sure that none of the items listed below are missing. Do not discard the packing materials, in case of return; the unit must be shipped in its original package. Wireless Gaming Router x 1 Power Adapter x 1 3dBi 2.4GHz Dipole Antennas x 2 CD-ROM with User Manual x 1 Quick Guide x 1 1.3. Safety Guidelines In order to reduce the risk of fire, electric shock and injury, please adhere to the following safety guidelines.
1.4.
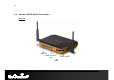
Front Panel Antenna Antenna Connector WPS button LED panel 11
Parts LAN Ports (1 – 4) WAN Port Antenna Connector Description Use an Ethernet cable to connect each port to a computer on your Local Area Network (LAN). Use an Ethernet cable to connect this port to your WAN router. Interface for the antennas. LAN LED WAN LED WLAN LED Power LED WPS button This LED will light up once an Ethernet cable is connected to one of the LAN ports. This LED will light up once an Ethernet cable is connected to WAN (Internet) port.
c) The ability to access real-time information Doctors/nurses, point-of-sale employees, and warehouse workers can access real-time information while dealing with patients, serving customers and processing information. d) Frequently changed environments Show rooms, meeting rooms, retail stores, and manufacturing sites where frequently rearrange the workplace. e) Small Office and Home Office (SOHO) networks SOHO users need a cost-effective, easy and quick installation of a small network.
1.7. Network Configuration To better understand how the wireless LAN products work together to create a wireless network, it might be helpful to depict a few of the possible wireless LAN PC card network configurations. The wireless LAN products can be configured as: a) Ad-hoc (or peer-to-peer) for departmental or SOHO LANs. b) Infrastructure for enterprise LANs.
b) Infrastructure Mode The infrastructure mode requires the use of an access point (AP). In this mode, all wireless communication between two computers has to be via the AP. It doesn’t matter if the AP is stand-alone or wired to an Ethernet network. If used in stand-alone, the AP can extend the range of independent wireless LANs by acting as a repeater, which effectively doubles the distance between wireless stations. The image below depicts a network in infrastructure mode.
2. Understanding the Hardware 2.1. Hardware Installation 1. 2. 3. 4. Place the device in an appropriate location after conducting a site survey. Plug one end of the Ethernet cable into the LAN port of the device and another end into your PC/Notebook. Plug one end of another Ethernet cable to WAN port of the device and the other end into you cable/DSL modem (Internet) Insert the DC-inlet of the power adapter into the port labeled “POWER” and the other end into the power socket on the wall.
2.2. Wall Mounting Screw Dimension: 18mm x 5mm You can mount the device on the wall. There are two mounting sockets on the bottom of the device. Please find a proper spot where two nails can be applied. Finally, carefully mount the device onto the wall and make sure the nails are firmly locked on the mount points.
2.3. IP Address Configuration This device can be configured as a Bridge/Router or Access Point. The default IP address of the device is 192.168.1.1 In order to log into this device, you must first configure the TCP/IP settings of your PC/Notebook. 1. In the control panel, double click Network Connections and then double click on the connection of your Network Interface Card (NIC). You will then see the following screen.
2. Select Internet Protocol (TCP/IP) and then click on the Properties button. This will allow you to configure the TCP/IP settings of your PC/Laptop. Select Obtain an IP address automatically radio button. 3. Click on the OK button to close this window, and once again to close LAN properties window.
3. Login To configure the device through the web-browser, enter the IP address of the device (default: 192.168.1.1) into the URL bar of the web-browser and press Enter. Make sure that the device and your computers are configured on the same subnet. Refer to previous chapter in order to configure the IP address of your computer. After connecting to the IP address, the web-browser will display the login page. Enter admin for both User Name and Password.
4. Internet Settings This device offers a quick and simple configuration through the wizard. This chapter describes how to use the wizard to configure the WAN, LAN, and wireless settings. Please refer to Chapter 6 in order to configure the more advanced features of the device. IMPORTANT NOTICE Internet Settings Page contains various settings related to WAN / Internet service. Usually, you only need to configure Internet Connection Type section to connect to the Internet.
4.1. Internet Connection Type Select your Internet service WAN type This device supports several types of Internet / WAN connections: o DHCP Connection (Dynamic IP address) – Choose this connection type if your ISP provides you the IP address. Most cable modems use this type of connection. o PPPoE (Poinit-to-Point Protocol over Ethernet) – Choose this option if your internet connection requires a user name and password. Most DSL modems use this type of connection.
4.1.1.DHCP Connection (Dynamic IP Address) The WAN interface can be configured as a DHCP Client in which the ISP provides the IP address to the device. This is also known as Dynamic IP. Host Name: this is optional if you need to specify the host name for this router. Use Unicasting: This option is normally turned off, and should remain off as long as the WAN-side DHCP server correctly provides an IP address to the router.
4.1.2.PPPoE (Point-to-Point Protocol over Ethernet) The WAN interface can be configured as PPPoE. This type of connection is usually used for a DSL service and requires a username and password to connect. Address Mode: PPPoE can be used with a dynamic or static IP address. If you select the Dynamic IP radio button, then the IIP address in the next field is not required. However, if you select the Static IP radio button, then the IP address in the next field is required.
o Automatic Connect: This option provides an automatically connect. o Manual Connect: This option provides a connection on demand. Maximum Idle Time: Specify the maximum idle time (disconnect when device is idled over the specified period.
4.1.3.PPTP (Point-to-Point Tunneling Protocol) PPTP (Point to Point Tunneling Protocol) uses a virtual private network to connect to your ISP. This method of connection requires you to enter a username and password (provided by your ISP) to gain access to the Internet. The supported authentication protocols are PAP and CHAP. Address Mode: PPTP can be used with a dynamic or static IP address. If you select the Dynamic IP radio button, then the IIP address in the next field is not required.
PPTP Server IP Address: If the PPTP Server’s IP address is different from the default gateway, then you may specify it here. Usernname: Specify the user name which is provided by your ISP. Password: Specify the password which is provided by your ISP, and then verify it once again in the next field. Verify Password: enter the password again for verification Reconnect Mode: o Keep Connection: This option provides a continuous connection.
4.1.4.Static IP Address Configuration In this type of connection, your ISP provides you with a dedicated IP address. IP Address: Specify the IP address for the device, which is assigned by your ISP. Subnet Mask: Specify the subnet mask for this IP address, which is assigned by your ISP. Gateway Address: Specify the IP address of the default gateway, which is assigned by your ISP. Usually, Static IP Address needs to specify DNS setting; please configure your DNS setting.
4.2. Other Internet Settings IMPORTANT NOTICE Internet Settings Page contains various settings related to WAN / Internet service. Usually, you only need to configure Internet Connection Type section to connect to the Internet. Unless your ISP specified otherwise, please keep the default settings if you are unsure of the configuration. Please consult your local ISP for your Internet Connection Type and account information. 4.2.1.
4.2.2.DNS Settings Most of the ISP does not require user to specify DNS settings. In case where DNS needs to be specified you can change the setting in this section. 4.2.3.MTU Settings Most of the ISP does not require user to specify MTU settings. In case where MTU needs to be specified. You can change the setting in this section. MTU: The Maximum Transmission Unit (MTU) is a parameter that determines the largest packet size (in bytes) that the router will send to the WAN.
4.2.4.WAN Ping If you enable this feature, the WAN port of your router will respond to ping requests from the Internet that are sent to the WAN IP Address. Enable WAN Ping Respond: checking the box. You can specify the Inbound Filter and choose whether to Allow All or Deny All. 4.2.5.Multicast Streams Enable Multicast Streams: checking the box if you have multicast streaming service on your local network.
4.2.6.MAC Cloning MAC Address: specify the MAC address. Click on [Clone Your PC’s MAC address] button to enter the MAC address of your PC/laptop automatically.
5. Wireless Setup Wizard This wizard will guide you in the configuration of the wireless network settings such as the SSID and security (WEP/WPA). .Please refer to Chapter 6 in order to configure more advanced features of the device 5.1. Wireless Network Wizard Setup Click on the Wizard Wireless link under the Basic menu, and then click on the Wireless Network Setup Wizard button.
The wizard will inform you that there are two options: auto and manual. 5.1.1.Automatic Network Setup If you select the Auto option, then the device will automatically configure the SSID and security mode. Click on the Next button to continue.
The wizard has automatically configured the SSID and security mode for the device. Click on the Save button to complete the setup. 5.1.2.Manual Network Setup If you select the Manual option, then you will be required to specify the SSID and select the appropriate network security. Click on the Next button to continue. The wireless wizard will inform you that there are three major steps in the process.
Click on the Next button to continue. Specify the Wireless Network Name (SSID) for the device. The SSID is a unique named shared amongst all the points of the wireless network. The SSID must be identical on all points of the wireless network and cannot exceed 32 characters. Click on the Next button to continue.
This step requires that you configure the security features based on your needs. The following options are available. o BEST – Select this option if your wireless adapters support WPA2 o BETTER – Select this option if your wireless adapters support WPA o GOOD – Select this option if your wireless adapters do not support WPA, but support WEP instead o None: Select this option if you do not want to activate any security features.
5.1.2.1. Wireless Security Level: BEST (WPA2) Select the BEST radio button which supports WPA2 encryption. Then click on the Next button. Enter a security password between 2 and 20 characters then click on the Next button. The setup is complete. Click on the Save button and then reboot the device.
5.1.2.2. Wireless Security Level: BETTER (WPA) Select the BETTER radio button which supports WPA encryption. Then click on the Next button. Enter a security password between 2 and 20 characters then click on the Next button.
The setup is complete. Click on the Save button and then reboot the device.
5.1.2.3. Wireless Security Level: GOOD (WEP 64/128-bit) Select the GOOD radio button which supports WEP encryption. Then click on the Next button. Enter a security password between 2 and 20 characters then click on the Next button. The setup is complete. Click on the Save button and then reboot the device.
42
5.1.2.4. Wireless Security Level: None (Security Disabled) Select the NONE radio button if you do not want to activate any security features. Then click on the Next button. The setup is complete. Click on the Save button and then reboot the device. The setup is complete. Click on the Save button and then reboot the device.
6. Manual Web Configuration 6.1. Logging In To configure the device through the web-browser, enter the IP address of the Bridge (default: 192.168.1.1) into the address bar of the web-browser and press Enter. Make sure that the device and your computers are configured on the same subnet. Refer to Chapter 2 in order to configure the IP address of your computer. After connecting to the IP address, the web-browser will display the login page. Enter Admin for both User Name and Password.
6.2. Basic Click on the Basic link on the navigation drop-down menu. 6.2.1. Internet Settings Refer to Chapters 4 in order to use the wizard. The other options are described below. 6.2.2. Wizard Wireless Refer to Chapters 5 in order to use the wizard. The other options are described below.
6.2.3. Network Settings This device can be configured at a Router or a Bridge. Select Router mode if the WAN port is connected to the Internet. Select Bridge if the device is connected to a local network downstream from another router. 6.2.3.1. Bridge Mode In this mode, the device functions as a bridge between the network on its WAN port and the devices on its LAN port and those connected to it wirelessly. Select the Bridge Mode radio button.
6.2.3.2. Router Mode In this mode, the device functions as a NAT router and is connected to the Internet. Select the Router Mode radio button. WAN Port Mode: Select the Router Mode radio button. Router IP Address: Specify the IP address of this device Subnet Mask: Specify the subnet mask for the IP address Local Domain Name: This entry is optional. Enter a domain name for the local network.
RIP (Routing Information Protocol) RIP enables the router to share routing information with other routers and hosts on the LAN. Enable RIP: Enable RIP if the LAN has multiple routers or if the LAN has other hosts that listen for RIP messages, such as auto-IP devices or the Windows XP RIP Listener Service. RIP Operating mode: This router supports both version 2 and version 1 of the RIP specification. V1. Use if none of the routers supports Version 2. V2 Broadcast.
subnet that has conflicting IP addresses. Enter the password twice for verification. Leave both password fields empty if RIP passwords are not used. Accept RIP Updates: The "Accept RIP Updates" option controls whether the router updates its routing tables when it receives RIP messages from other LAN devices. Disable "Accept RIP Updates" if not needed or if RIP messages could originate from an insecure device on the LAN.
DHCP Server Settings DHCP stands for Dynamic Host Configuration Protocol. The DHCP section is where you configure the built-in DHCP Server to assign IP addresses to the computers and other devices on your local area network (LAN).
Enable DHCP Server: Once your router is properly configured and this option is enabled, the DHCP Server will manage the IP addresses and other network configuration information for computers and other devices connected to your Local Area Network. There is no need for you to do this yourself. The computers (and other devices) connected to your LAN also need to have their TCP/IP configuration set to "DHCP" or "Obtain an IP address automatically".
Primary WINS Server IP address: Configure the IP address of the preferred WINS server. WINS Servers store information regarding network hosts, allowing hosts to 'register' themselves as well as discover other available hosts, e.g. for use in Network Neighbourhood. This setting has no effect if the 'Learn NetBIOS information from WAN' is activated. Secondary WINS Server IP address: Configure the IP address of the backup WINS server, if any.
Add/Edit DHCP Reservation This option lets you reserve IP addresses, and assign the same IP address to the network device with the specified MAC address any time it requests an IP address. This is almost the same as when a device has a static IP address except that the device must still request an IP address from the router. The router will provide the device the same IP address every time.
colons such as 00-0D-88-11-22-33 or 00:0D:88:11:22:33. If your network device is a computer and the network card is already located inside the computer, you can connect to the router from the computer and click the Copy Your PC's MAC Address button to enter the MAC address. DHCP Reservations List This shows clients that you have specified to have reserved DHCP addresses. Click the Enable checkbox at the left to directly activate or de-activate the entry.
6.2.4. Wireless Settings These options allow you to enable/disable the wireless interface, switch between the 11b, 11g, 11n and mixed radio band and channel frequency Enable Wireless: Place a check in this box to enable the wireless interface, it is enabled by default. Wireless Network Name: The SSID is a unique named shared amongst all the points of the wireless network. The SSID must be identical on all points of the wireless network and cannot exceed 32 characters. 802.
Wireless Channel: Select a channel from the drop-down list. The channels available are based on the country’s regulation. A wireless network uses specific channels in the wireless spectrum to handle communication between clients. Some channels in your area may have interference from other electronic devices. Choose the clearest channel to help optimize the performance and coverage of your wireless network. Transmission Rate: Select a transmission rate from the drop-down list.
6.2.4.1. Wireless Security Mode To protect your privacy this mode supports several types of wireless security: WEP WPA, WPA2, and WPA-Mixed. WEP is the original wireless encryption standard. WPA provides a higher level of security. The following section describes the security configuration in detail.
6.2.4.2. WEP (Wired Equivalent Privacy) Select the WEP from the drop-down list if your wireless network uses WEP encryption. WEP is an acronym for Wired Equivalent Privacy, and is a security protocol that provides the same level of security for wireless networks as for a wired network. WEP is not as secure as WPA encryption. To gain access to a WEP network, you must know the key. The key is a string of characters that you create. When using WEP, you must determine the level of encryption.
6.2.4.3. WPA Personal (Wi-Fi Protected Access) Select the WPA-Personal from the drop-down list if your wireless network uses WPA encryption. WPA (Wi-Fi Protected Access) was designed to improve upon the security features of WEP (Wired Equivalent Privacy). The technology is designed to work with existing Wi-Fi products that have been enabled with WEP.
6.2.4.4. WPA Enterprise (Wi-Fi Protected Access & 802.1x) Select the WPA-Enterprise from the drop-down list if your wireless network uses WPA encryption. WPA (Wi-Fi Protected Access) was designed to improve upon the security features of WEP (Wired Equivalent Privacy). The technology is designed to work with existing Wi-Fi products that have been enabled with WEP.
WPA Mode: Select the WPA / WPA2 from the drop-down list. Cipher Type: Select TKIP or AES as the cipher suite. The encryption algorithm used to secure the data communication. TKIP. Use TKIP only. TKIP (Temporal Key Integrity Protocol) provides per-packet key generation and is based on WEP. AES. Use AES only. AES (Advanced Encryption Standard) is a very secure block based encryption.
6.3. Advanced Click on the Advanced link on the navigation tree menu. The configuration steps for each option are described below.
6.3.1. Advanced Wireless By clicking on Advanced tab, you will be able to access Advanced Wireless page. If you are not familiar with Advanced Wireless Settings, please read the help section before attempting to modify these settings.
Beacon Period: Beacons are packets sent by a wireless router to synchronize wireless devices. Specify a Beacon Period value between 20 and 1000. The default value is set to 100 milliseconds. Values that are not a multiple of 4, are forced to a multiple of 4. RTS Threshold: When an excessive number of wireless packet collisions are occurring, wireless performance can be improved by using the RTS/CTS (Request to Send/Clear to Send) handshake protocol.
6.3.2.Virtual Server The Virtual Server option gives Internet users access to services on your LAN. This feature is useful for hosting online services such as FTP, Web, or game servers. For each Virtual Server, you define a public port on your router for redirection to an internal LAN IP Address and LAN port. Name: Assign a meaningful name to the virtual server, for example Web Server. Several well-known types of virtual server are available from the Application Name drop-down list.