802.
PRODUCT DESCRIPTION The PCE4553AH is a 5Ghz 3T3R 802.11ac PCIe module base on QCA9880 commercial grade solution. PRODUCT SPECIFICATION RF Specification Radio 1 Support 5GHz Frequency Band 802.11a/n/ac 5.180~5.825GHz Data rate 1300Mbps Receive Sensitivity (Typical) 802.11a 802.11a/ n_HT20 802.11n_HT40 802.
Federal Communication Commission Interference Statement This equipment has been tested and found to comply with the limits for a Class B digital device, pursuant to Part 15 of the FCC Rules. These limits are designed to provide reasonable protection against harmful interference in a residential installation. This equipment generates, uses and can radiate radio frequency energy and, if not installed and used in accordance with the instructions, may cause harmful interference to radio communications.
This device is intended only for OEM integrators under the following conditions: 1) The antenna must be installed such that 20 cm is maintained between the antenna and users, and 2) The transmitter module may not be co-located with any other transmitter or antenna, As long as 2 conditions above are met, further transmitter test will not be required.
End Product Labeling The final end product must be labelled in a visible area with the following "Contains FCC ID: U2M-PCE4553AH" If the size of the end product is larger than 8x10cm, then the following FCC part 15.19 statement has to also be available on the label: This device complies with Part 15 of FCC rules.
Manual Information to the End User The OEM integrator has to be aware not to provide information to the end user regarding how to install or remove this RF module in the user’s manual of the end product which integrates this module. The end user manual shall include all required regulatory information/warning as show in this manual.
Configuration The Wireless Adapter can be configured by Wireless Client Utility (WCU). This chapter describes how to configure your Wireless Adapter for wireless connectivity on your Wireless Local Area Network (WLAN) and use the data security encryption features. After Installing the Adapter, the Adapter’s tray icon will appear in your system tray. It appears at the bottom of the screen, and shows the signal strength using color and the received signal strength indication (RSSI).
Wireless Mode - Displays the wireless mode. Configure the wireless mode on the Advanced tab of Profile Management. Network Type - The type of network and the station currently connected. The options include: • Infrastructure (access point) • Ad Hoc Configure the network type on the Advanced tab of Profile Management. IP Address - Displays the computer’s IP address. Current Channel - Shows the currently connected channel.
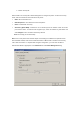
Add or Modify a Configuration Profile To add a new configuration profile, click New on the Profile Management tab. To modify a configuration profile, select the configuration from the Profile list and click Modify. 1. Edit the General tab Profile Name - Identifies the configuration profile. This name must be unique. Profile names are not case-sensitive. Client Name - Identifies the client machine. Network Names (SSIDs) - The IEEE 802.11 wireless network name.
2. Edit the Security tab Edit the fields in the Security tab of Profile Management to configure the profile. To define the security mode, select the radio button of the desired security mode. WPA - Wi-Fi Protected Access WPA Passphrase - Wi-Fi Protected Access Passphrase 802.1x - Enables 802.1x security. Shared Key (Static WEP) - Enables the use of shared keys that are defined on both the access point and the station.
3. Edit the Advanced tab Transmit Power Level - Selects the transmit power level for in mW. Actual transmit power may be limited by regulatory domain or hardware limitations. Power Save Mode • Maximum - Selects maximum mode to let the access point buffer incoming messages for the wireless adapter. The adapter will detect the access point if any messages are waiting periodically.
Scan Available Networks 1. Click Scan on the Profile Management, the Available Infrastructure and Ad Hoc Networks window will appear. 2. Click Refresh to refresh the list at any time. 3. Highlight a network name and click Activate to connect an available network. If no configuration profile exists for that network, the Profile Management window will open the General tab. Fill in the Profile name and click OK to create the configuration profile for that network.