1N Wireless Gigabit Multi-Function Client Bridge ECB9500 User’s Manual Version: 2.
Multi-Function Gigabit Wireless-N Client Bridge Version 1.0 Table of Contents 1 INTRODUCTION............................................................................................................................... 5 1.1 1.2 1.3 1.4 1.5 1.6 a) b) 2 UNDERSTANDING THE HARDWARE.......................................................................................... 9 2.1 2.2 3 FEATURES AND BENEFITS .....................................................................................................
Multi-Function Gigabit Wireless-N Client Bridge Version 1.0 3.2.4.5.5 3.2.4.5.6 3.2.4.5.7 3.2.4.5.8 3.3 3.3.1 3.3.2 3.4 3.4.1 3.4.2 3.4.3 3.4.4 3.4.5 3.4.6 3.4.7 3.5 3.5.1 3.5.2 FILTER ....................................................................................................................................46 WPS (WI-FI PROTECTED SETUP) .............................................................................................46 CLIENT LIST ......................................................
Multi-Function Gigabit Wireless-N Client Bridge Version 1.0 Revision History Version Date Notes 1.0 2.
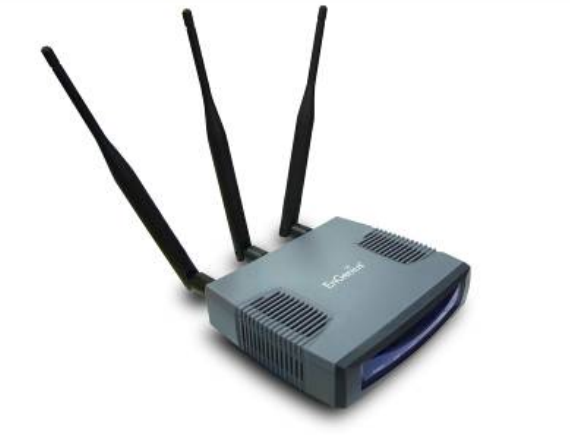
Multi-Function Gigabit Wireless-N Client Bridge Version 1.0 1 Introduction The Multi-function Gigabit Wireless-N Client Bridge is an 802.11n-draft compliant device that delivers up to 6x faster speeds than 802.11g while staying backward compatible with 802.11g and 802.11b devices. The Wireless Client Bridge, Access Point, and Repeater/WDS built into the device uses advanced MIMO (Multi-Input, Multi-Output) technology to transmit multiple steams of data in a single wireless channel.
Multi-Function Gigabit Wireless-N Client Bridge Version 1.0 Support Multi-SSID function (4 Multiple SSIDs serve as multiple APs which allow SSID) in AP mode administrator to assign different policies for specific user groups. WPA2/WPA/ IEEE 802.1x Powerful data security support 802.
Multi-Function Gigabit Wireless-N Client Bridge Version 1.0 1.3 Safety Guidelines In order to reduce the risk of fire, electric shock and injury, please adhere to the following safety guidelines. h h h h h h h h 1.4 Carefully follow the instructions in this manual; also follow all instruction labels on this device. Except for the power adapter supplied, this device should not be connected to any other adapters. Do not spill liquid of any kind on this device.
Multi-Function Gigabit Wireless-N Client Bridge Version 1.0 g) Wired LAN backup Network managers implement wireless LANs to provide backup for mission-critical applications running on wired networks. h) Training/Educational facilities Training sites at corporations and students at universities use wireless connectivity to ease access to information, information exchanges, and learning. 1.
Multi-Function Gigabit Wireless-N Client Bridge Version 1.0 2 Understanding the Hardware 2.1 Hardware Installation 1. Place the unit in an appropriate location and screw device with mounting kit. 2. Plug one end of the Ethernet cable into the LAN port of the device and another end into your PC/Notebook. 3. Plug one end of another Ethernet cable to WAN port of the device and the other end into you cable/DSL modem (Internet) 4.
Multi-Function Gigabit Wireless-N Client Bridge Version 1.0 2. Select Internet Protocol (TCP/IP) and then click on the Properties button. This will allow you to configure the TCP/IP settings of your PC/Notebook. 3. Select Use the following IP Address radio button and then enter the IP address and subnet mask. You may follow the example below. Please Ensure that the IP address and subnet mask are on the same subnet as the device. For Example: Device IP address: 192.168.1.2 PC IP address: 192.168.0.
Multi-Function Gigabit Wireless-N Client Bridge Version 1.0 3 Web Configuration 3.1 Logging In To configure the device through the web-browser, enter the IP address of the Bridge (default: 192.168.1.2) into the address bar of the web-browser and press Enter. Make sure that the device and your computers are configured on the same subnet. Refer to Chapter 2 in order to configure the IP address of your computer. After connecting to the IP address, the web-browser will display the login page.
Multi-Function Gigabit Wireless-N Client Bridge Version 1.0 3.2 System Click on the System link on the navigation drop-down menu. You will then see five options: Operation Mode, Status, Schedule, Event Log, and Monitor. Each option is described in detail below.
Multi-Function Gigabit Wireless-N Client Bridge Version 1.0 3.2.1 Click on the Status link under the System drop-down menu. The status page displays a summary of current system settings. Information such as operating mode, system up time, firmware version, serial number, kernel version and application version are displayed in the ‘System’ section. LAN IP address, subnet mask, and MAC address are displayed in the ‘LAN’ section. In the ‘WLAN’ section, the frequency, channel is displayed.
Multi-Function Gigabit Wireless-N Client Bridge Version 1.0 Click on the Add button to add a new schedule. . Schedule Description: Specify a name for the schedule. Service: Select a service. Days: Select the days at which you would like the schedule to be effective. Time of Day: Place a check in the All Day box if you would like the schedule to be active for 24 hours. If you do not use the 24 hours option, you may specify a start time and end time.
Multi-Function Gigabit Wireless-N Client Bridge Version 1.0 Save: Click on the Save button to save the log into a text file on your computer. Clear: Click on the Clear button to clear the log on the screen. Refresh: Click on the Refresh button to refresh the log. 3.2.4 Monitor Click on the Monitor link in the navigation drop-down menu. This page displays the transmitted and received packet statistics of the wired (LAN & WAN) and wireless interface.
Multi-Function Gigabit Wireless-N Client Bridge Version 1.0 Click to view the history records.
Multi-Function Gigabit Wireless-N Client Bridge Version 1.0 3.2.4.1 Switching between Operating Modes Each of the operating modes offers different features. In order to switch the operating mode, select it from the System >> Operation Mode A dialog box will appear to notify you that the system will restart in order for the change to take effect. Click on the OK button to continue. Please wait while the device counts down and restarts into the new operating mode.
Multi-Function Gigabit Wireless-N Client Bridge Version 1.0 Each of the operating modes is described in detail in this chapter. Refer to the following sections for each operating mode: o o o o 3.2.4.2 Access Point Operating Mode 3.2.4.3 Client Bridge Operating Mode 3.2.4.4 WDS Bridge Operating Mode 3.2.4.
Multi-Function Gigabit Wireless-N Client Bridge Version 1.0 3.2.4.2 Access Point Operating Mode 3.2.4.2.1 Status Click on the Status link under the Wireless drop-down menu. This page will display the current wireless settings such as SSID, Channel, Security and BSSID (MAC address) 3.2.4.2.2 In order to configure the device as an Access Point, select Access Point from the Operating Mode dropdown list.
Multi-Function Gigabit Wireless-N Client Bridge Version 1.0 • Radio: Choose to Enable or Disable the wireless radio. • Mode: This drop-down list is fixed to AP as this is the Access Point operating mode. • Band: Select the IEEE 802.11 mode from the drop-down list. For example, if you are sure that the wireless network will be using only IEEE 802.11g clients, then it is recommended to select 802.11g only instead of 2.4 GHz B+G which will reduce the performance of the wireless network.
Multi-Function Gigabit Wireless-N Client Bridge Version 1.0 Fragment Threshold: Packets over the specified size will be fragmented in order to improve performance on noisy networks. Specify a value between 256 and 2346. The default value is 2346. RTS Threshold: Packets over the specified size will use the RTS/CTS mechanism to maintain performance in noisy networks and preventing hidden nodes from degrading the performance. Specify a value between 0 and 2347. The default value is 2347.
Multi-Function Gigabit Wireless-N Client Bridge Version 1.0 3.2.4.2.4 Wireless Security Mode Click on the Security link under the Wireless drop-down menu. To protect your privacy this mode supports several types of wireless security: WEP WPA, WPA2, and 802.1x RADIUS. WEP is the original wireless encryption standard. WPA provides a higher level of security. The following section describes the security configuration in detail. 3.2.4.2.4.
Multi-Function Gigabit Wireless-N Client Bridge Version 1.0 WEP is an acronym for Wired Equivalent Privacy, and is a security protocol that provides the same level of security for wireless networks as for a wired network. WEP is less secure as compares to WPA encryption. To gain access to a WEP network, you must know the key. The key is a string of characters that you use for password. When using WEP, you must determine the level of encryption.
Multi-Function Gigabit Wireless-N Client Bridge Version 1.0 Authentication Type: Select Open System, Shared Key, or auto. Authentication method from the drop-down list. An open system allows any client to authenticate as long as it conforms to any MAC address filter policies that may have been set. All authentication packets are transmitted without encryption. Shared Key sends an unencrypted challenge text string to any device attempting to communicate with the AP.
Multi-Function Gigabit Wireless-N Client Bridge Version 1.0 ESSID Selection: As this device supports multiple SSIDs, it is possible to configure a different security mode for each SSID (profile). Select an SSID from the drop-down list. Broadcast SSID: Select Enable or Disable from the drop-down list. This is the SSID broadcast feature. When this option is set to Enable, your wireless network name is broadcast to anyone within the range of your signal.
Multi-Function Gigabit Wireless-N Client Bridge Version 1.0 This option works with a RADIUS Server to authenticate wireless clients. Wireless clients should have established the necessary credentials before attempting to authenticate to the Server through this Gateway. Furthermore, it may be necessary to configure the RADIUS Server to allow this Gateway to authenticate users.
Multi-Function Gigabit Wireless-N Client Bridge Version 1.0 Check on the Enable Wireless MAC Filtering Type in Description as a note for your own reference Enter the MAC address that you allow for accessing to your device Press Add to apply the policy Click Apply for the setting to take effect 3.2.4.2.6 WPS (Wi-Fi Protected Setup) Click on the WPS link under the Wireless drop-down menu WPS requires you to enter a PIN for the device press the configuration button on the device.
Multi-Function Gigabit Wireless-N Client Bridge Version 1.0 WPS: Place a check in this box to enable this feature. WPS Current Status: Displays the current status of the WPS configuration. Self Pin Code: Displays the current PIN. SSID: Displays the current SSID. Authentication Mode: Displays the current authentication mode. Passphrase Key: Displays the current passphrase.
Multi-Function Gigabit Wireless-N Client Bridge Version 1.0 3.2.4.2.8 VLAN Click on the VLAN link under the Wireless drop-down menu. A VLAN (Virtual LAN) is a group of hosts with a common set of requirements that communicate as if they were attached to the same wire, regardless of their physical location. Virtual LAN: Choose to Enable or Disable the VLAN features. SSID1 Tag: Specify the VLAN tag. Click on the Apply button to save the changes. 3.2.4.2.
Multi-Function Gigabit Wireless-N Client Bridge Version 1.
Multi-Function Gigabit Wireless-N Client Bridge Version 1.0 3.2.4.3 Client Bridge Operating Mode In order to configure the device as an Access Point, select Client Bridge from the Operating Mode drop-down list. A dialog box will appear to notify you that the system will restart in order for the change to take effect. Click on the OK button to continue. Please wait while the device counts down and restarts into the new operating mode.
Multi-Function Gigabit Wireless-N Client Bridge Version 1.0 • Radio: Choose to Enable or Disable the wireless radio. • Mode: This drop-down list is fixed to Client as this is the Client Bridge operating mode. • Band: Select the IEEE 802.11 mode from the drop-down list. For example, if you are sure that the wireless network will be using only IEEE 802.11g clients, then it is recommended to select 802.11g only instead of 2.4 GHz B+G which will reduce the performance of the wireless network.
Multi-Function Gigabit Wireless-N Client Bridge Version 1.0 Fragment Threshold: Packets over the specified size will be fragmented in order to improve performance on noisy networks. Specify a value between 256 and 2346. The default value is 2346. RTS Threshold: Packets over the specified size will use the RTS/CTS mechanism to maintain performance in noisy networks and preventing hidden nodes from degrading the performance. Specify a value between 0 and 2347. The default value is 2347.
Multi-Function Gigabit Wireless-N Client Bridge Version 1.0 3.2.4.3.4.1 Manage AP Profile 1. Press Add/Edit to add/modify the SSID(s) of your device. 2. Setting Encryption type from Encryption dropdown list. (See 3.2.4.2.4.2 to 3.2.4.2.4.4) 3. Press Save to save your setting. 4. 5. 6. 7. Check one of the SSID in the table to Move Up or Move Down the display order Delete Selected to delete the SSID on check.
Multi-Function Gigabit Wireless-N Client Bridge Version 1.0 3.2.4.4 3.2.4.4.1 WDS Operating Mode In order to configure the device as an Access Point, select WDS from the Operating Mode drop-down list. A dialog box will appear to notify you that the system will restart in order for the change to take effect. Click on the OK button to continue. Please wait while the device counts down and restarts into the new operating mode.
Multi-Function Gigabit Wireless-N Client Bridge Version 1.0 3.2.4.4.2 Basic Click on the Basic link under the Wireless drop-down menu. This page will display the current wireless settings such as SSID, Channel, Security and BSSID (MAC address). • Radio: Choose to Enable or Disable the wireless radio. • Mode: This drop-down list is fixed to WDS as this is the Wireless Distribution operating mode. • Band: Select the IEEE 802.11 mode from the drop-down list.
Multi-Function Gigabit Wireless-N Client Bridge Version 1.0 3.2.4.4.3 Advanced Click on Advanced link under the Wireless drop-down menu. This page allows you to configure the fragmentation threshold, RTS threshold, beacon period, DTIM Period, etc. Fragment Threshold: Packets over the specified size will be fragmented in order to improve performance on noisy networks. Specify a value between 256 and 2346. The default value is 2346.
Multi-Function Gigabit Wireless-N Client Bridge Version 1.0 CTS Protection: CTS (Clear to Send) can be always enabled, auto, or disabled. By enabled CTS, the Access Point and clients will wait for a ‘clear’ signal before transmitting. It is recommended to select auto. Click on the Apply button to save the changes. 3.2.4.4.4 WMM (Wireless Multimedia) Click on the WMM link under the Wireless drop-down menu.
Multi-Function Gigabit Wireless-N Client Bridge Version 1.0 3.2.4.5.1 In order to configure the device as an Access Point, select Repeater from the Operating Mode drop-down list. A dialog box will appear to notify you that the system will restart in order for the change to take effect. Click on the OK button to continue. Please wait while the device counts down and restarts into the new operating mode.
Multi-Function Gigabit Wireless-N Client Bridge Version 1.0 3.2.4.5.2 Basic Click on the Basic link under the Wireless drop-down menu. This page will display the current wireless settings such as SSID, Channel, Security and BSSID (MAC address). • Radio: Choose to Enable or Disable the wireless radio. • Mode: This drop-down list is fixed to WDS as this is the Wireless Distribution operating mode. • Band: Select the IEEE 802.11 mode from the drop-down list.
Multi-Function Gigabit Wireless-N Client Bridge Version 1.0 SSID: The SSID is a unique named shared amongst all the points of the wireless network. The SSID must be identical on all points of the wireless network and cannot exceed 32 characters. Status: Displays the current status of the device. Click on the Apply button to save the changes. 3.2.4.5.3 Advanced Click on Advanced link under the Wireless drop-down menu.
Multi-Function Gigabit Wireless-N Client Bridge Version 1.0 RTS Threshold: Packets over the specified size will use the RTS/CTS mechanism to maintain performance in noisy networks and preventing hidden nodes from degrading the performance. Specify a value between 0 and 2347. The default value is 2346. Beacon Interval: Beacons are packets sent by a wireless Access Point to synchronize wireless devices. Specify a Beacon Period value between 20 and 1000.
Multi-Function Gigabit Wireless-N Client Bridge Version 1.0 Broadcast SSID: Select Enable or Disable from the drop-down list. This is the SSID broadcast feature. When this option is set to Enable, your wireless network name is broadcast to anyone within the range of your signal. If you're not using encryption then they could connect to your network. When this is disabled, you must enter the Wireless Network Name (SSID) on the client manually to connect to the network.
Multi-Function Gigabit Wireless-N Client Bridge Version 1.0 ESSID Selection: As this device supports multiple SSIDs, it is possible to configure a different security mode for each SSID (profile). Select an SSID from the drop-down list. Broadcast SSID: Select Enable or Disable from the drop-down list. This is the SSID broadcast feature. When this option is set to Enable, your wireless network name is broadcast to anyone within the range of your signal.
Multi-Function Gigabit Wireless-N Client Bridge Version 1.0 alphanumeric characters) format. ASCII format is provided so you can enter a string that is easier to remember. Default Key: You may choose one of your 4 different WEP keys from below. Encryption Key 1-4: You may enter four different WEP keys. Enable 802.1x Authentication: Place a check in this box if you would like to use RADIUS authentication. This option works with a RADIUS Server to authenticate wireless clients.
Multi-Function Gigabit Wireless-N Client Bridge Version 1.0 Encryption: Select WPA pre-shared key from the drop-down list. WPA Type: Select TKIP, AES, or WPA2 Mixed. The encryption algorithm used to secure the data communication. TKIP (Temporal Key Integrity Protocol) provides per-packet key generation and is based on WEP. AES (Advanced Encryption Standard) is a very secure block based encryption.
Multi-Function Gigabit Wireless-N Client Bridge Version 1.0 WPS requires you to enter a PIN for the device press the configuration button on the device. If the device supports Wi-Fi Protected Setup and has a configuration button, you can add it to the network by pressing the configuration button on the device There are several ways to add a wireless device to your network. Access to the wireless network is controlled by a registrar.
Multi-Function Gigabit Wireless-N Client Bridge Version 1.0 3.2.4.5.7 Click on the Client List link under the Wireless drop-down menu. This page displays the list of Clients that are associated to the device. The MAC address and signal strength for each client is displayed. Click on the Refresh button to refresh the client list 3.2.4.5.8 Client List WMM (Wireless Multimedia) Click on the WMM link under the Wireless drop-down menu.
Multi-Function Gigabit Wireless-N Client Bridge Version 1.0 3.3 Network Click on the Network link on the navigation dropdown menu. You will then see three options: Status, LAN, and WAN. Each option is described in detail below.
Multi-Function Gigabit Wireless-N Client Bridge Version 1.0 3.3.1 Status Click on the Status link on the Network navigation drop-down menu. This page will display the current LAN settings such as IP address, subnet mask, and MAC address. 3.3.2 LAN / DHCP Client, Server Click on the LAN link on the Network navigation drop-down menu. This page will allow you to configure the device as a static or dynamic IP address, along with DHCP server settings.
Multi-Function Gigabit Wireless-N Client Bridge Version 1.0 3.4 Management 3.4.1 Click on the Management link on the navigation dropdown menu. You will then see four options: Admin, SNMP, Firmware, and Configure. Each option is described in detail below. Admin Click on the Admin link on the Management navigation drop-down menu. This page allows you to configure a new password to login to the device. It is recommended to change the default password for security reasons.
Multi-Function Gigabit Wireless-N Client Bridge Version 1.0 Upon receiving these messages, SNMP-compatible devices (called agents) return data stored in their Management Information Bases. . SNMP Active: Choose to enable or disable the SNMP feature. SNMP Version: You may select a specific version or select All from the drop-down list. Read Community Name: Specify the password for access the SNMP community for read only access.
Multi-Function Gigabit Wireless-N Client Bridge Version 1.0 Ensure that you have downloaded the appropriate firmware from the vendor’s website. Connect the device to your PC using an Ethernet cable, as the firmware cannot be upgraded using the wireless interface. Click on the Browse button to select the firmware and then click on the Apply button. 3.4.
Multi-Function Gigabit Wireless-N Client Bridge Version 1.0 3.4.5 Backup Settings Click on the Configure link in the navigation menu Click on the Save button you will be provided with download link Click on download link to save file to your local disk. 3.4.6 Restore Settings Click on the Configure link in the navigation menu Click on the Browse button to select the file that has been backed up and then click on the Upload button.
Multi-Function Gigabit Wireless-N Client Bridge Version 1.0 3.4.7 Rest Press Apply to reset your device. 3.5 Tools Click on the Tools link on the navigation drop-down menu. You will then see four options: Time zone, power saving, diagnosis, and reset. Each option is described in detail below.
Multi-Function Gigabit Wireless-N Client Bridge Version 1.0 3.5.1 Time Setting Click on the Time Setting link in the navigation menu. This feature allows you to configure, update, and maintain the correct time on the device’s internal system clock as well as configure the time zone. The date and time of the device can be configured manually or by synchronizing with a time server.
Multi-Function Gigabit Wireless-N Client Bridge Version 1.0 Address to Ping: Specify the IP address to ping and then click on the Start button. The result will then display in the field below.
Multi-Function Gigabit Wireless-N Client Bridge Version 1.0 Appendix A – Specifications Hardware Summary Physical Interface LAN: One 10/100/1000Mbps Reset Button Power Jack WPS push button (Wi-Fi Protected Setup) LEDs Status Power/ Status LAN (10/100/1000Mbps) WLAN (Wireless Connection) Power Requirements Power Supply: 100 to 240 VDC ± 10%, 50/60 Hz (depends on different countries) Active Ethernet (Power over Ethernet, IEEE802.3af)- 48 VDC/0.
Multi-Function Gigabit Wireless-N Client Bridge Operation Mode LAN VPN Wireless Security QoS Version 1.0 Client Bridge/Access Point/Repeater/WDS/PtP • DHCP Server • DHCP Client VPN pass-through (PPTP, L2TP, IPSEC) • Wireless Mode – 11b / 11g / 11n / Disable • Transmission Rate ¾ 11 b/g: 54, 48, 36, 24, 18, 12, 11, 9, 6, 5.
Multi-Function Gigabit Wireless-N Client Bridge Dimensions 125mm (L) x 108mm (W) x 31mm (H) Weight 350g Version 1.
Multi-Function Gigabit Wireless-N Client Bridge Version 1.0 Appendix B – FCC Interference Statement Federal Communication Commission Interference Statement This equipment has been tested and found to comply with the limits for a Class B digital device, pursuant to Part 15 of the FCC Rules. These limits are designed to provide reasonable protection against harmful interference in a residential installation.
Multi-Function Gigabit Wireless-N Client Bridge Version 1.0 Index 8 HEX, 21, 22, 30, 32, 41, 42, 50, 51 802.
Multi-Function Gigabit Wireless-N Client Bridge Trap, 62 Tx Power, 20, 40, 49 V VLAN, 2, 11, 17, 26, 68 W WAN, 3, 9, 11, 15, 55, 56, 57, 58, 59, 60 WDS Operating Mode, 2, 37 Web Configuration, 11 Version 1.