
User's Manual

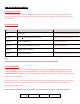


1GB
9 min
12 min
24 min
2GB
18 min
24 min
48 min
4GB
36 min
48 min
1 h 36 min
8GB
1 h 12 min
1 h 36 min
3 h 12 min
16GB
2 h 24 min
3 h 12 min
6 h 24 min
32GB
4 h 48 min
6 h 24 min
12 h 48 min
Note:
- You cannot record videos without a micro SD card.
- The headset gives a warning and automatically stops recording when the micro SD card is full or the battery runs out.
Your video will be saved before the headset powers off.
- If the camera becomes too hot, it gives a high temperature warning. Cool down your camera before further use.
- The maximum size per video is limited to 4GB. Therefore, when the video reaches the 4GB size limit during recording, it
saves and creates a new video file to continue recording.
5.4 Photo Shooting
Tap the Camera Button to take photos. The green LED will flash and you will hear a shutter sound. To select photo mode,
please refer to section 14.2.1, “Photo Mode”. The camera resolution is fixed to 3.5MP with 3:2 aspect ratio.
5.5 Video Tagging
Video Tagging allows you to save a video file 30 seconds before and 60 seconds after a selected point. This eliminates
the file storage of unnecessary video content. You have to be in loop recording mode to use Video Tagging.
1. Double tap the camera button to start loop recording. Green LED will flash twice and you will hear a voice prompt,
“Video tagging ready”.
2. When you encounter a situation that requires recording, press and hold the camera button for 1 second. Green LED will
flash and you will hear a voice prompt, “Video tagging”.
3. When Video Tagging is completed, you will hear a voice prompt, “Tagging complete”.
4. Double tap the camera button during Video Tagging to stop loop recording. You will hear a voice prompt, “Video
tagging off”.
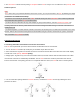
5.6 Playback
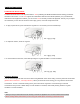
Playback videos and photos by connecting the headset to a TV (requires a micro HDMI cable sold separately).
To browse videos and photos:
1. Plug the camera into a TV/HDTV with a micro HDMI cable.
2. The TV displays previews of videos and photos stored on the micro SD card.