
Item Brochure


6
Analytical Sensitivity
The OSOM Trichomonas Rapid Test detected antigen derived from as few as 2500
organisms per mL, a concentration lower than that expected in the vaginal discharge of
most positive patients
8
. For these studies the analytical sensitivity of three representative
lots of the OSOM Trichomonas Rapid Test was determined using antigen prepared from
cultured T. vaginalis organisms.
Analytical Specicity
The OSOM
Trichomonas Rapid Test has been shown to be non-reactive with normal vaginal
ora and infectious agents (including Gardnerella vaginalis and Candida species).
Positive and negative control samples were tested against the following potential interferents
with no affect on the performance of the OSOM Trichomonas Rapid test:
Organisms
Bacteriodes merdae Candida albicans Chlamydia trachomatis
Escherichia coli Gardnerella vaginalis Tritrichomonas foetus
Neisseria gonorrhoeae Mobuluncus curtsii Monella choleraesuis
Salmonella typhimurium Shigella exneri Staphylococcus aureus
Streptococcus agalactiae
T. foetus, C. trachomatis, and C. albicans samples tested at approximately 0.5 x 10
5
. All
other samples tested at approximately 1x10
8
organisms/mL. Staphylococcus aureus in
specimens at concentrations higher than 1x10
8
organisms per mL may interfere with the
test results in negative samples. These concentrations of S. Aureus are higher than would
be expected to be present in normal patient samples
5
.
Other Substances
Condoms, with spermicide Douche (vinegar) HeLa cells
HVEC cells Human blood TYM Culture Medium
Vaginal yeast treatment (Monistat
®
brand)
Samples contaminated with preparations containing douche medicated with iodine may
interfere with negative samples (please refer to Limitations section).
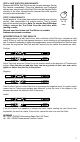
TEST PROCEDURE
When opening kit for the rst time, unscrew the cap from the Sample Buffer bottle and
replace it with the dropper top included in the kit. Discard the original Sample Buffer cap.
STEP 1: ADD SAMPLE BUFFER
Using the supplied dropper top, add 0.5 mL of Sample Buffer to
each test tube. Fill the dropper to the line indicated on the barrel
of the dropper top and expel entire contents into the tube. Note:
Add Sample Buffer to the tube before putting in the specimen
swab to prevent contaminating the Sample Buffer vial.
STEP 2: MIX SWAB IN BUFFER
Put the specimen swab into the tube. Vigorously mix the solution
by rotating the swab forcefully against the side of the tube at least
ten times (while submerged). Best results are obtained when the
specimen is vigorously mixed in the solution. Allow the swab to
soak in the Sample Buffer for one minute prior to step 3.
STEP 3: SQUEEZE LIQUID FROM SWAB
Squeeze out as much liquid as possible from the swab by
pinching the side of the exible test tube as the swab is removed.
At least 6mm of Sample Buffer solution must remain in the tube
for adequate capillary migration to occur. Discard the swab in a
suitable biohazardous waste container.
Allow to
soak for
1 min
Fill line
Handle EndAbsorbent End
Test Line
Result Window
Control Line