
Item Brochure


• If your lab requires a culture result as well as the OSOM Ultra Strep A Test result, streak the culture plate
with the swab before starting the OSOM Ultra Strep A Test procedure as the extraction reagents will
cause the specimen to become nonviable.
• Process the swab as soon as possible after collecting the specimen. If you do not perform the OSOM
Ultra Strep A test immediately, store the swabs either at room temperature or refrigerated for up to 48
hours. The swabs and the test kit must be at room temperature prior to running the test.
• Sample Transport:
• Because the performance characteristics of this product were established with the sterile rayon
swabs supplied with the kit, we recommend using these swabs to assure optimal performance.
You may purchase the kit swabs in a double swab/dry tube format as an accessory
(Sekisui Diagnostics Part #7784).
• Because the test does not require live organisms for processing, a rayon transport swab
containing Stuart’s or Amies media may also be used; however, swabs from other suppliers have
not been validated.
QUALITY CONTROL
Internal Procedural Controls
The OSOM Ultra Strep A Test provides three levels of procedural controls with each test run:
• The color of the liquid changes from pink to light yellow after the glass ampule is crushed and the
extraction reagents are mixed. This is an internal extraction reagent control. The color change means
you have mixed the extraction reagents properly. The color change also means that the reagents are
functioning properly.
• The red Control Line is an internal positive procedural control. For the Test Stick to be working properly,
capillary flow must occur. The Test Stick must absorb the proper amount of sample and the Test Stick
must be working properly for the red Control Line to appear.
• A clear background is an internal background negative procedural control. If no interfering
substances are in the specimen and the Test Stick is working properly, the background will
clear. A discernible result will be seen.
If the red Control Line does not appear the test is invalid. If the background does not clear and interferes
with the test result, the test is invalid. Call Sekisui Diagnostics Technical Service if you experience
either of these problems.
External Quality Control Testing
Each kit contains Positive and Negative Control material. The controls are for external quality control
testing. Use the Controls to test that the extraction reagents and the Test Sticks are working properly.
Also use the Controls to test that you are able to correctly perform the test procedure, including the
antigen extraction portion of the test procedure. If you choose, you may use Group A and non Group
A Streptococcus ATCC reference strains as external controls. Some commercial controls may contain
interfering additives. Therefore Sekisui Diagnostics recommends that you do not use commercial
controls with the OSOM Ultra Strep A Test.
Quality Control requirements should be established in accordance with local, state and federal
regulations or accreditation requirements. Minimally, Sekisui Diagnostics recommends that positive and
negative external controls be run with each new lot and with each new untrained operator.
QC Testing Procedure:
LIMITATIONS
As with all diagnostic assays, the results obtained by this test yield data that must be used only as an
adjunct to other information available to the physician. The following factors must be considered to
obtain reliable results:
• The OSOM Ultra Strep A Test is a qualitative test for the detection of Group A Streptococcal antigen.
This test detects both viable and non-viable Group A Streptococci, and may yield a positive result
in the absence of living organisms.
• The quality of the test depends on the quality of the sample; proper throat swab specimens must be
obtained. Negative results can occur from inadequate specimen collection or antigen level which
is below the detection limit of the test.
Positive Control
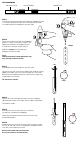
• Follow Steps 1 and 2 in the TEST PROCEDURE
section to dispense the Extraction Reagent
into the Test Tube.
• Vigorously mix the Positive Control material.
Add 1 free falling drop of the Positive Control
from the dropper bottle into the Test Tube.
• Using a clean swab, follow steps 3 – 6 in the
TEST PROCEDURE section to test the swab.
Negative Control
• Follow Steps 1 and 2 in the TEST PROCEDURE
section to dispense the Extraction Reagent
into the Test Tube.
• Vigorously mix the Negative Control material.
Add 1 free falling drop of the Negative Control
from the dropper bottle into the Test Tube.
• Using a clean swab, follow steps 3 – 6 in the
TEST PROCEDURE section to test the swab.
• If no glass ampule is inside the Extraction Reagent Bottle or the glass ampule appears to be broken
before use (reagent is colorless or yellow), discard and use another Extraction Reagent Bottle.
• The Positive and Negative Controls contain sodium azide which may react with lead or copper
plumbing to form potentially explosive metal azide. For sites permitted to dispose of material down a
sink: large quantities of water must be used to flush discarded control material down a sink.
• Do not interchange or mix components from different kit lots
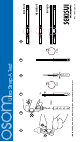
SPECIMEN COLLECTION AND PREPARATION
• Collect specimens with a sterile swab from the tonsils and/or the back of the throat
(2)
taking care to
avoid the teeth, gums, tongue or cheek surfaces.
• Do not use swabs with cotton tips, wooden shafts or calcium alginate swabs.
• Do not use a collection system that contains charcoal or semisolid transport media.