
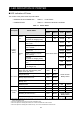
User Manual


15
1 POWER Switch
The POWER Switch turns the power on or off.
The POWER LED lights when turning on the
power. To turn off the power, hold down the
switch for longer than 1 second.
2 FEED Switch
The FEED Switch operates paper feed. When
holding down the switch for a few seconds, the
printer feeds the thermal paper continuously for
the period of held.
In the mark mode, form feed (paper feed until
mark detection) is performed by pressing this
switch once.
3 ERROR LED
The ERROR LED lights when something is
wrong with the printer. For more details, see "7
LED INDICATION OF PRINTER".
4 POWER LED
The POWER LED lights when turning on the
power. For more details, see "7 LED
INDICATION OF PRINTER".
5 WIRELESS LED
The WIRELESS LED shows the connection
status of wireless communication (Bluetooth /
Wireless LAN). For more details, see "7 LED
INDICATION OF PRINTER".
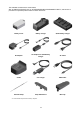
6 Power connector
The connector is for charging with AC adapter or
car charger.
7 USB connector
The connector is for using USB interface.
8 Paper cover open button
The button is for opening the paper cover.
9 Paper cover
The platen is released from the thermal paper
when opening this cover. Open this cover when
replacing the thermal paper or cleaning the
thermal head.
10 Paper outlet
Thermal paper is ejected from here. Two paper
cutters are installed: one is on the printer side,
and the other is on the paper cover side (10a,
10b).
Be careful not to touch these paper cutters.
11 Paper holder
The paper holder holds the thermal paper.
12 Thermal head
The thermal head prints data on the thermal
paper. NEVER touch the thermal head with
hands immediately after printing because it may
get hot.
13 Lock arm
The arm moves when opening and closing the
paper cover. DO NOT touch because the tip is
sharp.
14 Platen
The platen brings the thermal paper into contact
with the thermal head. The platen rotates to feed
the paper.
15 Paper sensor
The sensor detects thermal paper presence or
mark.
16 N mark (Only for MP-B30-B02JK1)
This mark indicates the position of the NFC tag.
By bringing an NFC-enabled terminal to this mark
closer, it is easy to connect the terminal and the
printer.
17 Battery pack compartment
The battery pack is installed here.
18 Belt clip installation hole
The belt clip or shoulder strap is installed here for
carrying the printer.
19 Charging terminal
The terminal is for charging the battery pack by
using the optional cradle. DO NOT touch this
charging terminal.