
User's Manual
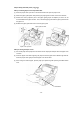

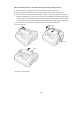

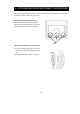
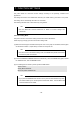
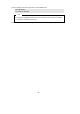
Table Of Contents
- COVER
- COPYRIGHT
- INTRODUCTION
- SAFETY PRECAUTIONS
- OPERATING PRECAUTIONS
- 1. PREPARATION
- 2. NAMES OF PARTS
- 3. POWER CONNECTING
- 4. PAPER SETUP
- 5. ATTACHING AND DETACHING THE BELT CLIP AND STRAP
- 6. TEST PRINTING
- 7. FUNCTION SETTINGS
- 8. CONNECTING TO THE HOST COMPUTER
- 9. CHARGING THE BATTERY PACK
- 10. THERMAL HEAD/PLATEN ROLLER MAINTENANCE
- 11. TROUBLESHOOTING
- 12. SPECIFICATIONS
- 13. OPTIONAL UNITS AND CONSUMABLES
- REAR COVER

-
31
-
5. ATTACHING AND DETACHING THE BELT CLIP AND STRAP
The belt clip is provided with the grooves to attach the shoulder belt. When using the shoulder belt, it
is necessary to attach the belt clip to the printer.
■ Attaching and Detaching the Belt Clip
Attach the belt clip using screws (3 positions).
The belt clip is already attached to the printer
prior to shipping for the model with a belt clip.
■ Attaching and Detaching the Shoulder Belt
(1) Put the shoulder belt through the grooves
located on the left and right sides of the belt
clip.
(2) Put the shoulder belt as shown in the figure.
Screws