
User's Manual
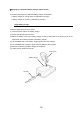
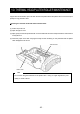


Table Of Contents
- COVER
- COPY RIGHT
- INTRODUCTION
- SAFETY PRECAUTIONS
- OPERATING PRECAUTIONS
- 1 PREPARATION
- 2 NAMES OF PARTS
- 3 POWER CONNECTING
- 4 PAPER SETUP
- 5 ATTACHING AND DETACHING THE BELT CLIP AND STRAP
- 6 TEST PRINTING
- 7 FUNCTION SETTINGS
- 8 CONNECTING TO THE HOST COMPUTER
- 9 CHARGING THE BATTERY PACK
- 10 THERMAL HEAD/PLATEN ROLLER MAINTENANCE
- 11 TROUBLESHOOTING
- 12 SPECIFICATIONS
- 13 OPTIONAL UNITS AND CONSUMABLES
- REAR COVER

- 39 -
QCharging by a Dedicated Battery Charger (Optional Unit)
The following two types of a dedicated battery charger are available:
• Battery charger for a single pack. (a single-battery charger)
• Battery charger for 5 packs. (a multi-battery charger)
Single-battery charger
Follow the steps shown below to charge:
(1) Connect the AC cable to the battery charger.
(2) Put the AC cable plug into the inlet.
(3) Mount the battery pack on the battery charger so that the electrodes of the battery pack can be
aligned with the metallic terminals of the battery charger.
(4) The CHARGE lamp on the battery charger lights red to start charging.
(5) The CHARGE lamp changes to green when the battery is fully charged.
(6) Remove the battery pack after charging is completed.
(7) Unplug the AC cable from the inlet.
AC cable
Battery charger
Battery pack