
User's Manual
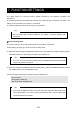

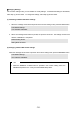

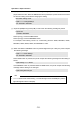
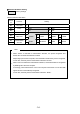
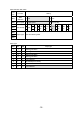
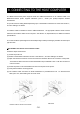
Table Of Contents
- COVER
- COPY RIGHT
- INTRODUCTION
- SAFETY PRECAUTIONS
- OPERATING PRECAUTIONS
- 1 PREPARATION
- 2 NAMES OF PARTS
- 3 POWER CONNECTING
- 4 PAPER SETUP
- 5 ATTACHING AND DETACHING THE BELT CLIP AND STRAP
- 6 TEST PRINTING
- 7 FUNCTION SETTINGS
- 8 CONNECTING TO THE HOST COMPUTER
- 9 CHARGING THE BATTERY PACK
- 10 THERMAL HEAD/PLATEN ROLLER MAINTENANCE
- 11 TROUBLESHOOTING
- 12 SPECIFICATIONS
- 13 OPTIONAL UNITS AND CONSUMABLES
- REAR COVER

- 34 -
QSoftware DIP Switch Setting
: Factory settings
Interface selection DIP switch
Posi-ti
on
Function Setting
Bit7 Not used 1
Bit6 1 Even 0 Odd
Bit5
Parity
1 No 0 Yes
Bit4 Flow control 1 Hardware 0 Xon-Xoff
Bit3 1 1 0 0
Bit2
Baud rate
1
115200
0
57600
1
38400
0
19200
Bit1 1 1 0 0
Bit0
Transmission
selection
1
AUTO
0
Bluetooth
1
USB
0
Serial
Hints
•
When “AUTO” is selected for transmission selection, the printer recognizes and
selects the connected transmission method.
Depending upon the host computer, the transmission method may not be recognized.
In this case, manually set the transmission method to be used.
•
When “AUTO” is selected for transmission selection, serial transmission is recognized
by DSR signal of the host computer.
Accordingly, serial transmission of the host computer which does not use the DSR
signal cannot be automatically recognized.
In this case, manually set the transmission method to “Serial.”