
User's Manual


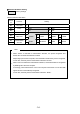
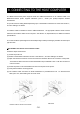
Table Of Contents
- COVER
- COPY RIGHT
- INTRODUCTION
- SAFETY PRECAUTIONS
- OPERATING PRECAUTIONS
- 1 PREPARATION
- 2 NAMES OF PARTS
- 3 POWER CONNECTING
- 4 PAPER SETUP
- 5 ATTACHING AND DETACHING THE BELT CLIP AND STRAP
- 6 TEST PRINTING
- 7 FUNCTION SETTINGS
- 8 CONNECTING TO THE HOST COMPUTER
- 9 CHARGING THE BATTERY PACK
- 10 THERMAL HEAD/PLATEN ROLLER MAINTENANCE
- 11 TROUBLESHOOTING
- 12 SPECIFICATIONS
- 13 OPTIONAL UNITS AND CONSUMABLES
- REAR COVER

- 28 -
7. FUNCTION SETTINGS
The printer allows for numerous function settings according to the operating conditions and
applications.
The settings are saved in the software DIP switches (non-volatile memory) mounted on the printer. The
setting can be controlled by the buttons or commands.
The following describes how to set functions by using buttons.
Hint
•
See the
MPU-L465
Technical Reference
for details on function settings with
commands.
QFunction Setting Mode
The printer must be in the function setting mode to set functions with buttons.
Follow steps (1) through (3) to enter the function setting mode:
(1) Make sure that the paper is loaded and the printer is off. If the paper is not loaded, load the paper as
described in Section 4, Paper Setup, and then turn the printer off.
Hint
•
If an error occurs in the function setting mode, the POWER lamp blinks several times
and then the power is turned off.
(2) Press the POWER and REPRINT buttons sumultaneously. When the POWER lamp lights, release
the POWER button, then the REPRINT button.
(3) If the message shown below is printed, press the FEED button.
Select Function
Setting Mode: FEED SW
HEX Dump Mode: REPRINT SW
Hint
•
If you press the REPRINT button at this time, the printer enters the HEX Dump mode.
This mode enables you to see the printer's transmission status. See the
MPU-L465
Technical Reference
for details.