
User's Manual


69
below a defined threshold. The squelch control on the receiver sets this threshold.
will not only cut out noise but mute quiet audio signals as well because the squelch
responds to the detected voltage and cannot distinguish between wanted signal and
noise. Besides that, a too high squelch threshold also decreases the usable range.
In the squelch control mode(Fig 2), use the UP/DOWN key to select squelch threshold.
The job of a squelch circuit is to reduce audible noise. It eliminates noise during
pauses in the audio signal by muting the receiver every time the audio level drops
Use the squelch control with care! If the squelch threshold is too high, the squelch
In order to achieve easy operation, the squelch threshold is divided into10 levels, please
refer to table.
- Squelch Control
press the MENU key once again to stop.
Note: When channel 1 and channel 2 are used at the same time, the frequency of channel 1 can
not be the same as that of channel 2 in case frequencies interfere.
XLR type connector outputs the balanced AF signal. AF OUT BALANCED 1 is for the output
signal from channel 1. AF OUT BALANCED 2 is for the output signal from channel 2.
AF OUT Balanced:
3
TS type jack outputs the unbalanced AF signal.
AF OUT unbalanced:
4
Connect the unit with the adapter for DC power supply.
DC input
5
LOW MID HI key
6
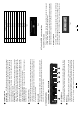
3.2 UL-H series, Handheld Transmitter
UL-83H
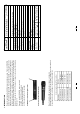
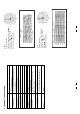
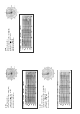
Massive Front Grill
Extremely rugged spring steel mesh grill to protect the capsule underneath in tough
stage or live performance.
1
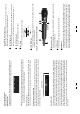
LCD Display
Generally, the LCD displays the current operation status.
CH/ON Key
Keep pressing this key for a few seconds, the unit will be powered on or off. After it
is switched on, touch this key slightly to select the parameter which you want to edit,
such as the preset channel, PL (RF power level), and Lock/Unlock; In this mode, if
there is no further operation in the next few seconds, it will return to the main menu,
and the LCD displays again the current preset channel, as well as the battery status.
2
3
3
7
6
1
2
4
5
- Select Channel
- Turn on the transmitter
- Turn on the receiver
Press the MENU button, channel 1 is selected and the corresponding LED lights up. Press
the MENU button again, channel 2 is selected and the corresponding LED lights up.
- Select Frequency
After the first touch the MENU key, use the UP key to scan the frequency presets from 0 to 99
and the DOWN key from 99 to 0. When the right channel is searched, all the RF LEDs light up.
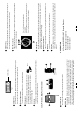
The volume control knob sets the audio signal level outputted through the balanced and unbalanced
output jacks on the rear panel. Turn the knob clockwise fully for the max volume, and Turn the knob
counterclockwise fully for the min volume. The volume knob on the left is for channel 1. The volume
knob on the right is for channel 2.
volume knob
- Audio Output Level Adjusting
500mA
Note: When you use CH1 and CH2 simultaneously, the frequency bands of both channels
may be interference with each other. Please change another frequency band of
any channel to avoid the problem if that situation happens.
This key controls the AF OUT Balanced output level. Set the key to LOW position for -12dB
output, MID for -6dB, HIGH for 0dB.