
User's Manual

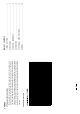

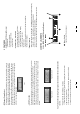

3.1 THE REAR PANEL
5
10
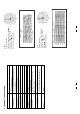
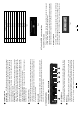
LED INDICATION
2
-AF INDICATION AF LEDs indicate the incoming status of the audio signal.
When "0" LED lights up, the incoming signal is optimized at unity gain. When the
"+6" LED lights up, the signal is overloaded. When only the "-20" LED lights up, the
incoming signal is just at 10% of the optimum states. If no LED lights up, there is little
even no signal being received.
-
RF INDICATION AF LEDs indicate the incoming frequency status of the radio
signal. When all the LEDs light up, the incoming signal is fully modulated and at the
optimum status. When only the 10% lights up, the incoming signal is just at 10% of the
optimum status. If no LED lights up, there is little or no signal being received.
NOTE: UL-82DR has two channels, channel 1 and channel 2. The LEDs of channel
1are on the left and the LEDs of channel 2 are on the right.
-FREQUENCY INDICATION It displays the number from 0 to 99. Each number
represents one frequency
This knob sets the audio signal level outputted through the balanced and unbalanced
output jacks on the rear panel. Turn the knob clockwise fully for the max volume, and
and turn the knob counterclockwise fully for the min volume. Each VOLUME knobs is
for one separated microphone.
VOLUME CONTROL
3
The antennas can be fully rotated for optimum placement. Generally, antenna A
and antenna B should be placed vertically for best receiving effect. Fold both antennas
inward for the convenience of transporting.
Antenna A/B
4
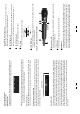
4.2 For the UL-H/P/G series transmitters
4.2.1 Edit The Parameter
Press and hold the CH/ON for a few seconds, then the transmitter is powered
on. Now the LCD displays the operation voltage status.
After the transmitter is switched on, touch the CH/ON key slightly to select the parameter
which you want to edit, such as the preset channel, PL(RF power level), and Lock/Unlock.
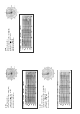
- Frequency Select
This system offers a lot of frequencies to choose in order to avoid interference.
You can select right frequency via the SELECT key in menu mode. Fig 3 is of
preset channel select. 10 10=100 different types each frequency of frequencies.
Fig 3
Fig 2
35 4
1
2
6
3.1.1 THE REAR PANEL OF UL-82DR
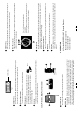
Use the UP key to scan the frequency presets from 0 to 99 and the DOWN key from 99 to 0.
Keep pressing these buttons for a few seconds, the channel selecting speed will be accelerated.
UP/DOWN key
1
Press the MENU key to switch channel 1 and channel 2. When channel 1 is selected, use the
UP/DOWN key to select the right frequency. Press the MENU key again, it switched to channel 2.
The frequency setting mode of channel 2 is the same as that of channel 1. Keep pressing the
MENU key for 1.5 seconds, it comes to the auto SQ mode. When the right frequency is selected,
MENU key
2
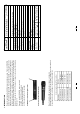
Table
No.
squelch threshold
0
1
2
3
4
5
6
7
8
9
95.0dB
91.7dB
88.3dB
85.0dB
81.7dB
78.3dB
75.0dB
71.7dB
68.3dB
65.0dB