
User manual


Steadiseg User Manual Chris Fawcett 2013/06
11 SEGWAY CONVERSION
!
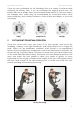
The Steadiseg conversion kit includes everything required to convert a Segway x2
Turf, or a Segway i2. We advise you to buy your Segway locally. Contact us for
dealers in your area.
!
For general use, we recommend the Segway x2 Turf, but if you intend to use the
Steadiseg exclusively indoors—on set or in cramped locations—you should
purchase a Segway i2. Most customers purchase the x2 Turf, and a set of i2 wheels.
Wheels and fenders are interchangeable between the 2 models.
!
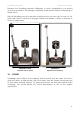
The conversion kit comes with fenders for both models, plus a hard-mount
extension, as standard. The hard-mount fender comes as right-sided (regular) and
left-sided (goofy). Rental houses can configure their Steadiseg with 2 hard-mount
fenders, so operating side may be switched quickly.
!
The Steadiseg modification does not support the standard x2 wheels, because
their tread is too rugged for Steadicam use. If you have a standard x2, you must
purchase a set of either x2 Turf, or i2 wheels, or both.
!
Converting a Segway to a Steadiseg takes between 30-90 minutes, depending on
practice. If you prefer to use rental Segways, Steadisegs can be converted back
to regular Segways at any time. See the Installation Manual supplied with the
conversion kit for details.
!
!
12 TOOLKIT
!
Recommended:
!
4 mm allen key
5 mm allen key
6 mm allen key
10 mm allen key
13 mm tire wrench, or socket wrench with extender for reaching wheel nuts.
7/32” allen key (for re-orienting Klassen vehicle mount)
Tire-pressure gauge
Foot-pump
!
Optional:
!
Torx 27 (for switching hard-mount fender sides—see section 6.4).
!
Important Note: Fully-charged batteries will deteriorate to the point of no return
in one month, if not connected to an electrical outlet. When it’s not in use, keep
your Segway plugged in.
! 16