
User manual


Steadiseg User Manual Chris Fawcett 2013/06
There are too many combinations of hard-mount positions, and of types of arms
and socket blocks to detail, but the solution lies in tweaking the following variables.
!
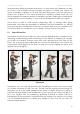
1/ If the arm block contains a stopper to limit its outward rotation, remove it. If you
are a front-mount vest user, leave it off, the arm works better without it.
2/ Rotate the hard-mount block to a different angle.
3/ Move the hard-mount position forwards or backwards.
4/ Use the hard-mount block fore–aft adjustments to bias the arm to fall outwards.
5/ Use a small shock-cord to encourage the arm to bend outwards.
6/ Invert both the hard-mount block and the arm block, and start again.
!
6.3.2 Excessive Cantilever
!
Most socket blocks are designed for use with front-mount vests. When the distance
between the centre of gravity of the rig and the attachment point of the arm
block is increased—as with a back-mount vest—blocks are subjected to forces
beyond their design specifications. This has led to failure of, specifically, titanium
blocks. It is recommended that steel blocks are used, and that the lineal distance
between the centre of gravity of a heavy rig and the block is minimized.
!
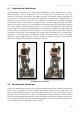
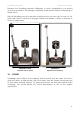
6.3.3 Restoring Lost Arm Reach
!
!
!
Restoring Lost Arm Reach
!
As mentioned, hard-mounting limits the arm’s reach to some extent. Certain types
of (low-mode) F-bracket may be used to restore some of this reach. The F-bracket
can be used in its usual configuration, or preferably, the yoke mounting pin may
be inverted, so the yoke remains in its usual orientation.
!
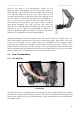
6.4 Switching Hard-Mount Sides
!
The hard-mount fender is configured for either regular or goofy operation. For the
occasional shot, fender sides can be switched; but because fore and aft fender
profiles are different, collision protection is diminished, and you cannot descend
drops. If you switch sides often, you require two hard-mount fenders.!
! 12