steadiseg ! USER MANUAL !
STEADISEG™ (patent pending) USER MANUAL JUNE 2013 ! CHRIS FAWCETT ! http://steadiseg.com/ http://steadivision.com/ ! 1 ABOUT THE STEADISEG 1 FOREWORD 2 SAFETY 2 4 4.1 4.2 4.3 RIDING TECHNIQUE Engage the Machine The Spiral Terrain 3 4 4 6 5 5.1 SOFT-MOUNT STEADICAM OPERATION Steps Off and On 7 8 6 6.1 6.2 6.3 6.
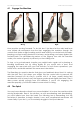
Steadiseg User Manual 1 ! Chris Fawcett 2013/06 ABOUT THE STEADISEG The Steadicam® Segway® is instantly available to create anything from a subtle perspective change to a dramatic traveling shot. The Steadiseg modification replaces the conventional Segway handlebars with a control-stick module between the knees, freeing the rider’s arms to operate camera stabilization systems. The addition of the hard-mount assembly eliminates carrying strain, permitting bulky camera setups (IMAX, 3D rigs, etc.
Steadiseg User Manual 2 ! Chris Fawcett 2013/06 FOREWORD The material presented here is informational, and is not intended as guidance or advice. It is designed, instead, to get you off to a start from which your personal experience will broaden our understanding of the Steadiseg’s capabilities—and of its limitations. Join the mailing list at info@steadiseg.com to contribute your ideas, and to keep up to date with revisions.
Steadiseg User Manual 4 ! Chris Fawcett 2013/06 RIDING TECHNIQUE Before attempting to shoot Steadicam using the Steadiseg, master the riding technique. There is no need to practice first with the conventional handlebar. ! Crank the control-stick module all the way to the front on its front spindle, and mount the device as recommended in the Segway Manual. Take care to avoid the control stick as you step on.
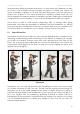
Steadiseg User Manual 4.1 ! ! ! Chris Fawcett 2013/06 Engage the Machine ! Wrong Right Now practice moving forwards. To do this, don’t just bend at the waist and lean over. Initiate all movements from the hips, engaging the machine through the control stick. Make a slight kneeling motion and incline your whole body forwards, keeping your feet evenly planted on the base, and pushing your knees against the forward pads.
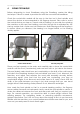
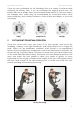
Steadiseg User Manual ! ! Chris Fawcett 2013/06 ! Rotating out of Balance Rotating In Balance First practice turning 360s: bend your knees slightly, and look over your left shoulder. This will turn your entire body—from the knees up—45 degrees to the machine. The control stick will rotate on its swivel to accommodate this movement (if the swivel centering feels too light or too heavy for your preference, dismount and adjust it to taste). Lean neither left nor right.
Steadiseg User Manual Chris Fawcett 2013/06 Now the forward spiral: turn anti-clockwise again, by looking over your left shoulder, and lifting the heel of your left foot while inclining slightly forwards. The Steadiseg will spiral slowly outwards from the spot. Inclining forwards at this 45 degree angle moves your centre of gravity to the left, so you are leaning into the turn, and you are in balance. Practice this to clockwise.
Steadiseg User Manual Chris Fawcett 2013/06 Once you are comfortable on the Steadiseg, ride on a variety of surfaces while watching the InfoKey face. If you do something the Segway doesn’t like, the InfoKey will show a straight face, and the speed limiter will kick in. The next stage is the unhappy face, which may be accompanied by control-stick shake, some serious bleeping, and a Safety Shutdown. Learn its likes and dislikes, so you both stay happy.
Steadiseg User Manual Chris Fawcett 2013/06 Using the same riding techniques as before, you now have the Steadicam to help you. Push it out to initiate moving forwards, but follow it to keep your masses, as much as possible, together. If you feel the base tilting back, cut your speed and review your situation. If you were operating at maximum speed, back off. You should operate the Segway below its maximum speeds. Tripping the speed limiter compromises your shot anyway.
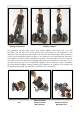
Steadiseg User Manual Chris Fawcett 2013/06 ! ! ! Stepping On Stepping on is trickier though perhaps easier to manage without an assistant. Stepping on from the rear is straightforward. Backing on from the front is onerous, though using an apple box the same height as the base can help. Again, avoid the control stick.
Steadiseg User Manual 6.1 ! Chris Fawcett 2013/06 Adjusting the Hard-Mount The Steadiseg hard-mount is strong and adaptable, and is designed to work in either regular or goofy orientation. You can adjust the assembly such that the block is in a variety of positions, but unless you are shooting a simple tracking shot over a smooth surface, you must leave leaning room between yourself and it. If the block is too close to your hip, you cannot turn effectively towards the hardmount side.
Steadiseg User Manual Chris Fawcett 2013/06 Now fix the arm to the hard-mount, switch on the Segway, and—maintaining control of the arm—step on. Ride around to get used to the arm range before having your assistant pass you the rig. You can’t bow as you would to undock from a stand, as this is the Segway’s cue to race off like a wild thing. The rig must be passed up to you, or you must push the arm down to meet the rig.
Steadiseg User Manual Chris Fawcett 2013/06 There are too many combinations of hard-mount positions, and of types of arms and socket blocks to detail, but the solution lies in tweaking the following variables. ! 1/ If the arm block contains a stopper to limit its outward rotation, remove it. If you are a front-mount vest user, leave it off, the arm works better without it. 2/ Rotate the hard-mount block to a different angle. 3/ Move the hard-mount position forwards or backwards.
Steadiseg User Manual 7 Chris Fawcett 2013/06 RIDER DETECT ERROR ! If 2 or more of the 4 Rider Detect Sensors on the Segway base are not depressed, the InfoKey shows a straight-face with these shoe symbols—and the speed limiter kicks in suddenly. Riding solo, you experience an immediate deceleration as the base tilts back. The effect this has on a Steadicam is to throw it backwards.
Steadiseg User Manual Chris Fawcett 2013/06 shout stop! if s/he sees anything untoward about to happen. Try not to deviate from the plan—you might feel confident, but others may not share your confidence. Never approach anyone you are not in eye contact with, unless you have a well-rehearsed arrangement with a reliable person in an unstressed situation. Be predictable. Be safe. If in doubt, just stop. Don’t take risks, and refuse to be talked into talking risks. You are the expert.
Steadiseg User Manual Chris Fawcett 2013/06 Because the Steadiseg behaves differently in each configuration, you should accustom yourself to the divergent handling characteristics before attempting to make a shot. ! Flip the Steadiseg onto the opposite wheel from the one you wish to work on. For each side, allow 5 minutes to change wheels and fenders. It takes 10 minutes to switch configurations.
Steadiseg User Manual 11 ! Chris Fawcett 2013/06 SEGWAY CONVERSION The Steadiseg conversion kit includes everything required to convert a Segway x2 Turf, or a Segway i2. We advise you to buy your Segway locally. Contact us for dealers in your area. ! For general use, we recommend the Segway x2 Turf, but if you intend to use the Steadiseg exclusively indoors—on set or in cramped locations—you should purchase a Segway i2. Most customers purchase the x2 Turf, and a set of i2 wheels.