Segway® HT reference manual > > > > welcome to the evolution of personal mobility.
about this manual Congratulations on the purchase of your new Segway Human Transporter (HT)! You are about to experience human mobility like you never have before. This manual describes the technology and engineering incorporated into your Segway HT. It also includes information on battery charging, maintenance, and troubleshooting. The Reference Manual does not contain instructions on how to ride the Segway HT.
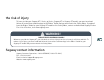
the risk of injury To learn to ride your Segway HT i Series, p Series, Segway XT or Segway GT model, you must read and follow all instructions and warnings in the Riders’ Guide and you must watch the Safety Video. If you don’t have the Riders’ Guide for your Segway HT model or the Safety Video, contact an Authorized Segway Dealer. For a list of Dealers, visit www.segway.com.
icon legend WARNING! WARNING indicates a potentially hazardous situation that, if not avoided, could result in serious injury or death. notes Look for this icon for important information. troubleshooting Look for this icon for guidance in troubleshooting problems with your Segway HT. record your serial number and key code 4 To order replacement Keys, you must have both the Serial Number of your Segway HT, and the Key Code.
your Segway HT ................................................................. 6 Segway HT specifications................................................... 7 chapter 1: how the Segway HT works............................... 12 chapter 2: helpful hints .................................................... 19 chapter 3: battery packs .................................................. 22 chapter 4: troubleshooting and display icons................... 29 chapter 5: service ....................................
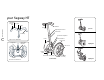
your Segway HT Mode Button Steering Grip Key Port Display Handlebar your Segway HT Handlebar Trim 6 Height Adjustment Collar p Series Control Shaft Fixed Grip Control Shaft Clamp Bolt Fender Control Shaft Base Top View of Handlebar Charge Port Splashguard Charge Port Indicators Segway XT Wheel Insert Parking Stand Front Trim Platform Battery Packs Mat (i180 shown) Back View of Platform Tire/Wheel Assembly Segway GT
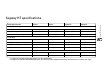
Model Specifications p Series i Series Segway XT Segway GT max. payload (rider plus all cargo): 210 lbs (96 kg) 260 lbs (118 kg) 260 lbs (118 kg) 260 lbs (118 kg) min. rider weight: 100 lbs (45 kg) 100 lbs (45 kg) 100 lbs (45 kg) 100 lbs (45 kg) max. handlebar cargo weight: 10 lbs (4.5 kg) 10 lbs (4.5 kg) 10 lbs (4.5 kg) 10 lbs (4.5 kg) max. speed: 10 mph (16 km/h) 12.5 mph (20 km/h) 12.5 mph (20 km/h) 12.
p Series i Series Segway XT Segway GT machine weight without battery packs: 55 lbs (25 kg) 68 lbs (29 kg) 82 lbs (37 kg) 74 lbs (33.5 kg) Segway HT specifications Model Specifications (Continued) battery pack weight: See Battery Pack Specifications on page 23. ground clearance (unloaded)- NiMH: 3.0 in (7.6 cm) 4.0 in (10.2 cm) NiMH not available NiMH not available ground clearance (unloaded)- Li-ion: Li-ion not available 3.0 in (7.6 cm) 4.5 in (11.4 cm) 3.0 in (7.
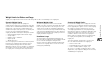
Weight Limits for Riders and Cargo Dynamic Weight Limits Minimum Weight Limit Structural Weight Limits To keep the Segway HT and rider upright, the Segway HT must always have enough power to be able to turn its wheels forward and backward. Exceeding the weight limits, especially when combined with other variables that require more power (see list below), will increase your risk of falling or damaging the Segway HT.
Maximizing Range Only experienced riders riding in optimum conditions will reach the maximum range distances stated on page 7. The range of your Segway HT is affected by many variables, including: Segway HT specifications > 10 > Terrain: Riding on smooth, flat terrain improves range; riding on hilly terrain and unpaved surfaces reduces range. For example, the Segway GT’s estimated range on a golf course is 8 to 10 miles (13 to 16 km); on pavement, the estimated range is 16 to 24 miles (26 to 39 km).
Model Descriptions i Series The i Series model is optimized for indoor/outdoor use in a wide variety of environments. Weight limits, range and top speed are higher than on the p Series model. The i Series may use either two NiMH Battery Packs or two Li-ion Battery Packs. Older i Series models, originally equipped with NiMH Battery Packs, require a software upgrade to switch to Li-ion Battery Packs. p Series The p Series model is optimized for indoor/outdoor use in densely populated environments.
chapter 1: how the Segway HT works how the Segway HT works Redundant Subsystems 12 The Segway HT works like the human body. If you lean forward, you take a step forward to keep your balance. If you lean back, you step back. Substitute wheels for feet, and you have an empowered pedestrian on a Segway HT. The Segway HT uses technology called dynamic stabilization.
how the Segway HT works > Controller Boards > Motors The two Controller Boards receive input from the gyroscopes and other sensors, and from the Handlebar Electronics. They also monitor battery condition. The Controller Boards send commands to the Motors. The Controller Boards are interchangeable.
how the Segway HT works 14 > Battery Packs > Balance Sensor Assembly > Handlebar Electronics The two Battery Packs are sealed units that require no maintenance besides proper charging and storage. Either Battery Pack can be installed in the front or back of the Platform. Both Battery Packs must be of the same chemistry (for example, you cannot mix one NiMH Battery Pack with one Li-ion Battery Pack). Li-ion Battery Packs are larger than NiMH Battery Packs.
Read and follow all the instructions in the Riders’ Guide and watch the Safety Video for important safety information about Speed Limiter, Stick Shake and Safety Shutdown. When the Segway HT reduces performance, the Display will show the following: Display Icon Speed Limiter The Segway HT will push its Handlebar back to slow the rider down.
Stick Shake Warning how the Segway HT works One of the ways the Segway HT notifies you that you are at risk of falling is by shaking the Handlebar and making growling noises. This is called the Stick Shake Warning. The Stick Shake Warning will occur if you ride backward too fast or if you demand too much power from the Segway HT, such as by riding on a steep slope, on rough terrain, against an obstacle or by accelerating or decelerating abruptly.
pending empty battery condition even though the Battery Packs were recently charged. Whenever you see the pending empty battery condition icon in the Display, you should come to a controlled stop and safely step off of the Segway HT prior to commencement of the Safety Shutdown.
Rider Detection how the Segway HT works The Segway HT Platform contains four Rider Detect sensors (beneath the Mat), which detect the presence or absence of a rider while the Segway HT is powered on. 18 Mode Button Make sure to press four When a rider (weighing 100 lb./45 kg. or more) is aboard with feet properly positioned on the Platform, all four Rider Detect sensors are depressed, and allow the Segway HT to operate normally in Balance Mode.
chapter 2: helpful hints Before each ride, check to make sure the Tire/Wheel Assembly does not wobble and both Wheel Nuts are tight. Grasp the Tire/Wheel Assembly and attempt to move it side-to-side to check for Wheel wobble. The Tire/Wheel Assembly should not move laterally. If you detect Wheel wobble, check the Wheel Nut and tighten if necessary. See page 40 for additional information regarding service procedures for the Tire/Wheel Assembly.
helpful hints 20 Lifting and Loading Watch Your Fingers Use safe and appropriate loading and lifting techniques. Make sure the Segway HT is powered off prior to lifting. Segway recommends that two people work together to lift the Segway HT. Each person should place one hand on the Control Shaft (below the Height Adjustment Collar). Each person should place the other hand under the Platform or, with the Segway XT, use the Lifting Handles on the Fender Frames. Lift with your legs, not your back.
Using the Parking Stand (i Series only) To deploy the Parking Stand: Reminders: Although your Segway HT is versatile, you should not attempt to tow or push anything with it. If you try to tow a trailer or other item, you may not be able to stop in a safe manner, turn effectively, or handle various terrain features. 1. Make sure the power is off. 2. Tilt the Segway HT back toward you. 3. Turn the lever at the right front corner of the Platform to the left until it is perpendicular to the Fender. 4.
chapter 3: battery packs Safety Guidelines battery packs Follow the instructions in this manual carefully for your own safety, the safety of others, and to maximize battery life and performance. 22 Related Documents The information in this chapter provides a basic understanding of Segway HT Battery Packs. For more advanced information, and for more experienced riders, read the complementary document, “Battery Care Booklet” posted at www.segway.com/support/docs.
Battery Pack Specifications Segway HT Battery Pack Type NiMH- 60 Cell (i Series) NiMH- 48 Cell (p Series) Li-ion - 92 Cell Charging Time Important! 12 hours. As soon as possible and before your first use, charge the Battery Packs for at least 12 hours.
battery packs To Charge Your Battery Packs 24 In order to maintain the best performance from your Segway HT Battery Packs, fully charge your Battery Packs for at least twelve hours, once a month, or once every twelve hours of operation— whichever comes first. Make sure that your Battery Packs are within the specified charging temperature range when charging.
Charging Indicators "R" rear The left charging indicator corresponds to the front Battery Pack, the right to the rear Battery Pack. They are marked “F” and “R,” respectively. The charging indicators provide independent information regarding whether each Battery Pack is charging. Stage Initial Test Fast Charge When a green LED is on, the respective Battery Pack is receiving a pulse of current.
battery packs Charging Failures If a failure is detected during charging, all charging will stop. Depending on the nature of the failure, a solid red charging indicator light will be displayed or the charging indicator will be off. (For Li-ion Battery Packs, the charging indicators will be unlit for approximately 5 minutes after the Cell Balancing stage. See page 25.
In certain situations, such as riding uphill, the battery charge level display may temporarily drop because you are drawing heavily on the Battery Packs. The battery charge level display should return to the actual charge level once you return to level ground and reduce the load on the Battery Packs.
Temperature Affects Performance Charging in Hot or Cold Temperatures The Battery Packs will generally be significantly warmer than the air temperature due to heating that occurs as electricity is delivered from them (while riding) and to them (while charging.) Your Battery Packs should be within the recommended charging temperature range prior to and during charging (see page 23).
Before contacting an Authorized Segway Dealer, you may attempt to troubleshoot certain problems yourself. Refer to the Display Icons on the Handlebar (beginning onpage 32) for information about the operational mode of the Segway HT (Power Assist Mode or Balance Mode), the battery charge level, and fault conditions. If following these steps and referring to the Display Icon information does not solve the problem, contact an Authorized Segway Dealer. For a list of Dealers, visit www.segway.com.
troubleshooting and display icons Problem 30 The Tire/Wheel Assembly is loose and wobbles. 1. Tighten the Wheel Nut (see page 40). If the Tire/Wheel Assembly is still loose or wobbles, proceed to step 2. 2. Remove, clean, and reseat the Tire/Wheel Assembly (see page 40). Problem Segway HT pulls to the left or right when riding. 1. Check to make sure tire inflation pressure is equal in both tires. 2. Check to make sure the Steering Grip returns to center.
Safety Shutdown while entering or leaving a store, library, or other building. Theft detection systems may interfere with Segway HT operation. Many libraries, retail stores, and other buildings use theft detection systems to detect protected items as they enter and exit a building. These systems are usually situated at the building entrances and exits so that patrons must pass through on their way in and out. These systems may not always be visible.
Display Messages troubleshooting and display icons The Display on the Handlebar indicates the following information: 32 > The operational mode of the Segway HT (Power Assist Mode or Balance Mode) > The battery charge level > Whether a fault is detected in any system It is important to understand all the icon messages that may appear in the Display. Display Icon (red) Display Colors Green (and only green) means you may step on and ride in Balance Mode. Orange indicates Power Assist Mode.
Startup Error Conditions (Continued) User Response Right front rider detect sensor is on at startup. Make sure your foot is not on the Platform when powering on. Check the Mat to ensure it is clear of foreign objects and not sticking to the Platform. If necessary, remove the Mat (see page 41) and inspect beneath it. (red) Left front rider detect sensor is on at startup. (red) Left rear rider detect sensor is on at startup. Display Icon (red) Mode Button is depressed at startup.
troubleshooting and display icons Normal Operation Reduced Performance Levels The following Display icons should appear each time you power on or power off your Segway HT. The following Display icon (the face is not smiling) will appear if the Segway HT is operating at reduced performance levels due to a temporary condition. See page 15 for a list of these conditions. Display Icon Normal Operation User Response Startup test being performed. (All segments should be displayed, with no backlight.
Pitch or Roll Angle Exceeded If, during normal riding, the Segway HT detects a fault in any of its redundant subsystems (see page 12), the Segway HT will perform a Safety Shutdown by automatically reducing its speed, shaking its Handlebar, making growling and beeping noises, and flashing red in the Display. The following Display icon will appear.
troubleshooting and display icons System Faults If the Segway HT detects a fault in its hardware one of the following icons will appear in the Display. The Segway HT cannot be used until the fault is cleared. Display Icon System Faults User Response There is a fault in the Platform. 1. Check and make sure the two Control Shaft Cord connections are properly connected (see pages 38–39). 2. Power on the Segway HT. 3.
chapter 5: service General Information If you have a question on parts or replacements, please contact an Authorized Segway Dealer. For a list of Dealers, visit www.segway.com.
Service Procedures Follow these procedures when instructed to do so by the Troubleshooting section of this Reference Manual. The tools provided in the Wrench Set included with your Segway HT are intended to assist with these procedures. However, additional tools, such as a torque wrench may be necessary to perform some of these procedures correctly. . WARNING! service Always shut down your Segway HT and unplug the Power Cord before performing any maintenance or installing any part or accessory.
yellow Install Handlebar/Control Shaft Assembly Tool required: 5 mm hex wrench. 1. Make sure the Segway HT is powered off and not plugged in. It is unsafe to perform this procedure while the Segway HT is powered on or charging. 2. Loosen the Height Adjustment Collar and slide the upper part of the Handlebar/Control Shaft Assembly fully into the lower part of the Control Shaft. Gently tighten the Height Adjustment Collar. 3.
Reseat the Battery Packs service Tool Required: 3 mm hex wrench. 40 1. Make sure the Segway HT is powered off and not plugged in. It is unsafe to perform this procedure while the Segway HT is powered on or charging. 2. Reseat Battery Packs on chassis with curved edge facing outside of chassis. 3. Thread in the fasteners and tighten with the 3 mm hex wrench (4 per Battery Pack). To avoid risk of damage, do not use a power tool to thread in or tighten fasteners. Tightening Torque: 1.0 N-m (8.9 in-lbf) .
Remove/Reinstall Mat Cleaning Tools Required: None for p Series or Segway XT models. For i Series or Segway GT models, if you have any Gearboxmounted part installed, you must first remove that part, prior to removing the Mat. Clean your Segway HT with soap and water and a soft cloth. Do not use a power washer or high pressure hose because this could drive water into components that must stay dry. Avoid getting water in the Charge Port. Tool required: 5 mm hex wrench. 1.
chapter 6: frequently asked questions frequently asked questions Please visit our website, www.segway.com, for a complete list of up-to-date frequently asked questions and answers. 42 Can the Segway HT climb stairs? You should not attempt to ride the Segway HT up or down stairs. Use Power Assist Mode as described in the Riders’ Guide and the Safety Video. How often should I check the air pressure in the tires on the Segway HT? Check tire inflation pressure regularly, at least monthly (see page 19).
Report All Incidents Obey All Laws and Regulations If you or any other user of your Segway HT is involved in an accident, or if your Segway HT performs in a way that you do not intend or in a way that it is not supposed to, contact Segway Customer Operations by telephone at 1-866 4SEGWAY (1-866-4929), or by Email: technicalsupport@segway.com Many governmental authorities regulate use of Segway HTs on public roads and sidewalks.
contact and legal information 44 > Other Standards Patent and Licensing Information The Segway HT is covered by US and foreign patents, including one or more of the following: Canadian ICES-003 The Segway HT also complies under the following: Applicable sections of Safety for Information Technology Equipment, IEC950, CAN/CSA C22.2 No. 60950-00, UL 60950. Applicable sections of UL Standard for Safety for Motor-Operated Appliances, UL73.
10-2002-7007338. MC: 95911624.5. MX: 2001/004018; PA/a/2001/012685; PA/a/2001/008933; PA/a/2001/ 009342; PA/a/2001/012232; PA/a/2001/009374; PA/a/ 2000/12498; PA/a/2001/012557; PA/a/2002/002217; PA/ a/2002/005801; 000162. MY: PI20000540; PI20001210; PI200010118; PI20001458; PI20002479; PI20002502; PI 200014753. NL: 95911624.5. NO: P973,153; 20011809. NZ: 513868; 517412; 525279. RU: 2000114547; 2002108569. SE: 95911624.5. SG: 200201245-8; 200203390-0. TW: 88117468; 89,106,673; 89,110,752.
index index A 46 AC power, 24 accessories, 41 adapters, 42 All-terrain Tire/Wheel Assembly, 8, 37 angular rate sensors, 14 assembly instructions, 2 authorized Segway dealer, 2 B Balance Mode, 18, 29, 32, 34 error while attempting to enter, 33 problem entering, 33 Balance Sensor Assembly, 12, 13, 14 Battery Packs, 6, 12, 14, 36, 37 battery maintenance stage, 25 casing, 22 cell balancing, 25 charge level display, 24, 32 charging, 10, 15, 24, 25 discharge, 20 disposal, recycle, 42 electric shock, 22 fast
Display, 6, 32 display messages, 32 battery charge level, 32 critical error, 17, 35 inadequate battery charge, 26 operational mode, 32 reduced performance, 15, 28, 34 disposal of Battery Packs, 42 dynamic stabilization, 12 E electric shock, 22, 41 Email, 3 enhanced traction tires, 8 F Fender, 6, 37 Fender Frame, 37 Fixed Grip, 6, 37 foot pressure, 9, 15 foreign patent numbers, 44 Front Trim, 6, 37 G Gearboxes, 37 grips, 41 installing and removing, 41 steering, 14 ground clearance, 8 growling noise, 16, 1
M index Mat, 37 maximum handlebar cargo weight, 7, 9 maximum payload (rider plus all cargo), 7 maximum speed, 7 minimum rider weight, 7 minimum weight limit, 9 mixed battery types, 14, 28 Mode Button, 6, 14, 18, 37 Motors, 12, 13 48 N nickel metal hydride (NiMH) Battery Packs, 7, 8, 11, 14, 23, 24, 25, 28 charging process, 25 i Series (60-cell), 23 limit discharge, 24 p Series (48-cell), 23 noise beeping, 17, 35 growling, 16, 17, 35 note icon, 4 O operating temperature, 23 operational mode Balance Mode
Safety Shutdown, 13, 14, 17, 28, 35 Safety Video, 3 security, 19 Segway Customer Operations, 3 Segway GT, 6, 7, 11 specifications, 7 Segway XT, 6, 7, 11, 37 Fender and Lifting Handle, 37 specifications, 7 serial number and key code, 4 service procedures, 38 shipping requirements, Li-ion Battery Packs, 22 solid state gyroscopes, 14 specifications Battery Pack, 23 Segway HT models, 7 Speed Limiter, 15 Splashguard, 6, 37 stairs, use on, 42 standards, 44 Canadian ICES-003, 44 European directives, 44 other, 44 s
notes
enjoy the ride
fun, smart transportation 1891600000ag www.segway.