ULTRASONIC CLEANER USER MANUAL FEATURES Stainless steel housing, tank and lid. Stamp tank without welding gap for better waterproof. Cooling fan Moisture-proof PCB Industrial grade IC & Ultrasonic transducer Thank you for purchasing the ultrasonic cleaner. Please take the time to read the operating instruction before use and retain it for future reference. Failure to follow these instructions may lead to serious personal injury and damage to property.
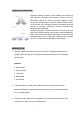
ULTRASONIC PRINCIPLE Ultrasonic cleaning is based on the cavitation effect caused by high frequency ultrasonic wave vibration signal in the fluid. Microscopic bubbles are formed, and they implode violently causing the cavitation which create an intense scrubbing action on the surface of the item being cleaned. The bubbles are small enough to penetrate microscopic crevices, cleaning them thoroughly and consistently.
4. Carefully fill at least 2/3 of the tank with a solvent solution. For demanding cleaning we recommend a small amount of washing up liquid, this will help increase the cleaning performance. The cleaner is now ready for use. Attention a)While the machine is working normally, ultrasonic and tank syntony gives a well-proportioned sound, and no shudder on the surface of the water, yet there is spray made by the tiny bubbles.
) The more items that you place in your cleaning bath the less efficient it will clean. It is not advised to overlap items. Always allow plenty of clear space between the items. 5) Do keep the lid on during use. This will prevent splashes and reduce evaporation of the fluid. 6) Never immerse the machine or power cord in water or other liquid. 7) DO NOT touch the power plug with wet hands, especially when inserting or removing the plug.
APPLICATIONS This list is almost endless. Provided the product is non porous and can normally be immersed in water almost anything can be thoroughly cleaned.
The cleaning stops when the timer counts down to 00:00. If the unit needs to be stopped before the timer runs up, press ON/OFF button. NOTE: Do not run the cleaner continuously for more than one hour 3. Set temperature: Press “temperature-/temperature+”shortly at a time means time increase/reduce 1℃ at a time, press and hold there means time will increase/reduce by 1℃ . Usually, the best results are within 40℃ to 60℃. 4. After time and heat setting, press ON/OFF key to start both function.
Advantage Ultrasonic is widely used throughout industries to remove difficult contaminants from the parts during or after manufacturing process which might require a stage of cleaning before the next process. In general, if an item can be cleaned with liquid, it can be cleaned much faster and more thoroughly with an ultrasonic cleaner.
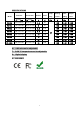
SPECIFICATIONS Frequ Heating Time Temper ency Power setting ature KHz W Min ℃ 60 100 1-99 0-80 2 60 100 1-99 0-80 240×140×100 270×170×220 3.2 120 100 1-99 0-80 PS-30A 300×155×150 330×180×280 6.