
Installation guide
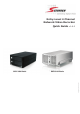


Quick Installation Guide
English
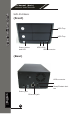
4 Channel (Basic)
Network Video Recorder
6
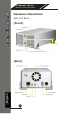
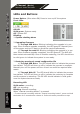
LEDsandButtons
OSLED
Solid green: System ready
Off: System Off
Blinking:
1. System shutting down
2. Upgrading rmware
a) Through USB drive: Blinking indicating the upgrade is in pro-
cess. Once rmware upgrade completes, the LED goes off. Manually turn
off the power and turn it back on would be required afterwards.
b) ThroughthewebUI: Blinking indicating the upgrade is in pro-
cess. Once rmware upgrade completes, the LED goes off. The NVR will
then restart automatically. Once it nishes restarting, the LED should turn
to solid green to indicate the system is now ready.
3. Restoring previously saved conguration le
a) Through USB drive: The LED should blink to indicate the process
has started. The LED will then go off to indicate the process is complete.
Manually turn off the power and turn it back on would be required after-
wards.
b) ThroughWebUI: The LED should blink to indicate the process
has started. The LED will then go off to indicate the restoring is complete
and the system is restarting. The OS LED should indicate in solid green
once the system becomes ready.
RecordingLED
Solidamber: recording
Off: not recording
Blinking: Manual recording:
When “manual recording button” is pressed
* To start manual recording with the “manual recording button”, press and hold
the button for 2 seconds then release it. Follow the same procedure to stop.
Power Button: (Blue when ON) Press to turn on/off the system
FrontLEDs: