Entry-Level 4 Channel Network Video Recorder Quick Guide v1.6.
Contents Purpose Package Contents Hardware Illustration SVR-104 Basic SVR-304 Basic LEDs and Buttons Hard Drive Installations SVR-104 Basic SVR-304 Basic Connect to the NVR Set up Password Add a Camera Recording Configurations 3 3 4 4 5 6 8 8 9 10 14 15 17
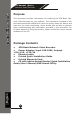
4 Channel (Basic) Quick Installation Guide Network Video Recorder Purpose This document provides information for installing the 4CH Basic Network Video Recorder on your network. The information included in this document should be sufficient for users to quickly setup the device and start the live video monitoring. Users should also be able to perform basic troubleshooting with information provided in this document.
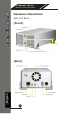
Channel (Basic) Quick Installation Guide Network Video Recorder Hardware Illustration SVR-104 Basic (Front) Manual Recording button (Manual Recording) English (Rear) 4
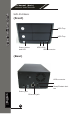
4 Channel (Basic) Quick Installation Guide Network Video Recorder SVR-304 Basic (Front) HDD Tray HDD Tray Power button and LED HDD LEDs USB Connector (Rear) USB connector Reset/Restart button Power jack English Ethernet jack 5
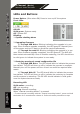
4 Channel (Basic) Quick Installation Guide Network Video Recorder LEDs and Buttons Power Button: (Blue when ON) Press to turn on/off the system Front LEDs: OS LED Solid green: System ready Off: System Off Blinking: 1. System shutting down 2. Upgrading firmware a) Through USB drive: Blinking indicating the upgrade is in process. Once firmware upgrade completes, the LED goes off. Manually turn off the power and turn it back on would be required afterwards.
4 Channel (Basic) Quick Installation Guide Network Video Recorder Ethernet Port LED The green LED on the left indicates the link connection and the LED on the right indicates the speed Restart Button Press and release the button for hardware restart. The OS LED should should go off during the restart to indicate the system is restarting. The LED should indicate in solid green once the system becomes ready.
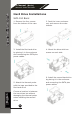
4 Channel (Basic) Quick Installation Guide Network Video Recorder Hard Drive Installations SVR-104 Basic 1. Remove the four screws from the bottom of the case. 2. Push the inner enclosure out, and remove the outer chassis. 3. Install the first hard drive by placing it in the enclosure and connecting the SATA plus power cables. 4. Mount the drive with two screws on each side. English 5. Attach the thermal probe with the tape provided to the first hard drive.
4 Channel (Basic) SVR-304 Basic 1. Push the silver button to release the HDD tray 2. Pull out the HDD tray 3. Place the HDD on the tray and secure the HDD with the screws at the bottom (as illustrated) 4.
4 Channel (Basic) Quick Installation Guide Network Video Recorder Connect to the NVR There are various ways you can connect to the NVR and below are the suggested methods for different network setup: • The NVR is placed in a network with a DHCP server: Connect to the NVR by using “NVR Search” Utility • The NVR is placed in a network without DHCP server (or you are connecting to it directly): Access the NVR with its default IP Use NVR Device Search Utility If the NVR is placed in a corporate network or a
4 Channel (Basic) Quick Installation Guide Network Video Recorder Once the installation is complete, check the “Launch the Search AP” option and click “Finish”: The search should start automatically and its status should be displayed: The NVR should be located and its IP address should be displayed: Double-click on an NVR and the search program should automatically access the NVR’s web administration page from your default browser English double-click 11
4 Channel (Basic) You should be prompted for the the NVR’s username and password.
4 Channel (Basic) Quick Installation Guide Network Video Recorder Access the NVR with its default IP address The NVR comes with a pre-configured static IP “192.168.101.50”. However, it is only used when there is no DHCP server presented in the network. The NVR will turn on its DHCP server function and act as the DHCP server in the network. To connect to the NVR, use a PC that is on the same network over a switch or hub, or connect the PC directly to the NVR using a crossover CAT5 Ethernet cable.
4 Channel (Basic) Quick Installation Guide Network Video Recorder Set up Password The default login username and password is admin/admin. To change the password of the admin account, go to “Setup” --> “System Configurations” --> “User Account”, click on the “admin” account in the account list then press the “edit” button to change its password. Finally, click “Apply” to save the change.
4 Channel (Basic) Quick Installation Guide Network Video Recorder Add a Camera Automatic Search: 1. Click the “Search” button to perform the camera search. You should be prompted to install Active Control component in order for the search to function properly. Go ahead and click “Install” 2. After that, the search should begin and its status should be displayed: 3. Found cameras should be listed and simply select a camera from the list and press “Configure” English 4.
4 Channel (Basic) Quick Installation Guide Network Video Recorder 5. Click on “Detect” to establish connection between the recorder and the camera. If connection establishes successfully, camera’s detailed information should be polled and displayed as below 6.
4 Channel (Basic) Recording Configurations The “recording configurations” gives users the overall control of how and when a recording is performed and the quality of different types of recordings performed on each channels. It can help the recorder to operate with sufficient system resource by performing recording only when it’s necessary with adjustable recording frame rate.
4 Channel (Basic) Quick Installation Guide Network Video Recorder The “recording buffer” allows user to define “pre-alarm” and “postalarm” time for event recordings. The “pre-alarm” time sets the NVR to record in advance when an event is triggered. The “post-alarm” time sets the NVR to continue recording for a period of time after an event trigger is finished. * The “Pre-alarm” function only works when the “Continueous” recording is also activated.
4 Channel (Basic) Quick Installation Guide Network Video Recorder Schedule Recording Here you can define the time range of the schedule recording for all channels. To configure a schedule recording: 1. Use the “Channel” drop-down menu and select a camera first 2. You can use the schedule table to set the time range. Click the cell boxes then move horizontally lets you set what hours to perform recording during a day.
4 Channel (Basic) 3. You can also use the “Quick Configuration” to define recording time range instead of clicking cell boxex one by one on the time table. Simply check what days you would like to perform recording and specify the recording duration by either choosing “All Day” or enter a start and end time for specific recording duration. 4. Select the “Copy to” option if you would like to set the same recording schedule to another camera.